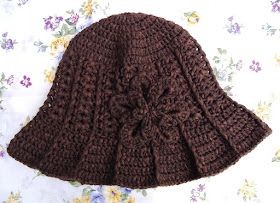
Crochet Ridge Hat With Brim

The Crochet Ridge Hat With Brim is not only a stylish accessory but also a practical one to keep you warm and fashionable during the cooler months. This versatile hat features a unique ridge pattern that adds a touch of texture and visual interest to your outfit. The brim provides extra sun protection and adds a trendy twist to the classic crochet hat design.
With a wide range of yarn colors and textures available, you can customize your hat to suit your personal style and preferences. Whether you're an experienced crocheter or a beginner looking for a fun project, the Crochet Ridge Hat With Brim is a delightful pattern to bring your creativity to life and keep you cozy in style.With size F (3.75mm) crochet hook and some cotton (or any kind of yarn as you wish), make a Magic circle.
- Round 1: Ch 3 (count as the first dc), 11 dc in loop. Join with slip stitch to the beginning chain 3 (12 dc)
- Round 2: 2 dc in each stitch around (24 dc)
- Round 3: *1 dc in the next stitch, 2 dc in the next stitch. Continue around from *. Join (36 dc)
- Round 4: *1 dc in each of the next 2 stitches, 2 dc in the next stitch. Continue around from *. Join (48 dc)
- Round 5: *1 dc in each of the next 3 stitches, 2 dc in the next stitch. Continue around from *.Join (60 dc)
- Round 6: *1 dc in each of the next 4 stitches, 2 dc in the next stitch. Continue around from *. Join (72 dc)
- Round 7: *1 dc in each of the next 5 stitches, 2 dc in the next stitch. Continue around from *. Join (84 dc)
Hat body:
- Round 1: Ch 3 (count as the first dc), * skip 2 stitches, work 2 dc in the next stitch, chain 1, 2 dc in the same stitch (this will form a shell). Skip 2 stitches, dc in the next stitch. Continue from * for the remainder of the round. Join with slip stitch to the beginning chain 3 (14 shells in total)
- Round 2: Ch 1, Front Post Single Crochet (FPSC) around the previous chain-3, chain 1 (count as the first FPDC). * Skip 2 stitches, 2 dc in the next ch-1 space, chain 1, 2 dc in the same stitch to complete a shell. Skip 2 stitches, work 1 Front Post Double Crochet (FPDC) around the previous dc. Continue around from * for the remainder. Join to the chain 1 right above the first FPSC. (You will have total of 14 shells and 14 FPDC between each shell).
- Repeat round 2 for the next 9 rounds. Join with slip stitch to the first FPDC.
- (This will straighten the shells) Ch 1, FPSC around the previous stitch, * hdc in the next stitch, sc in the next stitch, slip stitch to the chain-1 space, sc in the next stitch, hdc in the next stitch, FPDC around the previous FPDC. Continue around from * for the remainder. Join (84 stitches in total)
- Round 1: Ch 1, FPSC around the previous stitch, ch 1, 1 dc in each of the next 2 stitches, 2 dc in the next stitch (make an increase). * 1 dc in each of the next 3 stitches, 2 dc in the next stitch. Continue from *. Join (105 dc in total)
- Round 2: Ch 1, FPSC around the previous stitch, ch 1, 1 dc in each of the next 3 stitches, 2 dc in the next stitch (make an increase). * 1 dc in each of the next 4 stitches, 2 dc in the next stitch. Continue from *. (126 dc)
- Round 3: Ch 1, FPSC around the previous stitch, ch 1, 1 dc in each stitches around. (126 dc)
- Round 4: Ch 1, FPSC around the previous stitch, ch 1, 1 dc in each of the next 4 stitches, 2 dc in the next stitch (make an increase). * 1 dc in each of the next 5 stitches, 2 dc in the next stitch. Continue from *. (147 dc)
- Round 5: Ch 1, FPSC around the previous stitch, ch 1, 1 dc in each stitches around. (147 dc)
Slip stitch (or reverse sc) all around to make the brim stronger.
This flower has three layers, three particular flowers are stacked from big to small.
The flower with big petals:
Make a magic circle,
- Round 1: Chain 3 (count as a dc), ch 1, dc in the loop, ch 9, join with slip stitch to the first chain, ch 1. *dc, ch 1, dc, ch 9, join with slip stitch to the first chain, ch 1. Repeat from * 4 times. Join with slip stitch to the first ch-3 (12 dc and ch-1 space; 6 ch-9 loops in total).
- Round 2: Ch 1, sc in the same stitch, * work 14 dc in the ch-9 loop, sc in the next dc. Repeat from * 5 times, join with slip stitch to the first sc. Fasten off.
The smaller one:
Magic circle. Ch 1, * sc in the loop, ch 6, 1 hdc in the third chain from hook, 1 dc in each of the next 3 stitches. Repeat from * 5 times, join with slip stitch to the first sc (6 petals in total). Fasten off.
The smallest one:
Magic circle, * ch 8, slip stitch in the loop. Repeat from * 4 times (5 petals in total). Fasten off
Assembling:
Put these flowers in order they should be done with the smallest one on top. Sew in place in the center. Sew it in the hat using the photo in my blog as a guide, if you like making it that way. :)
