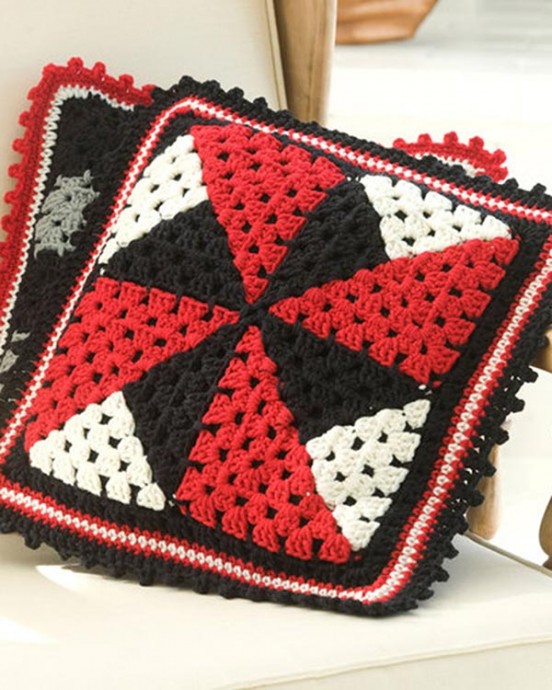
Crochet Pinwheel Pillow

Introducing the Crochet Pinwheel Pillow, a delightful and charming addition to your home decor. This unique pillow showcases the artistry of crochet, with its intricate pinwheel design that is sure to catch the eye of anyone who enters the room. The pinwheel pattern is created using a combination of different crochet stitches, resulting in a visually stunning and textured pillow that adds a touch of elegance to any space.
The pinwheel design adds a playful and whimsical touch to the overall aesthetic, making it a standout piece that will surely spark conversations among your guests. Whether you're a crochet enthusiast or simply someone who appreciates unique and handmade items, the Crochet Pinwheel Pillow is a must-have for adding a touch of warmth and creativity to your home.Skill Level: Intermediate
RED HEART® “Super Saver®”: 1 skein each 319 Cherry Red A, 316 Soft White B, and 312 Black C.
Do not cut colors but drop to wrong side; pick up and resume working with colors as required.
Square (Make 4)
With A, ch 4; join with a slip st to form a ring.
Round 3 (Right Side): With A, (slip st, ch 3, 2 dc) all in first ch-2 space, ch 1, 3 dc in next ch-1 space, ch 1, (3 dc, ch 2, 3 dc) all in next ch-2 space, ch 1, 3 dc in next ch-1 space, ch 1, 3 dc in next ch-2 space, ch 2, drop A, with B 3 dc in same space, ch 1, 3 dc in next ch-1 space, ch 1, 3 dc in next ch-2 space, ch 2, drop B, with C 3 dc in same space, ch 1, 3 dc in next ch-1 space, ch 1, 3 dc in first ch-2 space, ch 2; join; TURN.
Round 4 (Wrong Side): With C (slip st, ch 3, 2 dc) all in first ch-2 space, [ch 1, 3 dc in next ch-1 space] twice, ch 1, 3 dc in next ch-2 space, ch 2, drop C, with B 3 dc in same space, [ch 1, 3 dc in next ch-1 space] twice, ch 1, 3 dc in next ch-2 space, ch 2, drop B, with A 3 dc in same space, [ch 1, 3 dc in next ch-1 space] twice, ch 1, (3 dc, ch 2, 3 dc) all in next ch-2 space, [ch 1, 3 dc in next ch-1 space] twice, ch 1, 3 dc in first ch-2 space, ch 2; join; TURN.
Round 5 (Right Side): With A (slip st, ch 3, 2 dc) all in first ch-2 space, [ch 1, 3 dc in next ch-1 space] 3 times, ch 1, (3 dc, ch 2, 3 dc) all in next ch-2 space, [ch 1, 3 dc in next ch-1 space] 3 times, ch 1, 3 dc in next ch-2 space, ch 2, drop A, with B 3 dc in same space, [ch 1, 3 dc in next ch-1 space] 3 times, ch 1, 3 dc in next ch-2 space, ch 2, drop B, with C 3 dc in same space, [ch 1, 3 dc in next ch-1 space] 3 times, ch 1, 3 dc in first ch-2 space, ch 2; join. Fasten off.
Assembly
Arrange squares, right side up, being sure that colors form a pinwheel as shown. Join squares as follows: Holding 2 squares at a time with right sides together and working through both layers, join C in a corner ch-space with an sc; * [ch 3, sc in next ch-space] 5 times *, ch 2, pick up next pair of squares, sc in corner ch-space; repeat from * to * once more. Fasten off. Repeat across squares so that they are joined both vertically and horizontally.
Border
Round 1: With right side facing, join C in any corner ch-2 space; ch 1, * (sc, ch 3, sc) all in corner space, [ch 3, sc in next space] 10 times, ch 3; repeat from * around; join with a slip st in first sc.
Round 2: Slip st into corner space, (ch 3, 2 dc, 3 dc) all in same space, * [3 dc in next space] 11 times **, (3 dc, ch 2, 3 dc) all in next corner space; repeat from * around, end at **; join in top of ch-3 – 39 dc on each side between corner spaces. Fasten off.
Round 3: Join A in any ch-2 space; ch 1, [3 sc in ch-2 space, sc in each dc to next ch-2 space] 4 times; join – 41 sc between center corner sc. Fasten off.
Round 4: Join B in center sc of any corner; ch 1, [3 sc in center corner sc, sc in each sc to next center corner sc] 4 times; join – 43 sc between center corner sc. Fasten off.
Round 5: Repeat Round 4 with A increasing 1 sc at center of each side – 46 sc between center corner sc.
Round 6: Join C in center sc of any corner; ch 3, (dc; ch 3; sc in top of dc just made – picot made; 2 dc) all in center corner sc, * dc in next sc, picot, [dc in next 3 dc, picot] 15 times **, (2 dc, picot, 2 dc) all in next center corner sc; repeat from * around, end at **; join. Fasten off. Weave in ends.
Finishing
Center Pillow Top on purchased pillow. Sew in place with sewing needle and thread.
ABBREVIATIONS: A, B, C = colors A, B, C; ch = chain;
dc = double crochet; mm = millimeters; sc = single
crochet; * or ** = repeat whatever follows the * or ** as
indicated; [ ] = work directions in brackets the number of
times specified.
