How to Create a Beautiful Irish Rose Motif with Crochet

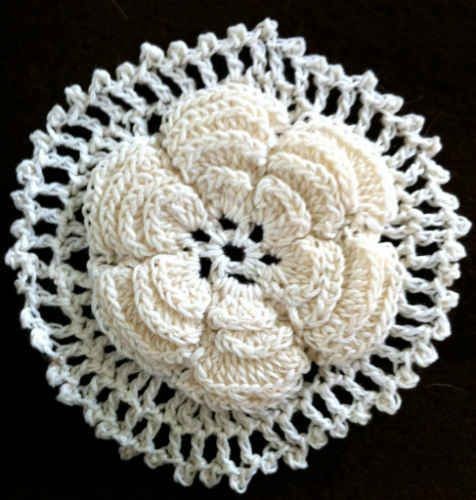
Create a beautiful Irish Rose motif using the art of crochet. This intricate design features delicate petals and a textured center, making it a lovely addition to any project. Whether you're a beginner or an experienced crocheter, this motif is a fun and rewarding pattern to work on. You can use different colors to customize your rose and make it truly unique. The Irish Rose motif can be used to embellish clothing, accessories, home decor items, or even be turned into a standalone piece of art. This motif is versatile and can be incorporated into a wide range of projects, from blankets to scarves to bags. Whether you're making it as a gift for a loved one or as a special touch for your own creations, the Irish Rose motif is sure to impress with its timeless beauty.
Skill Level
Easy
Size
About 4″ round
Materials
- Size 10 Crochet Cotton: White (W) – 35 yards
- Crochet Hook: Steel 7 (1.65 mm)
Joining with Single Crochet (sc)
When instructed to join with sc, begin with a slip knot on the hook, insert the hook in the stitch or space indicated, yarn over (yo) and pull up a loop, yo and draw through both loops on the hook.
General Starching Directions
Cut a piece of cardboard larger than the article to be stiffened. Cover the cardboard with clear plastic wrap.
Lay the article on the plastic, stretch out and pin into the correct shape.
Generously spray with heavy spray starch. Allow to dry completely.
This method allows for washing and re-starching whenever necessary.
Rose Circle Instructions
RND 1: (Right Side) Starting at the center, ch 6, sl st in first ch to form a ring; ch 1, (sc in ring, ch 4) 6 times; join with sl st to first sc. (6 ch-4 loops)
DO NOT TURN EACH ROUND.
RND 2: Ch 1, (sc, 7 dc, sc) in each ch-4 loop around; join. (6 petals)
RND 3: * Ch 5, working behind petals, sl st between next 2 petals, repeat from * around. (6 ch-5 loops)
RND 4: Ch 1, (sc, 9 dc, sc) in each loop around, join.
RND 5: * Ch 6, working behind petals, sl st between next 2 petals, repeat from * around. (6 ch-6 loops)
RND 6: Ch 1, (sc, 11 dc, sc) in each loop around; join.
RND 7: * Ch 7, working behind petals, sl st between next 2 petals, repeat from * around. (6 ch-7 loops)
RND 8: Ch 1, (sc, 13 dc, sc) in each loop around, join.
RND 9: Repeat RND 7.
RND 10: Sl st in next ch-7 loop, ch 4 (counts as first dc and ch 1), (dc, ch 1) 7 times in the same loop, (dc, ch 1) 8 times in each of the next 5 ch-7 loops around; join with sl st to first dc. (48 dc)
RND 11: Ch 6 (counts as first dc and ch 3), sl st in 3rd ch from hook (picot made), * dc in next dc, ch 3, sl st in 3rd ch from hook (picot), repeat from * around; join with sl st to first dc. (48 picots)
Finishing Touches
Finish off and weave in ends. Starch into a 4-inch circle using general starching directions.