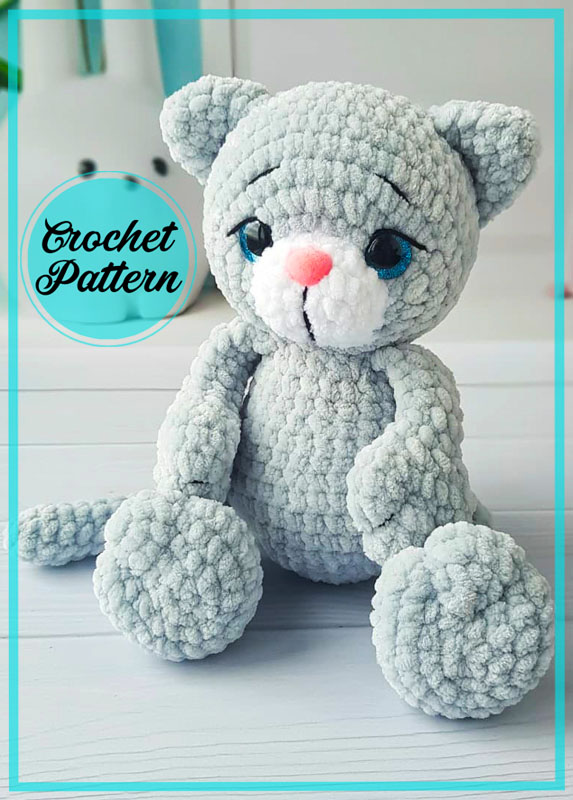
Crochet Cats Amigurumi

Create your own adorable feline friends with the art of crocheting Amigurumi cats. These cute and cuddly creatures are perfect for anyone who loves cats and enjoys working with yarn. With just a few basic crochet stitches and some colorful yarn, you can bring these charming kitties to life. Whether you're a beginner or an experienced crocheter, making Amigurumi cats is a fun and rewarding project that will bring a smile to your face.
From fluffy tails to whiskers, you can customize your crocheted cats to make each one unique. Add in some embroidered details for eyes and noses, and you'll have a collection of one-of-a-kind Amigurumi cats that are sure to delight anyone who sees them. These handmade creations also make wonderful gifts for cat lovers of all ages. So grab your crochet hook and yarn, and get ready to create your very own Crochet Cats Amigurumi that will be cherished for years to come.
MATERIALS
1. Yarn Himalaya Dolphin baby or similar;
2. Hook 3.5 mm;
3. The eyes on the mount are shiny 16 mm;
4. Spout on a secure mount 15×13 mm;
5. Yarnart Jeans yarn for the design of the face and legs;
6. Scissors, sewing needle;
7. Holofiber filler;
8. Mustache fishing line (optional).
Abbreviations
AR – Amigurumi Magic ring
MR – Amigurumi Magic ring
App – application
ll – lift loop
sc : Single Crochet
inc : Increase
dec : Decrease
tr : Triple Crochet/ Treble Crochet
st: Stitch
dc : Double Crochet
hdc: Half Double Crochet
sl-st : Slip Stitch
ch : Chain
..in : make increase into same stitch as many as the number which is given in front of “inc” abbreviation (exp; 3inc, 4inc..).
FLO : Crochet into front loops only
BLO : Crochet into back loops only
BL : Bobble Stitch – do 5dc all in the same stitch and then yarn over and pull through all the loops on your hook (the original loop + 1 loop for each partially completed dc).

UPPER FEET (2 parts)
1. 6MR
2. 6inc (12)
3. (1sc, inc)*6 (18)
4-5. 18sc (18)
6. 9dec (9) you can fill the lower part of the foot a little, but not necessarily
7-12. 9sc (9)
Fold in half and knit 4 sc. Cut the yarn, fasten.
On the lower part of the foot with thin yarn (YarnArt jeans), it is necessary to select the toes. To do this, we make 2 tight stitches, passing the needle through the foot.
LOWER FEET (2 parts)
1. 5 ch, start to knit in the second loop from the hook, inc, 2sc, 3sc to the extreme ch, 3sc (10)
2. 2inc, 2sc, 3inc, 2sc, inc (16)
3. (1sc, inc)*2, 2sc, (1sc, inc)*3, 3sc, inc (22)
4. (2sc, inc)*2, 2sc, (2sc, inc)*3, 4sc, inc (28)
5. 28sc (28)
6. 8sc, 8dec, 4sc (20)
7. 6sc, 6dec, 2sc (14)
8. 6sc, 3dec, 2sc (11)
9-15. 11sc (11) fill the lower part of the foot with a little filler
16. 10sc, fold in half and knit 5sc. Cut the yarn, fasten. On the lower part of the foot with thin yarn (YarnArt jeans), it is necessary to select the toes.
To do this, we make 2 tight stitches, passing the needle through the foot.
TAIL
1. 8MR
2-21. 8sc (8)
Fold in half and knit 4sc. Cut the yarn, fasten.
EARS (2 parts)
1. 6MR
2. (1sc, inc)*3 (9)
3. (2sc, inc)*3 (12)
4. (3sc, inc)*3 (15)
5. (4sc, inc)*3 (18)
Cut the yarn, leaving the long end for sewing the ear.
TORSO
1. 6MR
2. 6inc (12)
3. (1sc, inc)*6 (18)
4. (2sc, inc)*6 (24)
5. (3sc, inc)*6 (30)
6. (4sc, inc)*6 (36)
7. In this row we knit the lower legs and tail. The marker runs along the back. 5sc, 5sc with foot, 12 sc, 5sc with foot, 5sc, 4sc with tail (36)
8-9. 36sc (36)
10. (4sc, dec)*6 (30)
11-12. 30sc (30)
13. (3sc, dec)*6 (24)
14-15. 24sc (24)
16. (2sc, dec)*6 (18)
17. In this row we knit the upper legs. 4sc, 4sc with foot, 4sc, 4sc with foot, 2sc (18)
Knit slst, cut the yarn, leaving a long end for sewing on the head.
HEAD
We start knitting in white.
1. 5 ch, knit in the second loop from the hook, inc, 2sc, 3sc in the last ch, 3sc (10)
2. 2inc, 2sc, 3inc, 2sc, inc (16)
3. 16 sc (16)
4. 16 slst (16) change the yarn to the main color.
5. 16inc (32)
6. (2sc, inc)*7, 11sc (39)
7. 4sc, (5sc, inc)*3, 17sc (42)
8-13. 42sc (42)
Insert the spout between the 2nd and 3rd rows.
The photo shows the place where we insert the spout leg.
Insert eyes 16mm between the 5th and 6th rows.
Places of insertion are marked in the photo.
The distance between the marks is 10sc.
14. (5sc, dec)*6 (36)
15. (4sc, dec)*6 (30)
16. (3sc, dec)*6 (24)
17. (2sc, dec)*6 (18)
18. (1sc, dec)*6 (12)
19. 6dec (6)
Knit slst, cut the yarn, pull off the hole with a needle.
ASSEMBLY
Sew the ears on
level 12 and 13 rows in the form of an arc. The distance between the ears is 7-8 sc.
We embroider eyebrows, eyelids above the eyes with YarnArt Jeans yarn, divide the white muzzle into two cheeks and you can make a slight tightening by pulling the point above the nose to the bottom point of the mouth.
Sew the head to the body.
