Create Your Own Crochet Bao the Bunny - A Heartwarming Handmade Gift

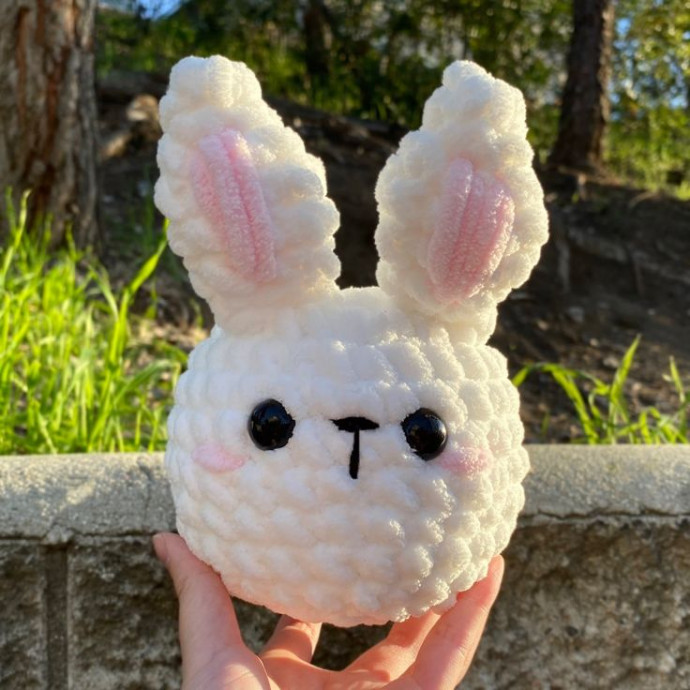
Crochet Bao the Bunny is an adorable handmade creation that brings joy and cuteness wherever it goes. With its soft fuzzy yarn and sweet button eyes, this little bunny is sure to steal hearts and make everyone smile. Whether snuggled up on a shelf or given as a thoughtful gift, Crochet Bao the Bunny is a charming addition to any collection.
Its handmade charm and lovable design make it a perfect companion for both children and adults alike. Get ready to fall in love with this delightful crochet creation!Skills and Abbreviations (In U.S. Terms)
- MR = Magic Ring (Magic Circle)
- SC = Single Crochet
- INC = Increase
- DEC = Decrease (or I recommend the Invisible Decrease)
- 6-DcBo = Bobble made with 6 partial double crochets
- FO = Fasten off
- R = Round/Row
Materials
- Super Bulky Weight Yarn (#6) in white (or the color of your choice)
- Super Bulky Weight Yarn (#6) in pink (or the color of your choice)
- Worsted Weight Yarn (#4) in black (for the nose detailing)
- 7 mm Crochet Hook (or a similar hook size)
- Two 16 mm Safety Eyes (WARNING: Safety eyes can be choking hazards and are not recommended for crochet plushies made for young children, pets etc.)
- Stuffing
- Yarn Needle
- Scissors
- Stitch Markers (Optional)
- Pins (Optional)
Please note that the above materials are recommendations based on what I used to make the bunny in the sample photo. Please feel free to switch up the yarn, eyes, or hook size based on what you have available or your preference.
If you are using a different yarn or hook size, don’t forget to ensure that the yarn and hook size work well together. For amigurumi, it is often recommended to use a hook size that is 1-2mm smaller than the recommended hook size on the yarn label for tighter stitches and less holes in your project. However, different crocheters have their own preferences on hook size and you are welcome to follow your own preference.
Body Instructions
Using White
Body Rounds
- R1: SC in a MR
- R2: [INC] x 7 (14)
- R3: [SC, INC] x 7 (21)
- R4: [2 SC, INC] x 7 (28)
- R5-9: SC 5 Rounds
- R10: Make a 6-DcBo, 27 SC
- R11: 28 SC
- R12: [2 SC, DEC] x 7 (21)
- R13: [SC, DEC] x 7 (14)
Stuff the bunny halfway and attach the eyes between rounds 6 and 7 around 4 stitches apart. They should be placed on the opposite side of where the cluster/bobble stitch is. The cluster/bobble stitch forms the tail. The tail should be in the back and the eyes in the front.
- R14: [DEC] x 7 (7)
- FO with a long tail for sewing.
- Finish stuffing.
- Use the leftover yarn to sew the body closed.
Ears (Make 2)
Using White
- R1: SC in a MR
- R2: [SC, INC] x 2 (6)
- R3: [SC, INC] x 3 (9)
- R4-5: SC (9) 2 Rounds
- R6: [SC, DEC] x 3 (6)
- R7: [SC, DEC] x 2 (4)
FO leaving a long tail for sewing.
Assembly
Nose
Using #4 worsted weight yarn in black, sew on a nose in between the eyes, starting between rounds 6 and 7 for the horizontal line, then bringing it down vertically to end at round 8.
Ears
Using #6 super bulky yarn in pink, sew pink accents onto the ears, starting between rounds 2 and 3 of the ears and ending at rounds 6 and 7.
Do not stuff the ears. Instead, flatten them and sew them onto the top of the body with the pink accents in the front. I place my bunny’s ears closer to the face than the back. I usually attach it starting at round 3 of the body, lining the inner edge of each ear roughly with the inner corner of each eye.
Optional: Blush
Using #6 super bulky yarn in pink, add blush by sewing the yarn between rounds 7 and 8, around 2 stitches apart on the outer corner of each eye. You can definitely change the placement to your liking.
