Create Your Own Crochet Coastal Belle Crop Top - Perfect for Summer Days by the Beach


The Crochet Coastal Belle Crop top is a perfect choice for summer days by the beach! Its fun and flirty design is sure to make you feel like a stylish coastal belle strolling along the shore. The intricate crochet detailing adds a touch of bohemian charm to any outfit, making it a versatile piece for any beach day or casual outing.
Pair it with high-waisted shorts or a flowy skirt for an effortlessly chic look. With its breezy and relaxed vibe, this crop top is a must-have for your warm-weather wardrobe.Materials
- Worsted Weight (4) Yarn, Lion Brand Lazy Days in Bluebell - 3(4, 4, 4, 4, 5, 5, 5, 5) skeins or 500(540, 580, 650, 690, 730, 780, 820, 860) yards
- L/8.00mm Crochet Hook
- Needle
- Scissors
- Stitch Markers (2)
Gauge
10 Sts by Rows 1-4 = 4×4”
Sizes
XS(S, M, L, XL, 2X, 3X, 4X, 5X)
Finished Measurements
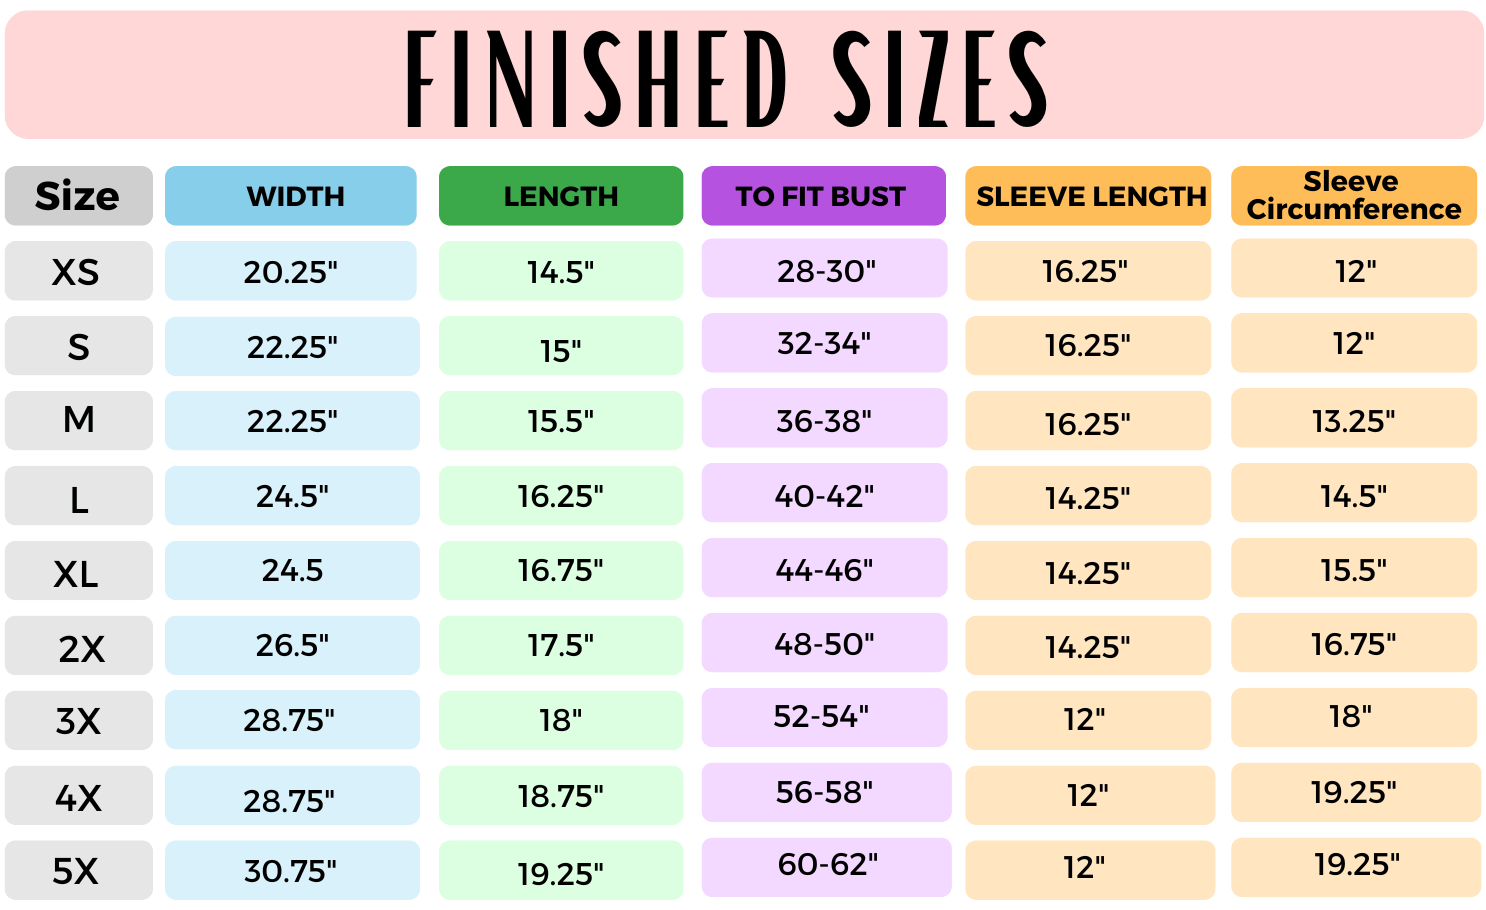

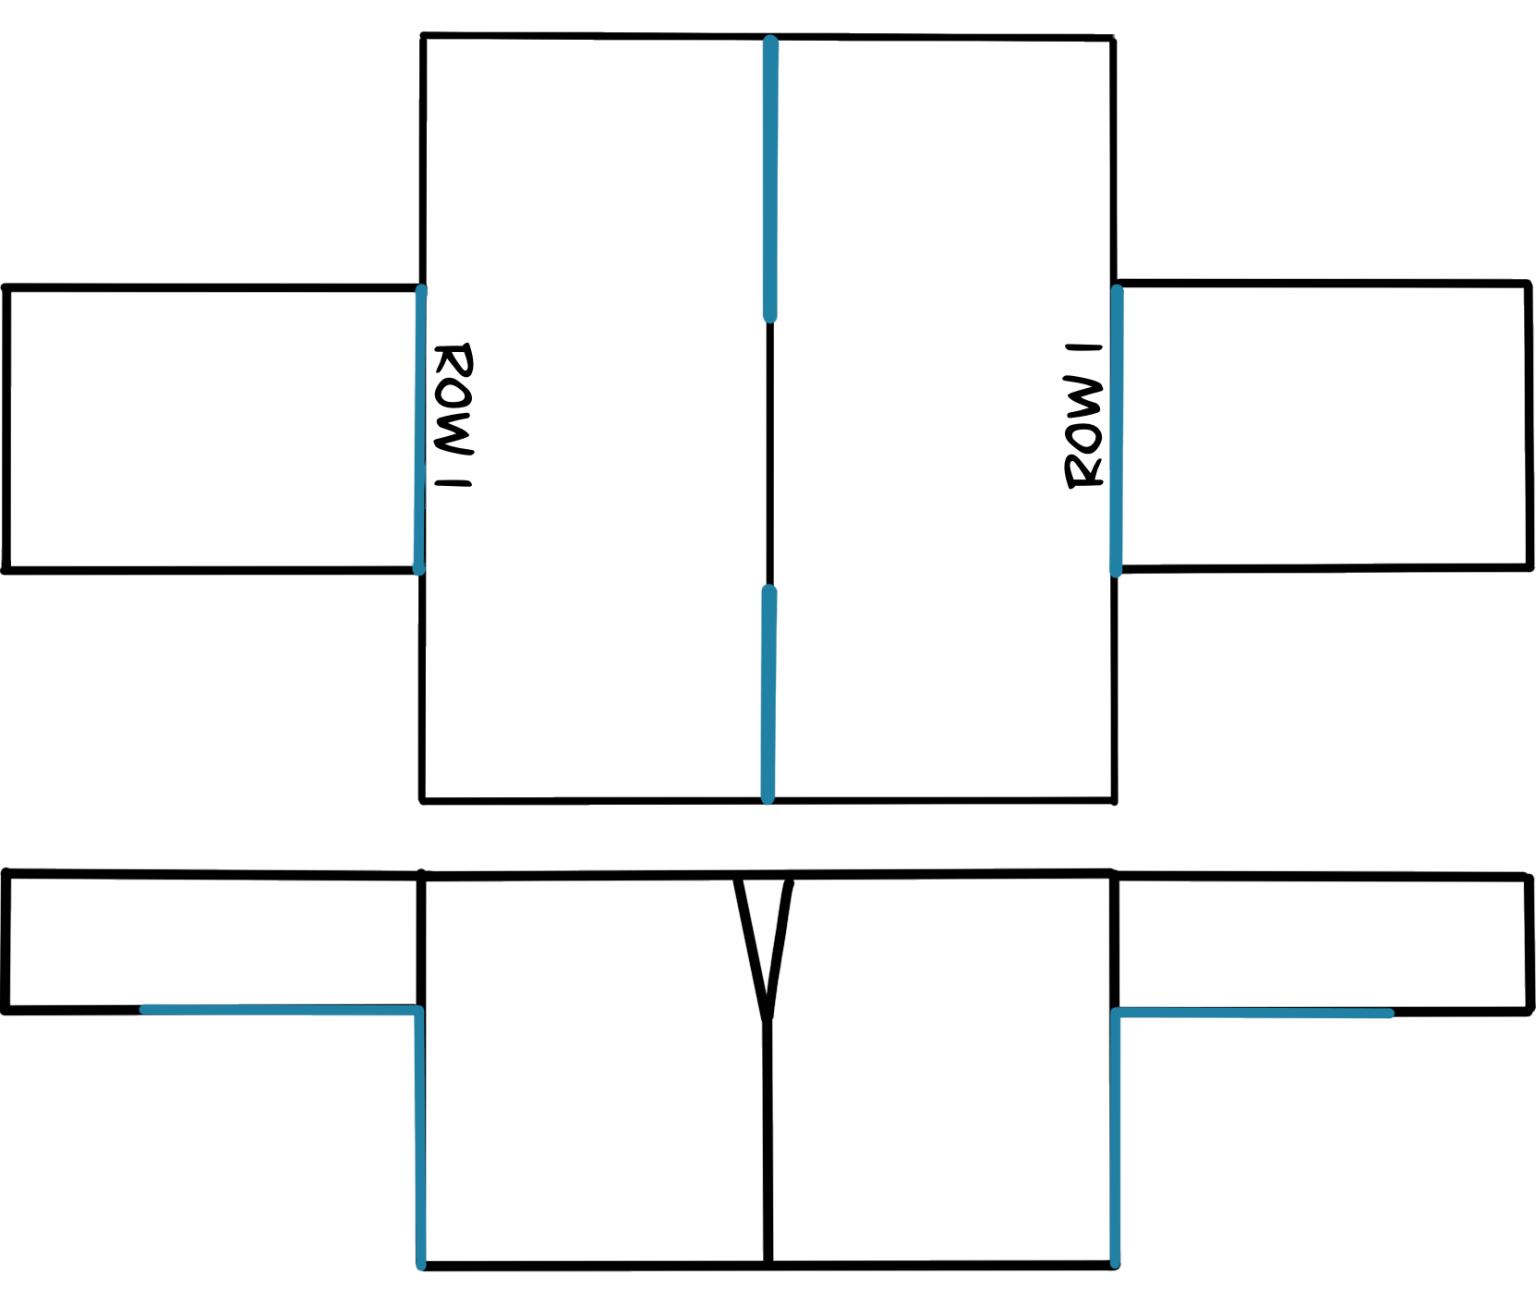
Notes
The main body of this sweater is worked vertically from side to side in 2 separate panels. The sleeves are worked separately in 2 panels.
We are using a larger hook so our stitches will be bouncy and on the looser side. No need to tug your Sts super tight.
You can adjust the length of your sleeves by adding or removing rows in multiples of 2.
You can adjust the length of your top by adding or removing Sts in the foundation row in multiples of 3.
You can adjust the width of your top by adding or removing rows in the main panels. Be sure to add or remove the same amount to both panels.
The starting Ch 4 counts as 1 St.
The Ch-1 Sp counts as 1 St.
The picot counts as 1 St.
Stitches and Abbreviations
- Fsc - Foundation Single Crochet
- Sc - Single Crochet
- Ch(s) - Chain
- Tr - Treble Crochet
- St(s) - Stitch(es)
- Sk - Skip
- Sp - Space
- Sl St - Slip Stitch
- RS - Right Side
- WS - Wrong Side
- Picot - Ch 4, Sl St into first Ch made
Pattern
Main Panels (Make 2)
Row 1: 72(75, 78, 81, 84, 87, 90, 93, 96) Fsc, turn (72(75, 78, 81, 84, 87, 90, 93, 96) Sc). Alternatively, you can Ch 73(76, 79, 82, 85, 88, 91, 94, 97) and work 1 Sc into the second Ch from the hook and each Ch across.
Row 2: Ch 4 (counts as 1 Tr here and throughout), 1 Tr in same St, Sk 1, [1 Tr, 1 Picot, 1 Tr] into next St, *Sk 2, [1 Tr, 1 Picot, 1 Tr] in next*, repeat from * to * across row until 3 remain, Sk 2, 1 Tr in last, turn. (72(75, 78, 81, 84, 87, 90, 93, 96) Sts)
Row 3: Ch 4, 1 Tr in same St, *Sk 2 (skipping the Tr and the picot), [1 Tr, Ch 1, 1 Tr] into next St*, repeat from * to * across row until 2 remain, Sk 1, 1 Tr in last (top of turning ch), turn. (72(75, 78, 81, 84, 87, 90, 93, 96) Sts)
Row 4: Ch 4, 1 Tr in same St, *Sk 2, [1 Tr, 1 Picot, 1 Tr] in next*, repeat from * to * across row until 2 remain, Sk 1, 1 Tr in last (top of turning Ch), turn. (72(75, 78, 81, 84, 87, 90, 93, 96) Sts)
Rows 5-10(11, 11, 12, 12, 13, 14, 14, 15): Repeat Rows 3 & 4. You will end on a Row 4(3, 3, 4, 4, 3, 4, 4, 3) repeat.
Row 11(12, 12, 13, 13, 14, 15, 15, 16): Ch 1, 1 Sc in each St across row. (72(75, 78, 81, 84, 87, 90, 93, 96) Sts). The sizes that ended on a Row 4 repeat will work your Sts in the top of the Tr like normal and into the first Ch of the picot, behind the picot. The sizes that ended on a Row 3 repeat will work your Sts in the top of the Tr like normal and into the Ch Sps across.
Fasten off, leave a long tail for seaming.
Sleeves (Make 2)
Row 1: 30(30, 33, 36, 39, 42, 45, 48, 48) Fsc, turn. (30(30, 33, 36, 39, 42, 45, 48, 48) Sc). Alternatively, you can Ch 31(31, 34, 37, 40, 43, 46, 49, 49) and work 1 Sc into the second Ch from the hook and each Ch across.
Row 2: Ch 4 (counts as 1 Tr here and throughout), 1 Tr in same St, Sk 1, [1 Tr, 1 Picot, 1 Tr] into next St, *Sk 2, [1 Tr, 1 Picot, 1 Tr] in next*, repeat from * to * across row until 3 remain, Sk 2, 1 Tr in last, turn. (30(30, 33, 36, 39, 42, 45, 48, 48) Sts)
Row 3: Ch 4, 1 Tr in same St, *Sk 2, [1 Tr, Ch 1, 1 Tr] into next St*, repeat from * to * across row until 2 remain, Sk 1, 1 Tr in last (top of turning ch), turn. (30(30, 33, 36, 39, 42, 45, 48, 48) Sts)
Row 4: Ch 4, 1 Tr in same St, *Sk 2, [1 Tr, 1 Picot, 1 Tr] into next St*, repeat from * to * across row until 2 remain, Sk 1, 1 Tr in last (top of turning Ch), turn. (30(30, 33, 36, 39, 42, 45, 48, 48) Sts)
Rows 5-16(16, 16, 14, 14, 14, 12, 12, 12): Repeat Rows 3 & 4.
All sizes will end on a picot stitch row. To adjust the length of your sleeve simply add or remove rows in multiples of 2.
Fasten off, leave a long tail for seaming.
Assembly
Lightly steam block your panels to the measurements listed above.
Place your 2 main panels together, RS facing. You will be joining your final row made on both panels together, leaving an opening in the middle for your head.
Count from one end, 27(28, 30, 31, 32, 34, 35, 36, 38) Sts towards the center and place a SM. This will be the back of the sweater. Now count from the other end 22(23, 24, 26, 27, 28, 29, 31, 32) Sts toward the center and place your second SM. This will be the front of the sweater. Note: it does not matter which end you count from and choose as your front or back as long as the RS of the panels are facing.
Sew from the end of the panels to your first SM. You can use your hook and Sl St or use a needle and your preferred sewing method. I used my hook here and worked Sl Sts through the outer loops only. Repeat the same thing on the other end to the second SM. You can adjust the opening of the neckline by sewing up further/less on both ends.
Next, we are going to join in our sleeves with the same method. Place Row 1 of your sleeve along Row 1 of your first panel, RS facing. Line up your sleeve with the center 30(30, 33, 36, 39, 42, 45, 48, 48) Sts of the edge of your main body panel. I recommend using SMs here to hold your sleeve in place. Sew across. Repeat the same process with the second sleeve. Note: sizes S-4X will have an extra St on one end of both the main body panels when you line up the sleeve. This will not affect the pattern. You can sew the extra stitch in when seaming the sleeve or sew it in when you are seaming the side and underarm. View my video tutorial for a visual.
Finally, fold your sweater and sleeves RS still facing. Seam from the bottom hem up to the underarm. Then from the underarm across the sleeve. Leave the final 5(5, 5, 5, 4, 4, 4, 4, 4) rows of the sleeve un-seamed to create the slit. Repeat on the opposite side.
Trim
With your sweater RS out, join yarn with a Sl St to Row 1 of the main panel (the Sc row) at the side seam.
Round 1: Ch 1, 1 Sc in same St as join, 3 Sc into the end of the first Tr row, 1 picot (this will line up with the picots in the main panel), 3 Sc into the end of the next Tr row. Continue repeating around the bottom, working 3 Sc into each Tr row and a picot on the rows that it lines up with on the main panels. When you reach the Sc rows at the seams, work 1 Sc into each of them. Sl St to the first Sc made, fasten off. (116(128, 128, 140, 140, 152, 164, 164, 176) Sc) picots not counted towards final St count
Weave in any remaining ends.