crochet a Strawberry Cat Memo Pad Stand


Crocheting a Strawberry Cat Memo Pad Stand is a delightful and whimsical project that is sure to add a touch of charm to your workspace. With its vibrant red color and adorable cat design, this memo pad stand will not only hold your notes in place but also bring a smile to your face every time you use it. The combination of creativity and functionality makes this DIY project a fun and rewarding way to showcase your crafting skills. So, grab your crochet hook and yarn, and get ready to create a one-of-a-kind accessory that is as cute as it is useful!
Materials:
Abbreviations
ch: chain
sl st: slip stitch
sc: single crochet
hdc: half double crochet
dc: double crochet
inc: increase
dec: invisible decrease
Pattern:
Top
Start by making a chainless foundation of 68 sc. Then join the 1st and last stitch with a slip stitch.
Next, you will just have to repeat round 10 to 12 of the bottom part. Finish it the same way, too.
The ears
Make a magic circle. Finish each round with a ch 1 then turn.
Row 1 : 5 sc (5) close the ring tight
Row 2 : sc inc, 1 sc, sc inc, 1 sc, sc inc (8)
R3 : sc inc, 2 sc, sc inc x 2, 2 sc, sc inc (12)
R4 : sc inc, 2 sc, sc inc, 1 sc, sc inc x 2, 1 sc, sc inc, 2 sc, sc inc. (18)
R5 : sc inc, 2 sc, sc inc, 1 sc, sc inc, 1 sc, 1 hdc, 2 dc, 1 hdc, 1 sc, sc inc, 1 sc, sc inc, 2 sc, sc inc (24)
Cut yarn and weave the ends. Make 2 of them.
The inside of the ears
Pink your pink yarn and the 3 mm crochet hook.
Make a magic circle. Finish each round with a ch 1 then turn.
Row 1 : 5 sc (5) close the ring tight
Row 2 : sc inc, 1 sc, sc inc, 1 sc, sc inc (8)
R3 : sc inc, 2 sc, sc inc x 2, 2 sc, sc inc (12)
Cut yarn and weave the ends. Make 2 of them.
Sew the 2 of them in each of the ears we previously made.
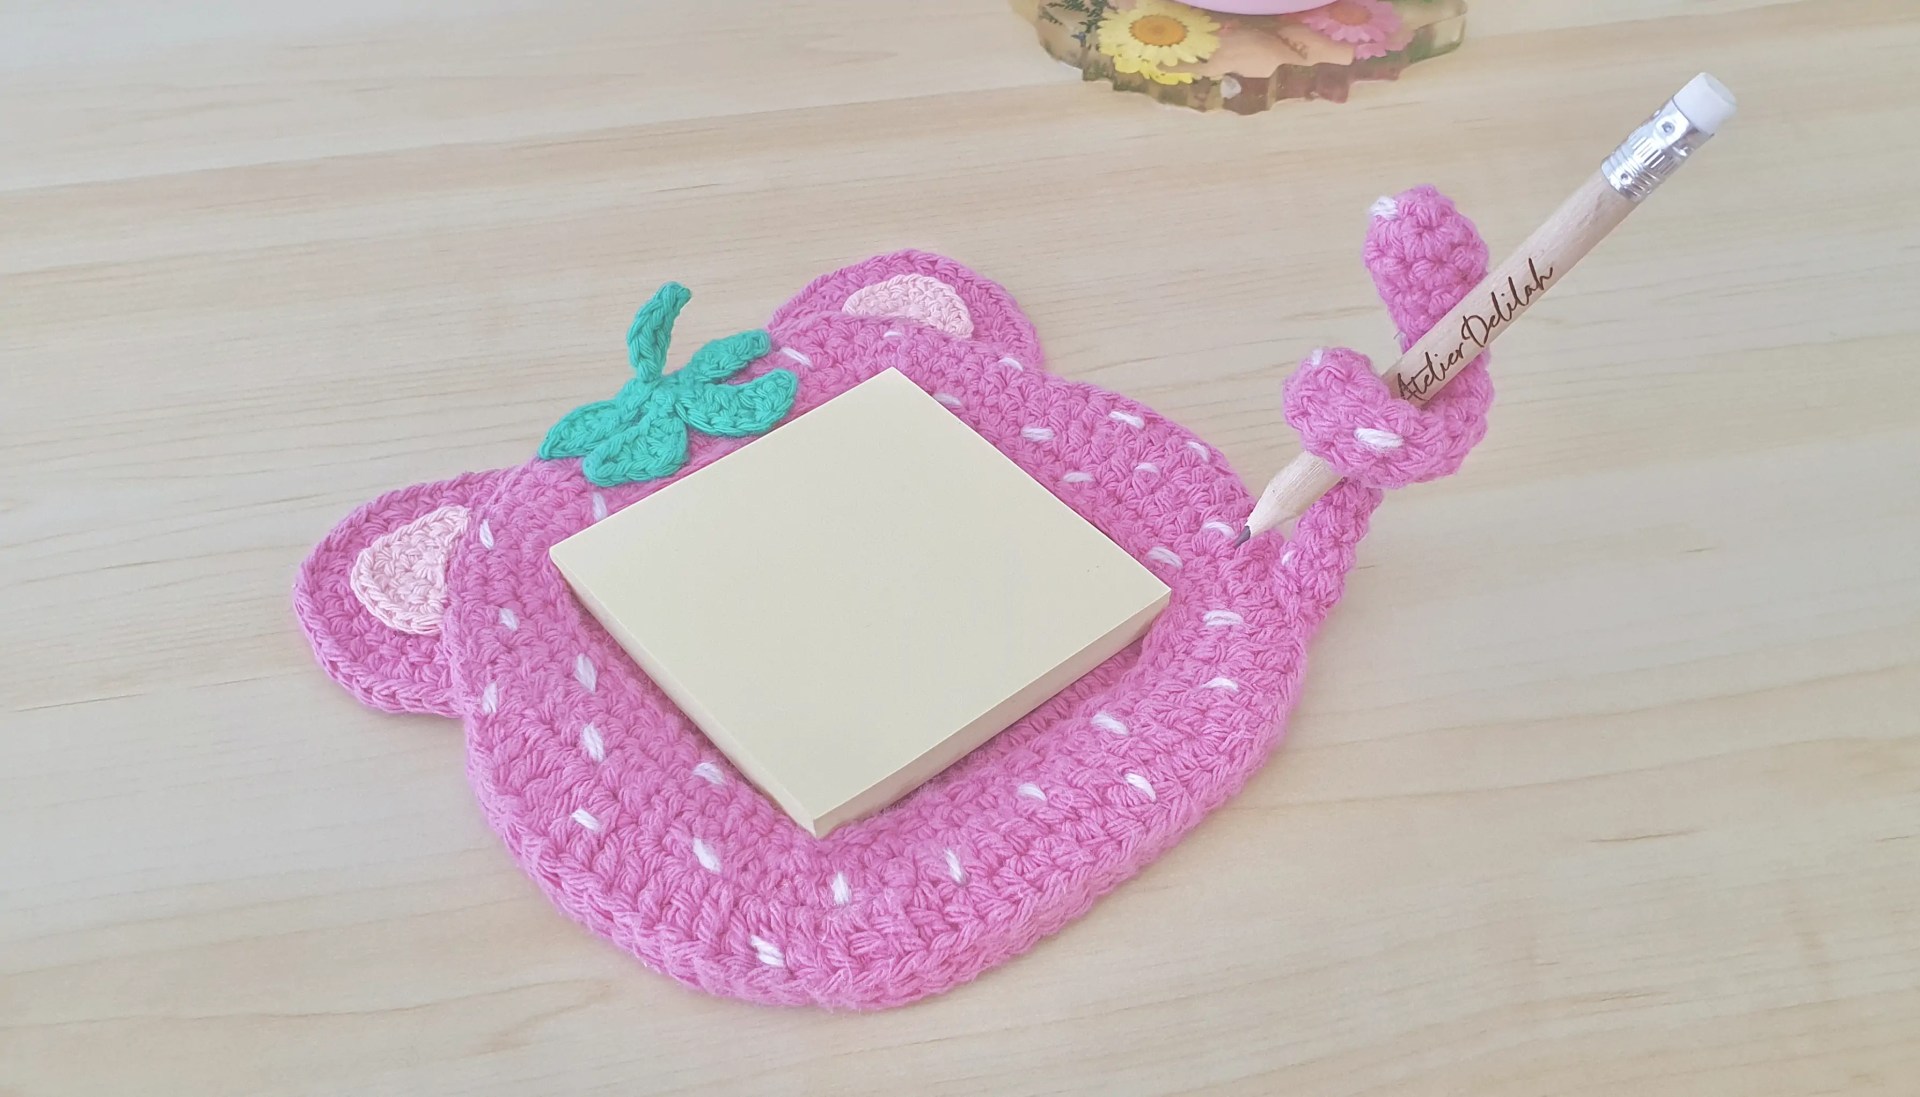
How to sew each part – Strawberry Cat Memo Pad Holder
Sew the top part on the bottom starting by “drawing” the square part on the center first. In order to do so, let the stitches of row 9 on both part correspond with each other. Sew them together.
Once you’re done, slide the ears between the top and bottom parts. Sew everything together, by sewing the edges together.
The Tail
Make a magic circle. (don’t join the rounds at the end with a sl st, we will work amigurumi style at the beginning)
Round 1 : 4 sc (4)
Round 2 : sc inc x 4 (8)
R3 to 4 : 8 sc (8)
Fill the tip of the tail with the polyester fiber.
R5 : 2 sc, sc dec, 2 sc, sc dec (6)
R6 to 25 : 6 sc (6)
Cut yarn and fasten off. Insert the wire inside the tail up to the tip of it. Leave a piece of wire out of the tail to insert into the memo pad holder base. (between the top and bottom parts) Then sew the tail on the side, making sure it is firm and sturdy.
The leaves
Pick your green yarn and the 3 mm crochet hook, and make a magic circle.
Row 1 : 4 sc (4) close the ring tight
Row 2 : ch 6, starting the 2nd loop from the hook: 1 sl st, 1 hdc, 2 dc, 1 sc, then sl st in the 1st sc of the row.
Ch 6, starting the 2nd loop from the hook: 1 sl st, 1 hdc, dc inc x 2, 1 hdc. Then sl st in the 2nd sc of the row.
Turn the leaf from left to right:
Ch 6, starting the 2nd loop from the hook: 1 sl st, 1 hdc, dc inc x 2, 1 hdc. Turn again from left to right to sl st in the 3rd sc of the row.
Sl st in the 4th stitch then: ch 6, starting the 2nd loop from the hook: 1 sl st, 1 hdc, 2 dc, 1 sc, then sl st back to the 3rd stitch.
Now sl st in the center of the magic circle. Then: ch 6, starting the 2nd loop from the hook: 1 sl st, 1 hdc, 2 dc, 1 sc. Then cut the yarn and make the tail go through the center of the magic circle again. Weave in ends.
Sew the leaves on top of the cat’s head. To complete your strawberry cat: with a sewing needle, embroider pieces of white yarn on the memo pad holder. Just twirl the tail to give it a shape that will hold your pencil, as shown in the picture below.