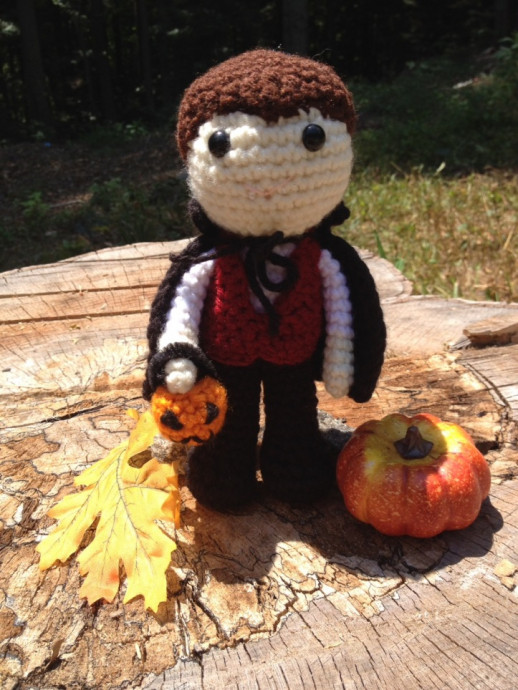
Crochet Vampire Boy Doll

Meet the adorable Crochet Vampire Boy Doll, a spookily sweet addition to your collection of crochet creations! With his charming fangs and tiny cape, he's sure to bring a smile to your face. This little guy is perfect for adding a touch of whimsy to your Halloween decor or as a unique gift for a fellow vampire enthusiast.
Let your creativity shine as you crochet every intricate detail, bringing this tiny vampire to life stitch by stitch. Get ready for some fang-tastic fun with the Crochet Vampire Boy Doll!**_Terms_**:
ch – chain
hk – hook
sc – single crochet
st – stitch
inc – increase ( 2sc in the same stitch )
dec – decrease ( sc two stitches together )
hdc – half double crochet
dc – double crochet
tr – triple crochet
**_Supplies:_**
G-hook
Worsted weight yarn in any color you choose. You will need skin tone, a small amount of white and clothing colors.
Yarn needle
Safety eyes or felt for eyes
Poly-fil stuffing
Tulle ( optional )
**_Head:_**
Using skin tone: Ch 2
1. sc 6 in the second ch from hk – 6
2. 2sc in each st around – 12
3. ( sc, inc )6x – 18
4. ( sc 2, inc )6x – 24
5. ( sc 3, inc )6x – 30
6 – 11. sc around – 30 each row
12. ( sc 3, dec )6x – 24
13. ( sc 2, dec )6x – 18
*if using safety eyes, attach them now. I put mine in at row #6.
* begin stuffing, stuff firmly
14. ( sc, dec )6x – 12
15. dec 6 – 6
Fasten Off, weave in ends.
**_Hair:_**
Using hair color of choice, Ch 2
1. sc 6 in second ch from hk – 6
2. 2sc in each st around – 12
3. ( sc, inc )6x – 18
4. ( sc 2, inc )6x – 24
5. ( sc 3, inc )6x – 30
6 – 8. sc around – 30 each row
9. hdc, dc, tr, dc, hdc, sc 25
Fasten off, leave long tail for sewing to head
**_Feet/Legs:_ **make two
Using shoe color: Ch 2
1. sc 5 in second ch from hk – 5
2. 2sc in each st around – 10
3. ( sc, inc )5x – 15
4. ( sc 2, inc )5x – 20
5. sc around – 20
6. ( sc 2, dec )5x – 15
7. ( sc, dec )5x – 10
8. sc around – 10
*begin stuffing
9 – 17. sc around – 10 each row
Fasten off
**_Body:_**
***see the witch girl pattern for instructions on how to connect legs***
1 – 3. sc around – 16 each row
*switch to shirt color
4 – 10. sc around – 16 each row
*continue the stuffing, stuff firmly
11. dec 11, fasten off, leave long tail,for sewing.
**_Arms:_ **Make two
Using skin tone, Ch 2
1. sc 4 in second ch from hk – 4
2. 2sc in each st around – 8
3 – 4. sc around – 8
5. dec, sc 2, dec, sc 2 – 6
6. sc around – 6
*switch to shirt color
7 – 13. sc around – 6
* do not stuff arm, fasten off, leave long tail for sewing.
**_Vest:_**
Using red, ch 22
1. starting in second ch from hk, sc across – 21
2. ch 1, turn, sc across – 21
3. ch 1, turn, dec, sc 17, dec – 19
4. ch 1, turn, dec, sc 15, dec – 17
5. ch 1, turn, dec, sc 13, dec – 15
6. ch 1, turn, sc 2, ch 5, skip next 2 stitches, sc 7, ch 5, skip next two sts, sc 2-20
7. ch 1, turn, sc across.
Crochet around entire vest to clean up edges. Fasten off, leave a tail for sewing vest closed.
**_Cape:_**
Using black, ch 23
1. starting in the second ch from hk, sc across – 22
2. ch 1, turn, sc across – 22
3 – 6. repeat row #2 – 22 each row
7. ch 1, turn, dec, sc 18, dec – 20
8. ch 1, turn, dec, sc 16, dec – 18
9. ch 1, turn, dec, sc 14, dec – 16
10. ch 1, turn, dec, sc 12, dec – 14
11. ch 1, turn, dec, sc 10, dec – 12
12. ch 1, turn, dec, sc 8, dec – 10
13. ch 1, turn, sc across – 8
14. ch 1, turn, 3dc in first stitch, dc in next 8, 3dc in last stitch.
Fasten off.
_**Pumpkin Pail:**_
Using orange, Ch 2
1. 5 sc in second ch from hk – 5
2. 2sc in each st around – 10
3. using back loops only: ( sc, inc )5x – 15
4 – 6. sc around – 15 each row
7. ( sc, dec )5x – 10
Fasten Off.
Use felt or yarn to add face. Use yarn or pipe cleaner for handle.
Assembly:
* Sew hair onto head
* Sew head onto body
* Pin vest on and mark where the arms need to go, remove vest, sew arms into place
* Put on vest, put on cape
* Add any additional details
Finished size: 7 inches
