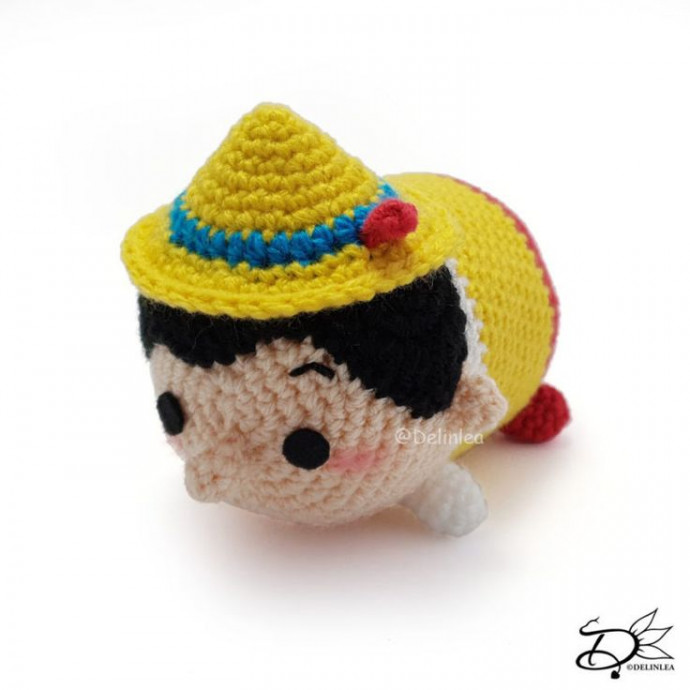
Crochet Pinocchio Tsum Tsum Amigurumi Toy

If you love the whimsical charm of Pinocchio and adore the cuteness of Tsum Tsums, then you'll fall head over heels for this Crochet Pinocchio Tsum Tsum Amigurumi Toy! This delightful handcrafted creation combines the beloved character of Pinocchio with the adorable round shape of Tsum Tsums, bringing a unique and charming toy to life. With its intricate crochet detailing and vibrant colors, this amigurumi toy is sure to bring joy and nostalgia to both children and adults alike. Whether it's for cuddling, decorating, or gifting, this Crochet Pinocchio Tsum Tsum is a delightful addition to any collection and is bound to put a smile on your face every time you see it.
For this Pattern you’ll need:
Yarn in the colors Yellow, Beige, White, Red, Black and Blue. (I used Stylecraft Special DK)
Crochet Hook (I used a 3mm hook).
Stuffing.
Scissors.
Stitch Markers.
Sewing Pins.
Yarn Needle.
Felt for the facial details.
(Fabric) Glue.
Stitches used (US Terms):
Magic Ring.
CH = Chain.
SLST = Slip Stitch.
SC = Single Crochet.
HDC = Half Double Crochet.
DC = Double Crochet.
TR = Treble Crochet.
ST = Stitch.
FL = Front Loops Only.
Inc = Increase.
Dec = Decrease.
(…) = Repeat the space in brackets the given number of times.
[…] = Total number of stitches.
Pattern Pinocchio
This pattern is made using continuous rounds, unless stated otherwise. Use a stitch marker to mark the first stitch.
Body
Start with the color Beige.
1: 6SC in a Magic Ring. [6]
2: 2SC in each st around. [12]
3: (1SC, inc) 6 times. [18]
4: (2SC, inc) 6 times. [24]
5: (3SC, inc) 6 times. [30]
6: (4SC, inc) 6 times. [36]
7: (5SC, inc) 6 times. [42]
8-14: 42SC. [42]
Change to the color White.
15-16: 42SC. [42]
Change to the color Yellow.
17-26: 42SC. [42]
Change to the color Red.
27-29: 42SC. [42]
30: (5SC, dec) 6 times. [36]
31: (4SC, dec) 6 times. [30]
32: (3SC, dec) 6 times. [24]
33: (2SC, dec) 6 times. [18]
Stuff the body here.
34: (1SC, dec) 6 times. [12]
25: Dec around. [6]
Fasten off and weave in tail.
Legs (Make 4)
Make 2 in the color White and 2 in Red.
1: 4SC in a Magic Ring. [4]
2: 2SC in each st around. [8]
3-5: 8SC. [8]
Fasten off and leave a long tail for sewing.
Nose
Use the color Beige.
1: 6SC in a Magic Ring. [6]
2-3: 6SC. [6]
Fasten off and leave a long tail for sewing.
Ears (Make 2)
Use the color Beige.
1: 6SC in a Magic Ring. [6]
2: 6SC. [6]
Fasten off and leave a long tail for sewing.
Hair
Use the color Black.
1: Ch15, insert in second ch from hook, 13SC, 3SC in the next st, work along the other side of the chain now, 12SC, inc. [30]
2: Inc, 12SC, (inc) 3 times, 12SC, (inc) 2 times. [36]
3: 1SC, inc, 12SC, (1SC, inc) 3 times, 12SC, (1SC, inc) 2 times. [42]
4: Ch3, 2DC inc the next st, 1HDC, 16SC, 1HDC, 2DC in the next st, 2TR in the next st, 2DC in the next st, 1HDC, 16SC, 1HDC, 2DC in the next st, 1TR. [48] (the first 3Ch counts as the first TR).
5: SlSt, 5SC, 1HDC, 2DC, 4TR, 1DC, 1HDC, 1SC, SlSt.
Fasten off and leave along tail for sewing.
Hat
Start with the color Yellow.
1: 7SC in a Magic Ring. [7]
2: 7SC. [7]
3: 2SC in each st around. [14]
4: 14SC. [14]
5: (1SC, inc) 7 times. [21]
6: 21SC. [21]
7: (2SC, inc) 7 times. [28]
Change to the color Blue.
8: 28HDC. [28]
Change to the color Yellow.
9: FL, (1SC, inc) 14 times. [42]
10-11: 42SC. [42]
Fasten off and leave along tail for sewing.
Feather
Use the color Red.
Ch4, insert in second ch from hook, 3SC. [3]
Fasten off and leave a long tail for sewing.
Assembling
Whenever I start assembling an Amigurumi, I use sewing pins first to put everything together. This way I can move all parts around easily until I am happy with how it looks. Then I will sew it on. I recommend you do so as well.
Start with sewing on all his legs. Then sew on his hair, the back of the hair will line up with the white of the body. While sewing it on, you can put a bit of stuffing under it, just to give it a bit more shape. Next sew Pinocchio his hat on top. Don’t forget to add the little feather to his hat as well.
Sew on his nose just under the middle of his face. And the ears go on both sides of his face.
With felt make his facial details and glue those in the right spot.
