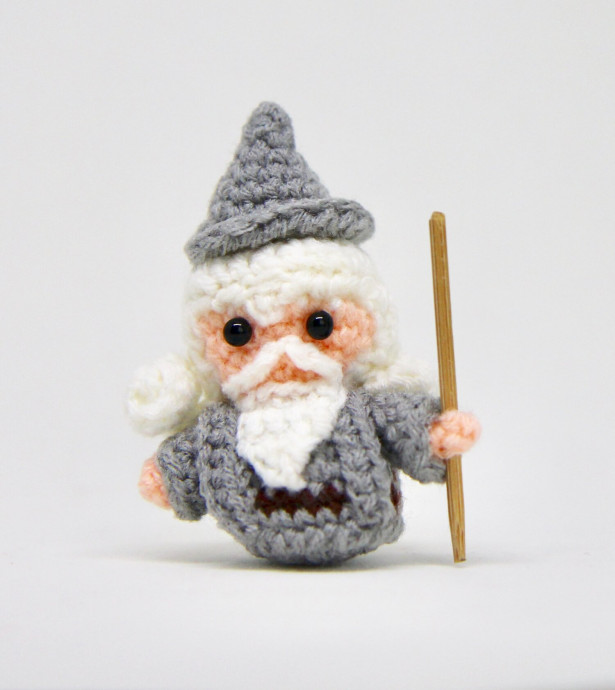
Crochet Adorable Wizard

Crocheting an adorable wizard can be a whimsical and delightful project! By using colorful yarns and intricate stitches, you can bring to life a charming little wizard with a magical touch. From their pointy hat to their tiny wand, every detail can be carefully crafted to add personality and charm to your creation. Whether you're making it as a gift for a fellow magical enthusiast or simply to bring some joy into your own space, this crochet project is sure to bring smiles and a sprinkle of enchantment wherever it goes. So grab your crochet hooks, let your creativity flow, and watch as your very own crochet wizard comes to life in the most adorable way!
Terminology
Ch = chain
Sc = single crochet (2sc1 means 2 single crochet in same ch) Sl st = slip stitch
St = stitch (refers to number of stitches in one round)
Hdc = half double crochet
Dc = double crochet (yarn over 1x)
Sc2tog1 = single crochet decrease
Picot st = picot stitch
Materials and Tools
2.0mm Clover crochet hook
Orion Top Deluxe Yarn, Crown Yarn (or any equivalent acrylic yarn) - white, beige, grey, dark brown
Darning needle
Stitch markers
Filling – use leftover yarn or polyester fiberfill
Scissors
4mm glass eyes or safety eyes
Toothpicks
Head
Round 1: Magic ring 10 (white) – 10st
Round 2: 2sc10 (white) – 20st
Round 3: Sc20 (white) – 20st
Round 4: (Sc1, 2sc1) x 10 (white) – 30st
Round 5: Sc12 (white), sc12 (beige), sc6 (white) – 30st
Round 6: (Sc1, sc2tog1) x 4 (white), (sc1, sc2tog1) x 4 (beige), (sc1, sc2tog1) x 2 (white) – 20st
Round 7: Sc8 (white), sc8 (beige), sc4 (white) – 20st
Round 8: Sc2tog4 (white), sc2tog4 (beige), sc2tog2 (white) – 10st
Round 9: Sc2tog5 (beige) – 5st
Body
Continue from head, into body.
Round 10: 2sc5 (grey) – 10st
Round 11: 2sc10 (grey) – 20st
Round 12: Sc20 (grey) – 20st
Round 13: Repeat round 12 – 20st
Round 14: Sc20 (dark brown) – 20st
Round 15: Sc20 (grey) – 20st
Round 16: Magic ring 10 then 2sc10, to join up to round 15 (all grey) – 20st
Wig cap
Using white yarn to make the wig cap,
Round 1: Magic ring 6 – 6st
Round 2: (Ch2, 2dc1 in 1st st), 2dc5, join up by sl st to top of ch2 – 12st
Round 3: (Ch2, dc1 in 1st st), 2dc1, (dc1, 2dc1) x 5, join up by sl st to top of ch2 – 18st
Round 4: (Ch2, dc1 in 1st st), dc1, 2dc1, (dc2, 2dc1) x 5, join up by sl st to top of ch2 – 24st
Round 5: Sc1, [(ch15, 2dc1 in 4th ch from hook, 2dc6, 5dc1), skip 2st then sl st onto main st] x 3, [(ch15, 2dc1 in 4th ch from hook, 2dc6, 5dc1), (yarn over 1x, then skip 1 st to dc1), hdc1, sl st 4, ch3 and picot st, skip 1 st then sl st 1, sl st 3, hdc1, dc1, sl st to previous round and end off
Attach wig cap onto the hairline of the head, align small triangular part of wig cap to the middle of the beige part of face.
Beard
Using white yarn to make the beard,
Row 1: Ch15, sl st to the other end (to join up in a circle) – 15st
Row 2: Sc5 down circle, turn – 5st
Row 3 3: Sc4, turn – 4st
Row 4: Sc3, turn – 3st
Row 5: Sc2, turn – 2st
Row 6: Sc1 – 1st
Row 7: Sl st and end off – 1st
Moustache:
- Attach chain portion to bottom sides of face, around Round 7-8 of head, at beige/ white junction.
- Sew down the mid-point of chain to the middle point of face, just below the triangular part of fringe.
Beard:
- Attach the triangle portion right at the bottom of beige face.
Hat
Using grey yarn to make the hat,
Round 1: Magic ring 3 – 3st
Round 2: Sc1, 2sc1, sc1 – 4st
Round 3: (Sc1, 2sc1) x 2 – 6st
Round 4: (Sc1, 2sc1) x 3 – 9st
Round 5: (Sc2, 2sc1) x 3 – 12st
Round 6: (Sc3, 2sc1) x 3 – 15st
Round 7: (Sc4, 2sc1) x 3 – 18st
Round 9: (Hdc5 FLO, 2hdc1 FLO) x 3 – 21st
Sleeves
Using grey yarn to make 2 sets of sleeves,
Round 1: Magic ring 6 – 6st
Round 2: Sc5, 2sc1 – 7st
Round 3: Sc6, 2sc1 – 8st
Round 4: Sc7, 2sc1 – 9st
Arms
Using beige yarn to make 2 sets of arms,
Round 1: Magic ring 4 – 4st
Round 2: Sc4 – 4st
Round 3: Repeat round 2 – 4st
Sew arms within sleeves on both sides, just such that arm is visible outside the sleeve at the end.
Scarf
Using grey yarn to make the scarf,
Row 1: Ch28
Row 2: Hdc17 – 27st
Wrap around shoulders, underneath the hair and sew it down to the main ami body
Assembly
Head components
- Attach wig cap onto hairline of head, align triangular part to the middle of the beige part of face.
- Place the 2 glass eyes on 2nd row of beige face, right below fringe from the wig cap attachment.
- Add the beard and moustache to the face (mentioned above).
- Join the hat onto head, optional. (I personally prefer headgear non-detachable so I don’t lose them.)
Body components
- Sew on the arms within the sleeves over both sides, as mentioned previously.
- Attach sleeves with arms inside over Round 11-12 of main body, on either side.
- Add scarf to the body (as mentioned above) and sew it down.
- Attach on a toothpick to the left hand as his staff.
