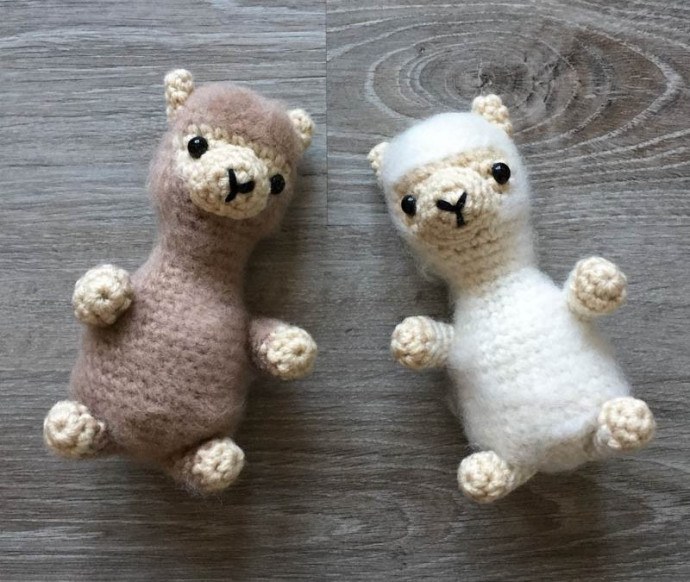
Crochet Alpaca Amigurumi

Crochet Alpaca Amigurumi is an adorable and fun craft project that brings warmth and joy to any room! Creating these tiny alpacas with soft yarn and a hook is not only relaxing but also rewarding. The intricate details, from their fluffy bodies to their charming faces, make them the perfect handmade gift for loved ones. With a little bit of patience and creativity, you can bring these cute alpacas to life and add a touch of whimsy to your living space. So gather your yarn, muster up some enthusiasm, and start stitching your way to a fluffy, huggable alpaca companion!
MATERIALS
Yarns – Main colour (A), Face/Ear colour (B), small amount of black for the nose
8 mm safety eyes
polyester fibrefill
size 7 (4.5 mm) crochet hook
yarn needle
pet slicker brush
ABBREVIATIONS
ch = chain
st = stitch
sc = single crochet
inc = single crochet 2 into the same stitch
dec = decrease over next two stitches (single crochet 2 stitches together or use invisible decrease)
sl st = slip stitch
EARS (Make 2)
R1: With B, sc 5 in magic ring (5)
R2: sc 2, inc, sc 2 (6)
R3: (sc 1, inc) three times (9)
Finish with a sl st. Cut a long tail for sewing.
FACE
R1: With B, sc 5 in magic ring (5)
R2: inc in each st around (10)
R3: (sc 4, inc) two times (12)
Finish with a sl st. Cut a long tail for sewing. Using a small amount of black yarn, embroider a nose in the middle of the piece.
HEAD/BODY BASE
R1: With A, sc 6 into magic ring (6)
R2: inc in each st around (12)
R3: (sc 1, inc) six times (18)
R4: (sc 2, inc) six times (24)
R5-6: sc in each st around (24)
R7: sc 8, switch to B, sc 8, switch to A, sc 8 (24)
R8: sc 7, inc, switch to B, sc 8, switch to A, inc, sc 7 (26)
R9: sc 9, switch to B, sc 8, switch to A, sc 9 (26)
R10: sc 10, switch to B, sc 6, switch to A, sc 10 (26)
R11: (sc 11, dec) two times (24)
R12: (sc 2, dec) six times (18)
R13: sc in each st around (18)
At this point, you can add the facial details before closing up the body. Sew the FACE onto the HEAD. Insert the safety eyes.
R14: (sc 7, dec) two times (16)
R15-16: sc in each st around (16)
R17: (sc 7, inc) two times (18)
R18: (sc 2, inc) six times (24)
R19: sc in each st around (24)
R20: (sc 3, inc) six times (30)
R21-28: sc in each st around (30)
R29: (sc 3, dec) six times (24)
R30: sc in each st around (24)
R31: (sc 2, dec) six times (18)
R32: (sc 1, dec) six times (12)
R33: dec six times (6)
Finish with a sl st. Cut a short tail and weave in to close up the body.
To fuzz up the body, use a pet slicker to brush out the yarn.
ARMS (Make 2)
R1: With B, sc 5 in magic ring (5)
R2: inc in each st around (10)
R3: Switch to A, (sc 3, dec) two times (8)
R4-6: sc in each st around (8)
R7: (sc 2, dec) two times (6)
Finish with a sl st. Cut a long tail for sewing.
FEET (Make 2)
R1: With B, sc 5 in magic ring (5)
R2: inc in each st around (10)
R3: Switch to A, (sc 3, dec) two times (8)
R4-5: sc in each st around (8)
R6: (sc 2, dec) two times (6)
Finish with a sl st. Cut a long tail for sewing.
TAIL
R1: With B, sc 5 in magic ring (5)
R2: sc 2, inc, sc 2 (6)
R3: (sc 2, inc) two times (8)
Finish with a sl st. Cut a long tail for sewing.
ASSEMBLY
Sew EARS to HEAD.
Sew ARMS to BODY.
Sew FEET to BODY.
Sew TAIL to BODY.
