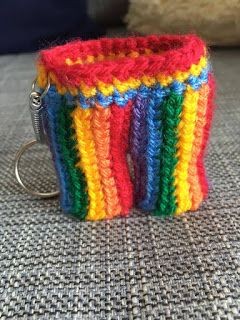
Crochet Rainbow Shorts Keyring Tutorial

How sweet and colorful the Crochet Rainbow Shorts Keyring is! This adorable accessory is not just a keyring; it's a burst of joy you can carry with you wherever you go. The charming rainbow shorts design adds a touch of whimsy to your keys or bag, making it hard not to smile whenever you catch a glimpse of it. Handcrafted with care, these keyrings are not only cute but also durable, ensuring they will brighten up your day for a long time to come. Whether you're a crochet lover or simply appreciate unique and charming accessories, the Crochet Rainbow Shorts Keyring is sure to add a pop of fun to your daily routine.
Materials
Small amounts of DK yarn in 6 rainbow colours - I used Stylecraft Special DK in Lipstick, Spice, Sunshine, Green, Aster and Violet
3.25mm/D hook
Yarn needle
Scissors
Keyring with short chain and second smaller split ring
Stitches:
This pattern uses all US terminology
sc - single crochet
st - stitch
blo - back loop only
slst - slip stitch
Notes
- - For the only time ever, I recommend crocheting over your ends as you go rather than having to spend time weaving them in at the end. I crocheted over the starting end of the current colour for the first 6 stitches, and over the tail from the previous row with the final 6 stitches.
- - Use standing sc stitches to start each row if you can! Reducing bulk will make your tiny shorts less flare-y.
- - If you're not good at remembering which end you started at, I recommend using a stitch marker to mark the end! You only really need this for the construction phase.
- - Don't turn after each row!
Pattern
Leg Sleeves (Make 2)
Row 1 - Using Lipstick, ch13. Turn and sc into the back loop of each chain. Finish off and cut yarn (12 sc).
Row 2 - Using Spice, join yarn with a standing sc in blo of first sc of Row 1. sc in BLO of each st. Finish off and cut yarn (12 sc).
Row 3 - Repeat Row 2 with Sunshine.
Row 4 - Repeat Row 2 with Green.
Row 5 - Repeat Row 2 with Aster.
Row 6 - Repeat Row 2 with Violet.
Row 7 - Repeat Row 2 with Lipstick.
Row 8 - Repeat Row 2 with Spice.
Row 9 - Repeat Row 2 with Sunshine.
Row 10 - Repeat Row 2 with Green.
Row 11 - Repeat Row 2 with Aster.
Row 12 - Repeat Row 2 with Violet.
Weave in all ends.
Construction
- Thread a 30cm length of Lipstick onto your yarn needle. With the first leg sleeve, fold in half with the right sides together, with the Violet row on top. Starting from the right-hand side (which is the side with the ends rather than the starts of each row), whip stitch the two edges together for 6 stitches. If you want to match the BLO pattern, stitch into the front loop of both the Violet and Lipstick only.
- Once you've joined 6 stitches, do an extra stitch in the last spot, and then pick up your second leg sleeve and fold in half with the right sides together, with the Lipstick row on top. Into the 7th stitch from the right, insert your yarn needle and do a little knot. Continue stitching towards the left - you'll do 6 stitches again. If you want to match the BLO pattern, stitch into the front loop of the Lipstick, and back loop of the Violet edges. Finish off securely and weave in your ends.
- Now we need to do the front-to-back seam of the tiny shorts. Line up the un-joined edges of the leg sleeves so that you are joining one sleeve to the other (as opposed to one sleeve to itself to make the leg holes). Whip stitch along this seam, adding an extra knot in the crotch if you think it's necessary. Finish off and weave in your ends securely.
Waistband
Row 1 - Join Aster in the end of any row with a standing sc. sc in the end of each row around. Slst to join to the first sc, cut yarn and weave in ends. (24 sc)
Row 2 - Join Sunshine into any sc. sc into each st around. Slst to join to the first sc, cut yarn and weave in ends. (24 sc)
Row 3 - Repeat Row 2 with Lipstick. (24 sc)
Keyring
Join your keyring to the side of the waistband using the smaller split ring, around a stitch on Row 2 of the waistband.
