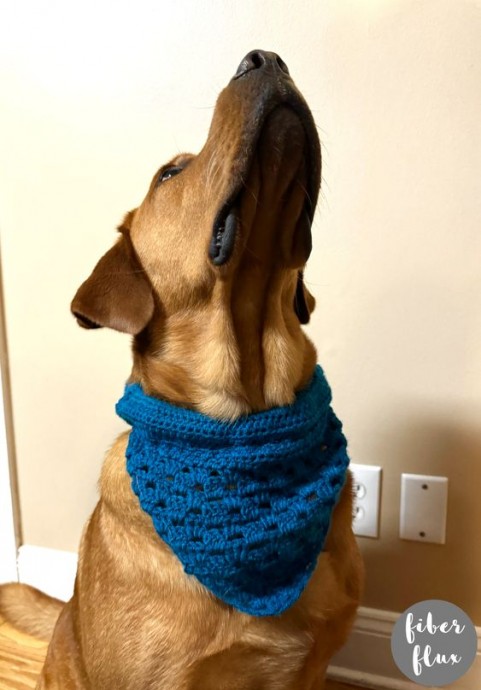
Crochet Safety Pet Bandana: Style and Safety Combined

The Crochet Safety Pet Bandana is a charming accessory that not only adds flair to your furry friend's style but also ensures their safety. Crafted with care and using soft, durable yarn, this bandana is comfortable for your pet to wear all day. The bright colors and fun patterns make it easy to spot your pet in a crowd, providing an extra layer of security during walks or playtime. With a simple, adjustable design, this bandana is both practical and stylish, making it a must-have for any pet owner who wants to keep their four-legged companion safe and looking adorable. Your pet will surely wag their tail in excitement every time you put on this lovely bandana!
Materials
- H (5.0 mm) crochet hook
- About 200 yards of light/#3 weight yarn (I used less than one ball of Kind Feather from Hobbii in the “Petrol Blue #18” colorway)
- Yarn/tapestry needle
- Scissors
- Measuring Tape
- Pet collar as an example to get the best fit
Note: When crocheting for pets, it is always a good idea to select a yarn that is washable!
Sizing
- Because this will be worn with the pet’s collar, use your pet’s collar as a starting point.
- Make the granny triangle roughly half the size of the collar (you can fold the collar in half to make it extra easy to see).
- When making the top “tube” part, make it just a little shorter than the length of the collar and make the height (before seaming) a little more than twice as tall as the collar.
Pattern Notes
- This bandana is made by starting with a granny triangle, working from the bottom point up. Then a rectangle is added to the top (the width of the collar and twice the height). After that, the rectangle part is folded over and seamed to create a tube in which the collar is slid into.
- This allows your pet to safely wear the bandana with their own collar and not tied around their neck.
- I chose a solid color, but you can also experiment with seasonal colors, or a matching color of your pet’s collar too!
Crochet Safety Pet Bandana Pattern
The Triangle
- Chain 5
- Row 1: In the 5th ch from the hook, work 3 dc. Ch 1, then work a dc (all in the same chain).
- Row 2: Ch 4 and turn. Then work (3 dc, ch 1) in the first space (the ch 1 space from the previous row). Then work (3 dc, ch 1, 1 dc) into the turning ch space.
- Row 3: Ch 4 and turn. Then work (3 dc, ch 1) in the first space (the ch 1 space from the previous row). Work (3 dc, ch 1) into each ch 1 space across (note: there will be one to work the first time, but then as your triangle grows, you do more and more of the (3 dc, ch 1) across). Then work (3 dc, ch 1, 1 dc) into the turning ch space.
- Repeat row 3 until the top edge of the triangle is roughly half the length of the collar. Note: As your triangle grows in width, it will also grow in height as well. Do not fasten off yarn and continue below to the next section of the instructions.
The Top Tube
- Row 1: After completing the last stitch of the final row of the triangle, position the triangle over the center of the collar and work a chain that goes to the end of the collar. (I did 14 chains, but you may need to do a different amount.)
- In the 3rd ch from the hook, work a hdc. Work a hdc in each chain until you work back to the triangle again.
- When you get back to the top edge of the triangle, work a hdc in each stitch and space across.
- When you reach the end of the top edge of the triangle, work the same number of chains you did at the beginning (again, I did 14, but use the same number you used before).
- Work a hdc in the 3rd ch from the hook and work a hdc in each chain across. When you reach the triangle again at the end of the chains, work a slip stitch into the last space of the triangle’s corner. Depending on how you held everything, you may need to flip it over to avoid a “stair step” look. Fasten off yarn.
- Row 2: Tie new yarn into the stitch all the way to the left.
- Chain 2 and turn.
- Work a hdc in each stitch across.
- Repeat row 2 until the rectangle (not including the triangle) is a little over twice the height of the collar. Fasten off.
Finishing & Assembly
- Fold rectangle over and seam across. I used a whip stitch across until I reached the triangle, then switched to a running stitch, then back to the whip stitch when I got past the triangle on the other side.
- Weave in any ends.
- Slide the tube over the pet’s collar and it is ready to wear!
- You may need to keep the metal ring exposed for things like tags, leashes, etc., but you can easily slide it around to accommodate this.

