Crochet Fashion Villain Doll

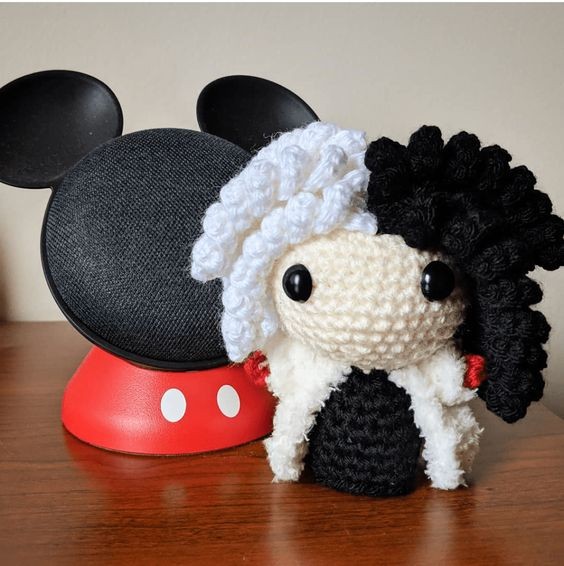
If you're looking to add a touch of mischief and style to your crochet collection, then the Crochet Fashion Villain Doll is the perfect pick for you! This sassy little doll brings a unique twist to traditional crochet designs, with its edgy and bold fashion choices that are sure to make a statement. Whether you're a crochet enthusiast or just someone intrigued by creative dolls, this villain doll will surely capture your heart. With its intricate detailing and charismatic charm, this doll is a delightful addition to any collection, making it a true standout piece that will have everyone talking. So, why not add a touch of playful villainy to your crochet creations and let this stylish doll showcase your fun and fabulous side!

Supplies
- Yarn weight 4
- Cream (Yarn Bee Soft and Sleek, Cream)
- Black (Yarn Bee Soft and Sleek, Black)
- White (Yarn Bee Soft and Sleek, White)
- Red (Yarn Bee Soft and Sleek, Red)
- Fluffy Yarn, weight 3 (Yarn Bee Cloud 9, Cream)
- Crochet hook size 3.5
- Yarn Needle
- Safety Eyes, 12mm plastic
- Stuffing (Loops and Threads Classic Fiberfill)
- Scissors
- Pins
Head
With Cream Yarn, ch 2, sc 6 in second ch from hook
R1 – inc in each sc (12 sts)
R2 – *sc, inc* x6 (18 sts)
R3 – *sc 2, inc* x6 (24 sts)
R4 – *sc 3, inc* x6 (30 sts)
R5 – *sc 4, inc* x6 (36 sts)
R6-9 – sc in each sc (36 sts per row)
R10 – *sc 4, dec* x6 (30 sts)
R11 – *sc 3, dec* x6 (24 sts)
R12 – *sc 2, dec* x6 (18 sts)
Insert safety eyes between R7 and R8, about 7 stitches apart. NOTE: you will want the eyes on the opposite side of the head from where the rows start. This way the color changes are not on the front of the doll.
Begin stuffing head to medium firmness.
R13 – *sc, dec* x6 (12 sts)
R14 – *sc 2, dec* x6 (9 sts)
Do not tie off. Continue to Body.
Body
Switch to Black Yarn
R15 – sc in each sc (9 sts)
R16 – sc in each sc (9 sts)
R17 – *sc 2, inc* x3 (12 sts)
R18 – sc in each sc (12 sts)
R29 – *sc 3, inc* x3 (15 sts)
R20-22 – sc in each sc (15 sts per row) TIE OFF
Body Base
In Black Yarn, ch 2, sc 6 in second ch from hook
R1 – inc in each sc (12 sts) TIE OFF and leave a tail long enough for sewing.
Sew base to the bottom of the body, stuffing body as you go. Do not overfill the body though because you want the bottom to be flat. Pull the tail from the body base circle up through the middle of the doll to help flatten out the bottom.
Coat
In Fluffy White Yarn, ch 12 (leaving long tail at the beginning for sewing)
R1 – Turn, and starting in second ch from hook, dc in each ch (11 sts)
R2 – ch 1, turn, dc 2 in each dc (22 sts)
R3-4 – ch 1, turn, dc in each dc (22 sts) TIE OFF.
To attach coat to dress, use initial tail and sew ch row to the seam between the head and body. Weave in the other tail.
Arm (make 2)
In Red Yarn, ch 2, sc 4 in second ch from hook
R1-3 – sc in each sc (4 sts per row) TIE OFF
Sleeve (make 2)
In Fluffy White Yarn, ch 7
R1 – turn, starting in second ch from hook, sc in each ch
R2-3 – ch 1, turn, sc in each sc
TIE OFF, leaving a tail for sewing
To attach, wrap one sleeve around one arm and stitch up so all three tails (one red from arm and two fluffy white) are on the same end. Use the red tail to anchor the arm to the body, inserting it into the side outside of the coat and pulling it through the back of the dress, leaving it under the coat. Do this with both arms and tie the red tails together. I do this because I don’t entirely trust the fluffy yarn to hold the arms, and since they are under the coat they won’t be seen. Then stitch the fluffy tails to the coat so the arms don’t flop around.
Hair (option 1: long)
ch 31, turn, starting in second ch from hook sc 2 in each ch. TIE OFF
make 8 white and 8 black (You may need more depending on how you arrange them)
Attach black strands to right side of the head and white stands to the left side of the head.
Hair (option 2: short)
ch 17, turn, in second ch from hook *inc, sc* x8. TIE OFF
make 13 of each color (you may need more depending on how you arrange them)
Attach black strands to right side of the head and white stands to the left side of the head.
