CrochetMenScarvesHatsGlovesSweatersCardigansSocksOther clothingWomenScarvesHatsGlovesShawls and cover upSweatersCardigansSocksSlippersBagsOther clothingChildrenScarvesHatsGlovesSweatersCardigansSocksSlippersOther clothingHomeBlankets and plaidsRugsHome decorationsPetsSchemesKnittingOther hand-madeChat
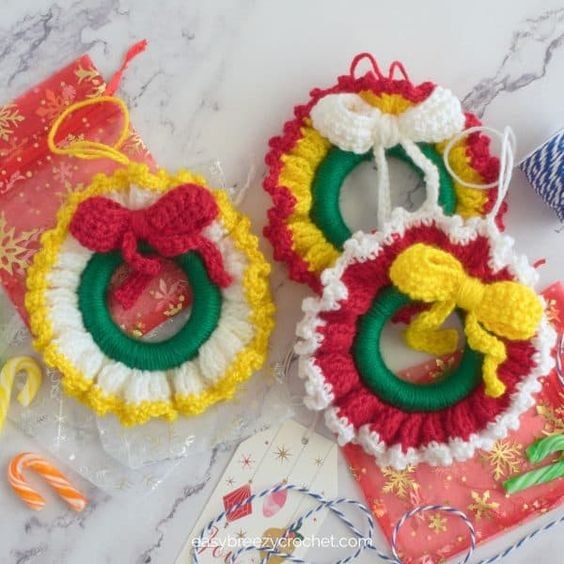
Crochet Mini Wreath

Creating a Crochet Mini Wreath can be such a delightful project that adds a touch of coziness and charm to your space. This cute and versatile craft allows you to personalize your wreath with different colors, yarn textures, and embellishments. Whether you are a beginner or an experienced crocheter, this miniature project is perfect for a relaxing afternoon of crafting.
You can hang it on your door, use it as a festive ornament, or even give it as a thoughtful homemade gift. So, grab your crochet hook and yarn, let your creativity flow, and enjoy the process of making something special with your own hands!What You Will Need
Yarn
- #3 Light (DK, light worsted, 8-ply) acrylic yarn
- Color A (Green) = 6.7 yards (6 meters)
- Color B (Yellow) - ruffle = 33 yards (30 meters)
- Color C (Red) - ruffle edge = 16.5 yards (15 meters)
- Color D (White) - bow = 13.5 yards (12 meters)
Hook
- 4 mm or size suited to the yarn you are using
Wooden Ring (or similar)
- 2.75 inches (7 cm) in diameter
Notions
- Scissors
- Yarn Needle
Gauge
- Not important for this pattern.
Finished Size
- The finished size of these crochet mini wreaths is about 5.5 inches (14cm) in diameter. However, yours may vary depending on the type of yarn you use, the size of the ring, and your tension.
Stitches and Abbreviations Used (US Terms)
- ch - chain
- sc - single crochet
- tr - treble crochet
- hk - hook
- sl st - slip stitch
- sp, space
- YO - yarn over hook
- picot - picot - see special stitches below
Special Stitches
- Picot - ch3, insert hk into 3rd ch from hk, YO pull the yarn back through both the stitch and the loop on the hk.
Pattern Notes
- This simple pattern can easily be adjusted to suit any ring size so keep this in mind when making your crochet mini wreath.
- If the ring size you are using is larger or smaller than the one indicated in the pattern, increase or decrease the number of stitches as required.
Instructions
Wreath
- Round 1, color A - Tie yarn around the ring, ch1, sc around the ring, sl st in 1st to join. [50 sc]
- Round 2, color B - Ch4 (counts as a tr st), 2 tr in same sp as ch4, (3 tr) in each sc, sl st in top of ch-4 to join. [150 tr]
- Round 3, color C - Ch1, picot, *2 sc, picot, repeat from * to the end, sl st into ch1 to join.Pull up a large loop for hanging - at least 5 inches (12cm) long, then cut yarn leaving a tail.Use a darning needle to knot the yarn at the base of the loop, then weave in the ends.
Make The Bow
- Foundation, color D - (leave a long tail) Ch 28
- Row 1 - Sc in 2nd ch from hk, sc in each st across, turn. [27 sc]
- Row 2 - Ch 1 (not counted as a stitch), sc in each st across, turn = [27 sc]
- Row 3 - 4 - Repeat row 2, cut yarn and fasten off, leaving a long tail.
- Sew the bow - Thread one of the long tail ends into a darning needle and sew the two short sides together to form a ring.Once sewn, locate the center and position the seam at the center of the bow, then wrap the center with the remaining tail yarn to form a bow.Then secure the yarn in place with a few stitches.
Make To Bow Tails
- Foundation, color D - Ch 30
- Row 1 - Sc in 2nd ch from hk, sc in each st across, fasten off, and weave in the ends.
- Attach the tail to the bow - Find the center of the tail and attach a length of yarn at the center point. Then position the tails at the base of the bow. Using the length of yarn attached to the tails, by wrapping the yarn around the bow to secure the tail in place, and fasten it off. Then sew the bow to the wreath.
No comments
Write a comment
