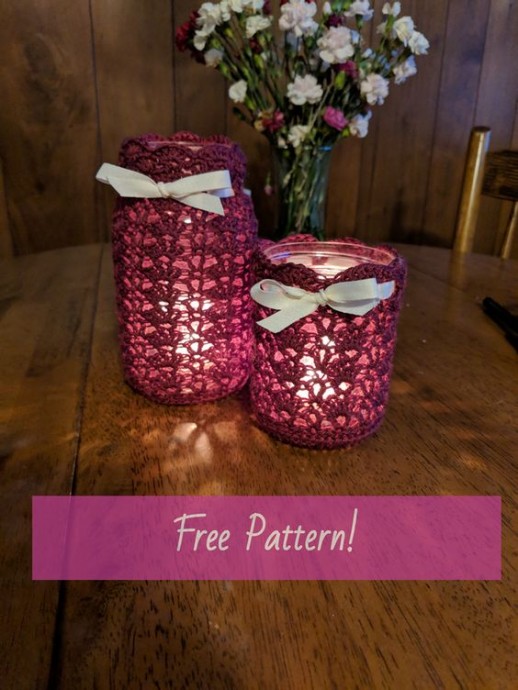
Crochet Lace Mason Jar Covers

Crochet lace mason jar covers are a delightful way to add a touch of charm and elegance to your home decor. These intricately designed covers not only protect your jars but also give them a cozy and stylish makeover. Whether you're using them to hold candles, flowers, or storing small items, the delicate lace patterns bring a sense of warmth and creativity.
The handmade nature of these covers adds a personal touch to your space, making them perfect for gifts or special occasions. So, why not give your mason jars a makeover with these lovely crochet lace covers and enjoy a touch of whimsy in your everyday life!Materials;
- 4 mm crochet hook
- Light (3) Yarn – I used Mary Maxim Fresh
- 1 quart jar and/or 1 pint jar (wide mouth works as well)
- Yarn Needle
- Ribbon (if desired)
Abbreviations:
- SC : Single Crochet
- DC: Double Crochet
- HDC: Half Double Crochet
- SL ST: Slip Stitch
- BLO: Back Loop Only
- V-Stitch: (dc, ch 1, dc) in same stich
Quart Size Pattern:
Row 1: 8 hdc in a magic circle, sl st to join to first hdc (8)
Row 2: Ch 1, 2 hdc in ea st around. Join first hdc with sl st (16)
Row 3: Ch 1, *1 hdc in first st, 2 hdc in next st* rep to end, sl st to join (24)
Row 4: Ch 1, *hdc in the next 2 st, 2 hdc in the next st* rep to end, sl st to join (32)
Row 5: Ch 2, *dc in the next 3 st, 2 dc in the next st* rep to end, sl st to join (40)
Row 6: Ch 2, * dc in the next 4 st, 2 dc in the next st* rep to end, sl st to join (48)
Row 7: Ch 1, sc in blo each st across, sl st to join (48)
Row 8: Ch 4 (counts as dc + ch 1), dc in same stich, *skip 2 st, V-stitch in the next *rep to last three st, skip last 3 st, join with sl st to ch 3 on starting chain.
Row 9: Ch 1, *sc in ch 1 of v-stitch, 5 dc in center of next v-stitch* rep to final V-stitch, sc in center of v-stitch, sl st to first sc.
Row 10: Ch 4 (counts as dc + ch 1), dc in same stich, *skip 2, V-stitch in the next sc (top of the shell), skip 2 st, V-stitch in the sc between the shells*rep to end, sl st to join.
Row 11: Ch 1, *sc in ch 1 of v-stitch, 5 dc in center of next v-stitch* rep to final V-stitch, sc in center of v-stitch, sl st to first sc.
Rep Row 10-11 (ending on row 11) 8 more times or to your desired height. (20 total rows of the V Stitch/ Shell Pattern)
Optional: Thread ribbon through row of V-stitches at the mouth of the jar.
Pint Size Pattern:
Row 1: 6 hdc in a magic ring (6)
Row 2: Ch 1, 2 hdc in each st across (12)
Row 3: Ch 1, 2 hdc in each st across (24)
Row 4: Ch 2, *dc in the next st, 2 dc in the next* rep to end, sl st to join (36)
Row 5: Ch 1, hdc blo in each st across (36)
Row 6: Ch 4 (counts as dc + ch 1), dc in same stich, *skip 2 st, V-stitch in the next *rep to last three st, skip last 3 st, join with sl st to ch 3 on starting chain.
Row 7: Ch 1, *sc in ch 1 of v-stitch, 5 dc in center of next v-stitch* rep to final V-stitch, sc in center of v-stitch, sl st to first sc.
Row 8: Ch 4 (counts as dc + ch 1), dc in same stich, *skip 2, V-stitch in the next sc (top of the shell), skip 2 st, V-stitch in the sc between the shells*rep to end, sl st to join.
Row 9: Ch 1, *sc in ch 1 of v-stitch, 5 dc in center of next v-stitch* rep to final V-stitch, sc in center of v-stitch, sl st to first sc.
Rep Row 8-9 (ending on row 9) 7 more times or to your desired height. (18 rows of the V-Stich/ Shell pattern)
Optional: Thread ribbon through row of V-stitches at the mouth of the jar.
Tips / Notes: Keep in mind the tension of your stitches. I would recommend keeping your stitches loose so that it doesn’t fit quite as snug on the jar but snug enough that it doesn’t slide down. (The ribbon can help with this if yours ends up too loose.
