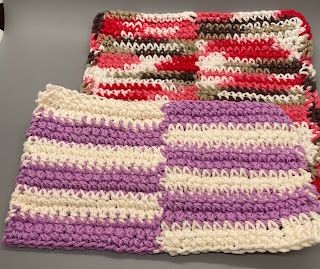
Discover the art of creating a unique and practical crochet dishcloth in the shape of a rectangle square. This delightful project combines the classic technique of crochet with a modern twist, resulting in a versatile and stylish addition to your kitchen essentials. The crochet rectangle square dishcloth offers a larger surface area compared to traditional square or circular dishcloths, allowing for more efficient cleaning and wiping.
Its rectangular shape provides a comfortable grip, making it easier to maneuver and tackle those stubborn stains on your dishes and countertops.
Materials:
2 colors of size 3 or 4 cotton yarn
Size g hook
scissors
yarn needle
Foundation row: chain 15 with Color A, pick up Color B and chain 16 more. 31 chains total in the foundation chain.
Row 1: sc in the second chain from the hook, sc in the next 13 chains, sc in the next chain and change back to Color A. You do this by starting the sc in Color B and doing the final yarn over in Color A, Move Color B to the front of the work (that way when you change back to this color the yarn will be in the back to pick up later.) sc in the remaining 15 chains. ch 1 and turn
Row 2:sc in the next 15 sc, change back to Color B on the 15th sc, move Color A to the front of the work, sc in the remaining 15, ch 1and turn
Row 3: sc in the next 15 sc, change back to Color A on the 15th sc.
You have two options at this point. one it to cut off Color B and sc in the remaining scs. The other is to float the Color B yarn back to the end of the row. You do this by putting Color B yarn on top of the remaining scs and sc around the yarn with Color A. The video tutorial will show how to float the yarn. Change to Color B at the last sc, ch 1, and turn.
Row 4: You will either have to cut or float Color A. sc in the next 15 sc, change to Color A on the 15th sc, move Color B to the front of the work, sc in the remaining 15, ch 1and turn
Row 5: sc in the next 15 sc, change back to Color B on the 15th sc, move Color A to the front of the work, sc in the remaining 15, ch 1and turn
Row 6: sc in the next 15 sc, change back to Color A on the 15th sc. Either cut Color B or float it to the end of the row.
Repeat rows 4-6 for a total of 30 rows or the desired length of a scarf
.
For the border, sc evenly around doing 3 sc in the corners and sc in every row (if the sides) and every stitch (top and bottom). You could do one of the colors for the border, or in the video tutorial, I have used the opposite color for every color the border touches. You would just float the color you are not using.

