Crochet Braided Headband {Tutorial}

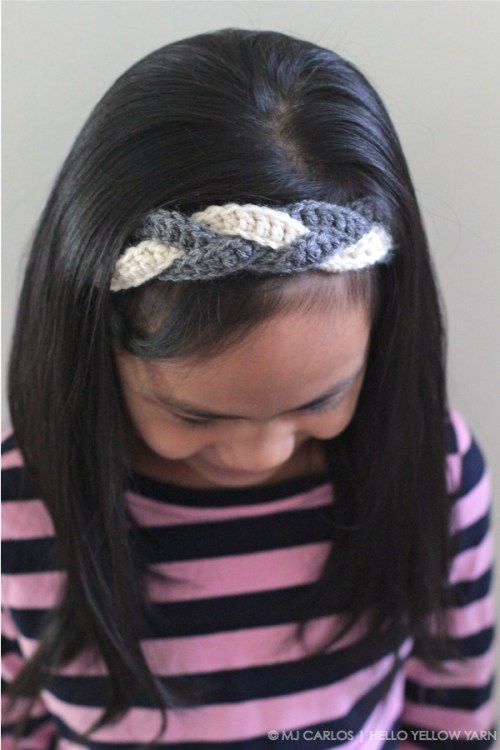
Step up your style game with the trendy and versatile Crochet Braided Headband! This fabulous accessory is a must-have for fashion-forward individuals who want to add a touch of elegance to their everyday look. Crafted with love and care, this headband is meticulously hand-crocheted using high-quality yarn, ensuring both durability and comfort.
The intricate braided design adds a unique and eye-catching element to your hairstyle, making it the perfect accessory for any occasion. Made with love and attention to detail, the Crochet Braided Headband is not only a fashion statement but also a practical accessory. The soft and stretchy material ensures a comfortable fit, allowing you to wear it all day without any discomfort. The intricate crochet braided pattern adds a touch of sophistication and elegance to any hairstyle, whether you choose to wear your hair up or down. With its versatility and timeless appeal, this headband is a must-have addition to your accessory collection. So why wait? Embrace your inner fashionista and let the Crochet Braided Headband take your style to new heights!You will need:
1 or 2 balls of yarn in your choice of colour/s and weight
Crochet hook (correct size for the yarn you’re using)
Scissors
Yarn Needle
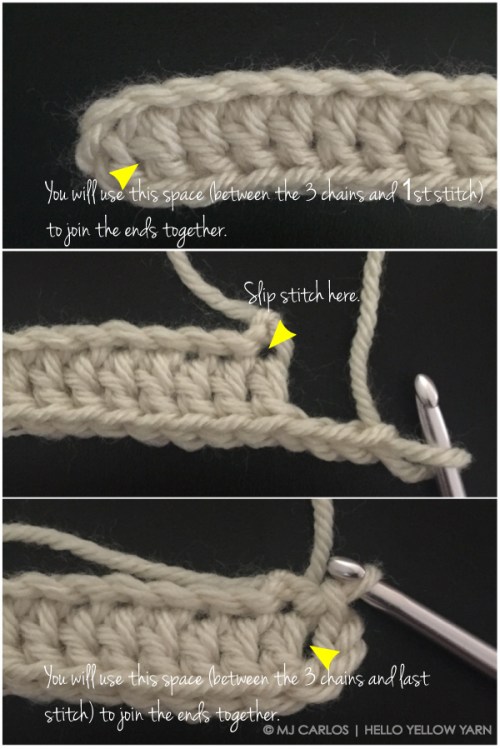
Child Size:Make a series of chains that will measure about 19.5″/50cm long (from the 1st chain to the last chain). Skip the first 3 chains and work 1 double crochet (US term) in each of the next chain stitches until the end. Chain 3 then slip stitch to the base (foundation chain – refer to below photo to see where you need to make your slip stitch). Fasten off, make a knot and weave in yarn tail.
**Make 3 strips, ensure to leave one strip with a long tail (about 15″/40cm) for sewing.**
Adult size:Same method as above however your chains will need to measure about 23″/59cm long.
**Make 3 strips, ensure to leave one strip with a long tail (about 15″/40cm) for sewing. **
NOTES:
- Use foundation double crochet method if you know how rather than making single chains at the start
- I used 8 ply yarn and 4mm crochet hook for this headband – I ended up with 83 chains to measure 19.5″
- Don’t make the braids too tight or too loose – a nice, relaxed tension will do
Once you’ve made the 3 strips, it’s time to braid the headband.

At the start we skipped the first 3 chains then worked double crochets in each chain stitch along and at the end we chained 3 – we will use the spaces between the chains and stitches to join the ends together.

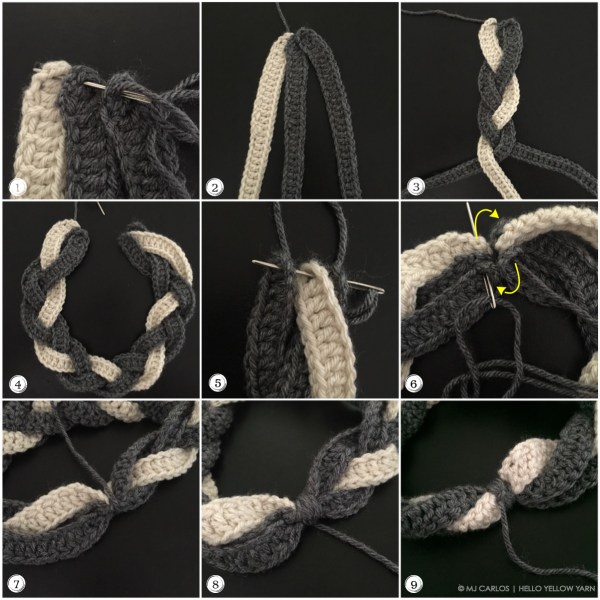
- Gather your strips and using the long sewing yarn tail, sew through all 3 strips on one end (sew through between those 3 chains and stitches).
- Place your strips on a flat surface. Put a little heavy weight on top so the strips don’t move (optional).
- Braid the strips together all the way to the end.
- Bring the 2 ends of the headband together.
- Using the same sewing yarn tail, sew through all 3 strips of the other end (sew through between the 3 chains and stitches).
- Sew the ends together by weaving the tail in and out through both ends of the strips about 5 times.
- Wrap the tail tightly in the middle about 6 – 8 times.
- Sew the yarn tail through the back.
- Make a tight knot to secure it. Hide yarn tail and snip excess yarn.

