Crochet Ruffle Crop Top Guide: Materials, Techniques, and Instructions


The crochet ruffle crop top is the perfect blend of comfort and style for sunny days ahead! With its charming ruffle detailing and lightweight crochet fabric, this top is a fun and versatile piece to add to your wardrobe. Whether you pair it with high-waisted shorts for a casual beach day or dress it up with a flowy skirt for a weekend brunch, this top is sure to turn heads and bring a smile to your face.
Materials
YARN: DROPS LOVES YOU 7, yarn group A, color 36
Hook: 4 mm/G-6
Yarn Needle, Scissors, Measuring Tape, Stitch Markers
Size
Small
Stitch Key (US terminology)
ch = chain
st = stitch
sts = stitches
sl st = slip stitch
sl sts = slip stitches
sc = single crochet
dc = double crochet
sc2tog = single crochet two stitches together
2 sc = two single crochets in the same stitch
Specialty Stitch & Technique Key
Lemon Peel Stitch:
Chain even number of chains.
Row 1: 1 sc in second ch from hook, *1 dc in next ch, 1 sc in next ch; rep from * to end.
Row 2: ch 2, turn. 1 dc in first stitch, *1 sc in next stitch, 1 dc in next stitch; rep from * to end.
Row 3: ch 1, turn. 1 sc in first stitch, *1 dc in next stitch, 1 sc in next stitch; rep from * to end.
Repeat rows 2 and 3 for the pattern.
Notes
The top is made of a front panel and a back panel.
It’s crocheted from bottom to top.
First, you will make the front panel, then the back panel. For the back panel you will start where the ruffle part begins (that’s 10 rows less than for the front panel for the length) and will crochet the ruffle part when the upper part of the back panel is finished. Then you will sew together on shoulders and body sides, finishing with the neckline and one round of scs around the armhole.
If you want the top to be longer, just add rows on the front and back panel.
Instructions
Front Panel
Ch 96
Row 1: working in back bumps of the chain. 1 sc in second ch from hook, *1 dc in next ch, 1 sc in next ch; rep from * to end.
Row 2: ch 2, turn. 1 dc in first st, *1 sc in next st, 1 dc in next st; rep from * to end.
Row 3: ch 1, turn. 1 sc in first st, *1 dc in next st, 1 sc in next st; rep from * to end.
Repeat rows 2 and 3 until row 40.
Size S
Decreasing for the armhole depth:
Row 41: ch 1, turn. Sl st in next 2 sts, ch 1, *1 sc in next st, 1 dc in next st* until 2 sts remain.
Row 42: ch 1, turn. Sl st in next 2 sts, ch 2, *1 dc in next st, 1 sc in next st* until 2 sts remain.
Row 43: ch 1, turn. Sl st in next 2 sts, ch 1, *1 sc in next st, 1 dc in next st* until 2 sts remain.
Row 44: ch 1, turn. Sl st in next 2 sts, ch 2, *1 dc in next st, 1 sc in next st* until 2 sts remain.
Row 45: ch 1, turn. Sl st in next 2 sts, ch 1, *1 sc in next st, 1 dc in next st* until 2 sts remain.
Row 46: ch 2, turn. 1 dc in first st, *1 sc in next st, 1 dc in next st; rep from * to end.
Row 47: ch 1, turn. 1 sc in first st, *1 dc in next st, 1 sc in next st; rep from * to end.
Repeat rows 46 and 47 until row 67.
Right Side of the Neck Hole:
With a stitch marker mark 25th st from left and right side of row 67.
Row 68: ch 1, turn. 1 sc in first st, *1 dc in next st, 1 sc in next st; rep from * to the stitch marker.
Row 69: ch 1, turn. Sl st in next 15 sts, ch 1, sc in 10 remaining sts.
Finish off.
Left Side of the Neck Hole:
Attach the yarn in 25th st where the stitch marker is.
Row 68: ch 1. 1 sc in first st, *1 dc in next st, 1 sc in next st; rep from * to end.
Row 69: ch 1, turn. Sc in next 10 sts.
Finish off.
Back Panel
Repeat the instructions from the front panel until row 30:
Ch 96
Row 1: working in back bumps of the chain. 1 sc in second ch from hook, *1 dc in next ch, 1 sc in next ch; rep from * to end.
Row 2: ch 2, turn. 1 dc in first st, *1 sc in next st, 1 dc in next st; rep from * to end.
Row 3: ch 1, turn. 1 sc in first st, *1 dc in next st, 1 sc in next st; rep from * to end.
Repeat rows 2 and 3 until row 30.
From row 31 repeat the instructions for armhole depth decreasing from the front panel. Rows 41 – 45 from the front panel. For the back panel the rows will be 31 – 35.
Row 36: ch 2, turn. 1 dc in first st, *1 sc in next st, 1 dc in next st; rep from * to end.
Row 37: ch 1, turn. 1 sc in first st, *1 dc in next st, 1 sc in next st; rep from * to end.
Repeat rows 36 and 37 until row 58.
Right Side of the Neck Hole:
With a stitch marker mark 10th st from left and right side of row 58.
Row 59: ch 1, turn. 1 sc in first st, *1 dc in next st, 1 sc in next st; rep from * to the stitch marker.
Finish off.
Left Side of the Neck Hole:
Attach the yarn in 10th st where the stitch marker is.
Row 59: ch 2, 1 dc in first st, *1 sc in next st, 1 dc in next st; rep from * to end.
Finish off.
Bottom of the Back Panel:
Attach the yarn in the 1st chain of the foundation chain:


Row 1: ch 1, 1 sc in 1st st, *2 sc in next st, 1 sc in next st* repeat from * to end, finishing with 1 sc in the last st.
Row 2: ch 1, turn. 1 sc in 1st st, *1 dc in next st, 1 sc in next st; rep from * to end, finishing with a dc in the last st.
Repeat row 2 until row 10. You will have a total of 69 rows on the back panel.
Assembling
Place the panels on top of each other with the right sides facing.
Sew the shoulders together with a sl st.
Sew the body sides together with a sl st.
Neckline
Round 1: Right side facing you, attach the yarn in the center st of the neck hole on the back panel, ch 1 and work scs around the neck hole. Sl st in the 1st st of this round.
Round 2: you will be working into the front loop only! Ch 1, turn. 1 sc in first st, *1 dc in next st, 1 sc in next st; rep from * to end. Sl st in the 1st st of this round. The last st has to be dc, so you continue the pattern sc, dc, sc, dc… if it’s not, then undo one st (sc) or add a dc. Test what works better for you.
Round 3: ch 1, turn. Work 1 sc on the top of the dc of previous round, *1 dc in next st, 1 sc in next st; repeat from * to the end of the round. Sl st in the 1st st of this round.
Finish off.
Armholes
Right side facing, attach the yarn near the side seam on the armpit area and work scs evenly across. This round of scs has to be a bit tighter, so it looks like you are slightly decreasing in this round. Sl st at the end of the round to join.
Finish off.
- Recipes
-
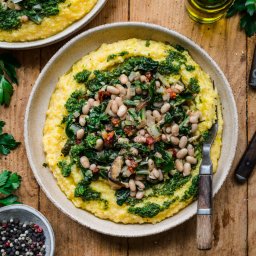 Polenta with Vegetables and White Beans
-
 Baked Cauliflower With Cheese
-
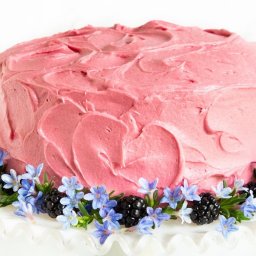 Vanilla Bean Cake with Blackberry Buttercream
- Funny Pictures
-
 Funny Dad Memes to Laugh At
-
 Have Some With These Memes Today
-
 Some Dog Snaps to Enjoy
- Crochet Ideas
-
 Crochet Summer Hat
-
 Crochet Zigzag Hat
-
 Crochet Baby Loafers
- Lifehacks
-
 How To Patch Jeans With Crochet Lace
-
 Crochet Sunburst (Sunflower) Granny Square Pattern
-
 How to Crochet the Plaid Stitch Photo Tutorial
- DIY
-
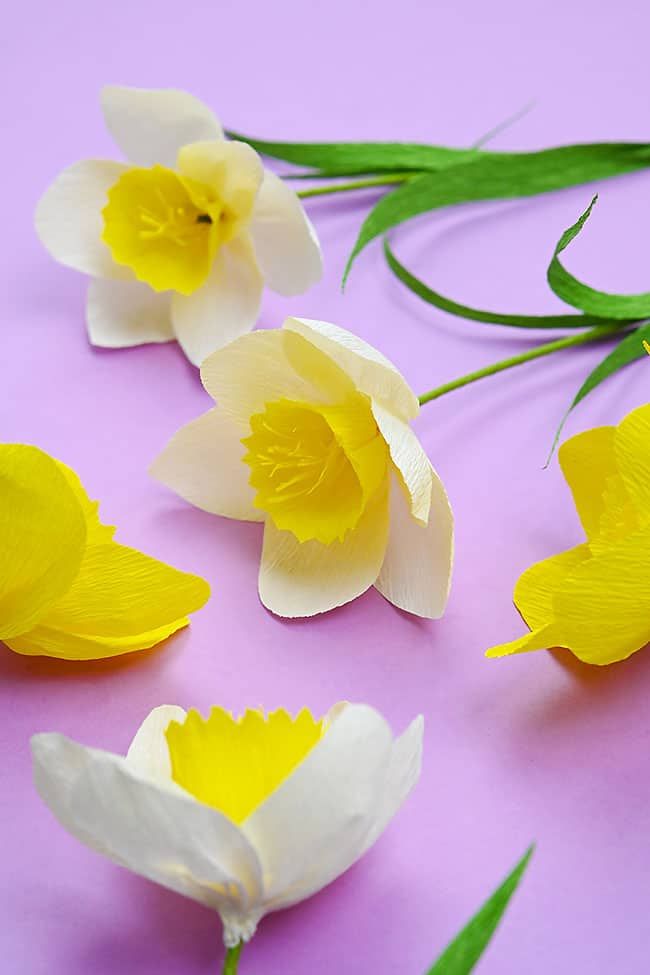 Crepe Paper Daffodils
-
 DIY Seashell Hair Pins
-
 Crochet Smiling Flowers
- Knitting Ideas
-
 Knitted Lake Diamond Tank Top
-
 Knitted Beautiful Scarf
-
 Knitted Twist and Shout Scarf
Where are the instructions for different sizes?