Crochet Matryoshka Russian Nesting Doll
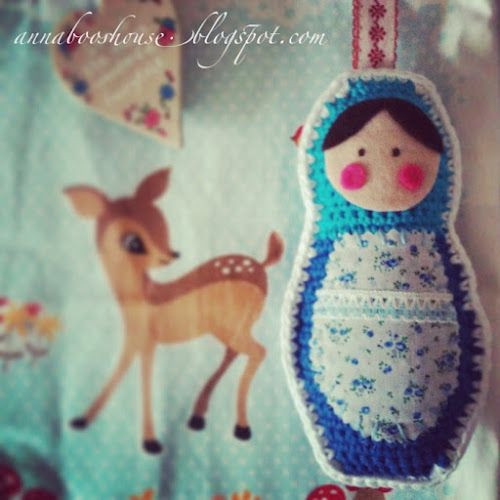
The Crochet Matryoshka Russian Nesting Doll is not only cute but also a fun and unique twist on the classic Russian nesting dolls. This doll is meticulously crafted with colorful yarn, creating a cozy and handmade feel that adds a special touch to any decor. Whether you're a fan of crochet or simply love one-of-a-kind decorations, this charming set of nesting dolls is sure to bring a smile to your face.
You'll need:
3 different colours of yarn and hook to match. (I used Rico Creative Cotton and 4 mm hook)
Polyester toy stuffing
Felt for the face, hair and cheeks
Fabric for the skirt
Fabric marker pen for the eyes (or you could stitch them)
Ribbon
Stitches and Abbreviations:
I use US terms, so single crochet= same as UK double crochet here.
Chain (ch)
Single crochet (sc)
Stitches (sts)
Single Crochet 2 Together (sc2tog)
To single crochet 2 together:
Insert hook into next stitch.
Yarn over, pull up a loop. (2 loops on hook)
Insert hook into next stitch.
Yarn over, pull up a loop (3 loops on hook)
Yarn over and pull through all 3 loops.
Pattern (make 2)
[Starting from bottom and working up]
At the end of each row you need to turn and ch 1
1. Sc 9
2. Sc 8, 2scs in next st (10)
3. Sc 9, 2scs in next st (11)
4. Sc 10, 2scs in next st (12)
5. Sc 11, 2scs in next st (13)
6. Sc 12, 2scs in next st (14)
7. Sc 13, 2scs in next st (15)
8. Sc 14, 2scs in next st (16)
9. Sc 15, 2scs in next st (17)
10-12. Sc 17
13. Sc 15, sc2tog (16)
14. Sc 16
15. Sc2tog, sc 14 (15)
16. Sc 15
17. Sc2tog, sc 13 (14)
18. Sc2tog, sc 12 (13)
19. Sc 13
Change colour
20. Sc2tog, sc 11 (12)
21. Sc2tog, sc 10 (11)
22. 2scs in next st, sc 10 (12)
23. 2scs in next st, sc 11 (13)
24-26. Sc 13
27. Sc2tog, sc 11 (12)
28. Sc2tog, sc 10 (11)
29. Sc2tog, sc 9 (10)
30. Sc2tog, sc 8 (9)
31. Sc2tog, sc 5, Sc2tog (7)
32. Sc2tog, sc 3, Sc2tog (5)
Fasten off
Choose one of your pieces of crochet and ensure that the tail from the beginning chain is hanging to the bottom right. Sew in all the tails, except this tail so you know which is the 'right' way round.
Cut a circle of felt for the face (I found a spice jar lid to be the perfect template) and cut hair and cheek shapes. Use PVA glue to stick the pieces together and to stick the face onto your crochet.
I added the eyes using a fabric marker pen.
Now cut the shape for the skirt using pinking shears. This took me a few goes to get right. You could stick this onto the crochet, or like me, you could stitch it on. Up to you.
Let the glue dry.
Put the two pieces of crochet together so that both the tails from your starting chain hang down at the right side. This means that the stitches will match exactly and make life easier when crocheting together.
Now use your third colour and single crochet around both pieces to join together. Make sure you work in anti-clockwise direction so your stitches face forwards.
Before you completely close, stuff with toy stuffing, sew in the remaining ends and then complete your stitching and fasten off.
Attach a ribbon to the back.

