Create Your Own Amigurumi Polar Bear: A Step-by-Step Crafting Guide
Introduction
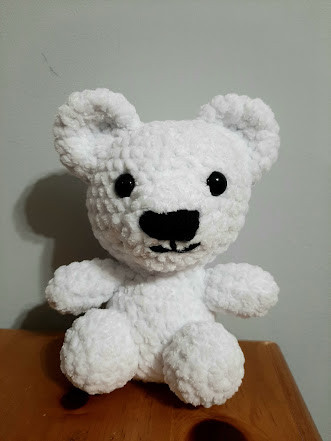
Crocheting an Amigurumi Polar Bear can be a delightful and rewarding experience for crafters of all levels. These cute creations are perfect for cuddling or decorating your space with a touch of whimsy. With their fluffy white yarn and adorable features, they are sure to bring a smile to anyone's face.
Materials
- Less than 90 yards of white yarn of your choice (I used “Baby Bee Adore-A-Ball” in the color “Angel”)
- Recommended hook size for your yarn (I used a 7mm hook)
- Yarn needle
- Safety eyes of your choice (I used 14 mm)
- Polyester Fiberfill
- Stitch Marker (optional)
Abbreviations Used
- Sc: Single Crochet
- Inc: Increase
- Dec: Decrease
- St: Stitch
- BLO: Back loops only
- FO: Fasten off
Other Pattern Notes
- Gauge isn’t important for this project! Your bear will be bigger or smaller depending on the type of yarn and hook size you use.
- Uses US crochet terms
- Worked in continuous rounds
- If you use a stitch marker, move it up each round
Head and Body
- Round 1: 6 sc in a magic ring (6)
- Round 2: Inc in each st around (12)
- Round 3: Sc, inc, repeat around (18)
- Round 4: 2 sc, inc, repeat around (24)
- Round 5: 3 sc, inc, repeat around (30)
- Round 6: 4 sc, inc, repeat around (36)
- Rounds 7-12: sc around (36)
- Round 13: 4 sc, dec, repeat around (30)
- Round 14: 3 sc, dec, repeat around (24)
- Insert Safety eyes between rounds 9 and 10, 6 stitches apart.
- Stuff head.
- Round 15: 2 sc, dec, repeat around (18)
- Round 16: sc, dec, repeat around (12)
- The head is now done. Continue on to make the body.
- Round 17: sc around (12)
- Round 18: sc, inc, repeat around (18)
- Round 19: 2 sc, inc, repeat around (24)
- Rounds 20-24: sc around (24)
- Stuff the body.
- Round 25: 2 sc, dec, repeat around (18)
- Round 26: In BLO, sc, dec, around (12)
- Add more stuffing if needed.
- Round 27: In both loops now, dec around (6)
- FO and sew hole closed. Weave in ends.
Legs (Make 2)
- Round 1: 6 sc in a magic ring (6)
- Round 2: inc in each st around (12)
- Round 3: 3 sc, inc, repeat around (15)
- Round 4: 3 sc, dec, repeat around (12)
- Round 5: 2 sc, dec, repeat around (9)
Arms (Make 2)
- Round 1: 6 sc in a magic ring (6)
- Round 2: inc in each st around (12)
- Round 3: 2 sc, dec, repeat around (9)
- Rounds 4-6: sc in each st around (9)
- Round 7: sc, dec, repeat around (6)
- Stuff lightly, fold in half and crochet the two sides together.
- FO, leaving a long tail for sewing.
Muzzle
- Round 1: 6 sc in magic ring (6)
- Round 2: inc in each st around (12)
- Round 3: sc, inc, repeat around (18)
- Round 4: sc around (18)
- FO, leaving a long tail for sewing.
Tail
- Round 1: 6 sc in a magic ring
- Round 2: inc, around (12)
- Round 3: sc around (12)
- Round 4: 2 sc, dec, repeat around (9)
- Round 5: sc around
- Stuff and FO leaving a long tail for sewing.
Ears (Make 2)
- Round 1: 6 sc in a magic ring
- Round 2: inc in each st around (12)
- Round 3: sc, inc, repeat around (18)
- Rounds 4-5: sc around (18)
- Round 6: sc, dec, repeat around (12)
- FO, leaving a long tail for sewing.
Assembly
Use the pictures as a guide to help you:
- Sew ears to head.
- Sew nose onto muzzle using black yarn.
- I didn't do this on mine, but if you wanted you could add eyelashes by stitching them on with black yarn.
- Sew tail onto body.
- Sew legs onto body.
- Sew arms onto body.
No comments
Write a comment

