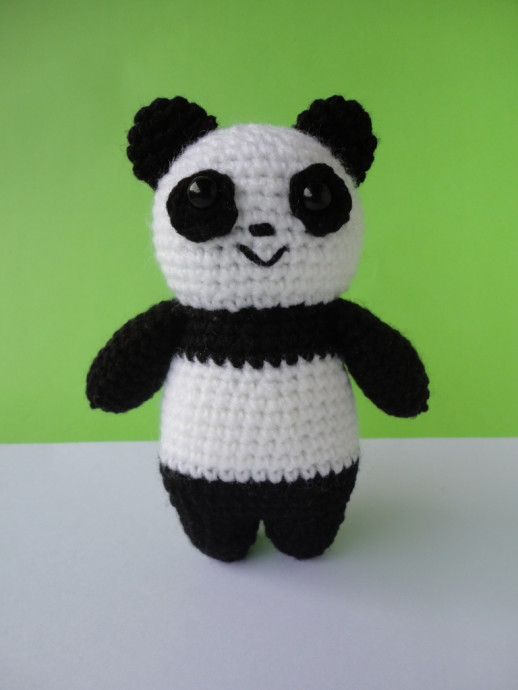
Crochet Panda Bear

Crocheting a panda bear is such a delightful and charming project! The soft black and white yarn creates the perfect contrast to bring these adorable creatures to life. With just a few simple stitches and some creativity, you can craft your very own cuddly panda friend. Whether you're making it as a gift for a loved one or simply to add some cuteness to your home decor, this crochet panda bear is sure to bring a smile to anyone who sees it.
GET INTO THE PATTERN INFO:
- The pattern is worked in spiral rounds.
- Use stitch marker to mark each end of the round to stay on track. Make sure to have exact number of stitches (seen on third column) each round.
- Fill in Fiberfill gradually and firmly to achieve preferred shape. For the arms, fill small amount of Fiberfill.
MATERIALS/TOOLS
4-ply Acrylic Yarn in White and Black
2.5mm hook
Fiberfill
6mm safety/amigurumi eyes
Yarn needle
Scissors
Stitch Marker
ABBREVIATIONS (US Terms)
R – Row
SC – Single Crochet
INC – Increase (2 sc in 1 stitch)
DEC – Decrease (2 stitches in 1 sc)
SL ST – Slip Stitch
***Watch out for the changing of colors – Black and White.
Gauge: 6 sc X 1 in (Make sure to have tight stitches)
LEGS
R1 Magic Ring of 6 sc 6
R2 Inc all around 12
R3 Sc all around 12
R4 Sc all around, 2 sl st 12
Fasten off. Cut a yarn tail long enough for sewing to the other leg.
For the 2nd leg, repeat R1-R4. Fasten off then cut. Sew to combine the legs’ last sl st together.
Continue to work for the body upward.
BODY
Start at the end of the slip st. 1 slip knot.
R5 Sc all around on 2 legs 24
R6 1 sc, inc * repeat 12x 36
R7-R8 Sc all around (2 rows repeat) 36
Change to white yarn
R9-14 Sc all around
R15 4 sc, dec * repeat 6x 30
R16 Sc all around 30
Change to black yarn
R17 Sc all around
R18 4 sc, dec * repeat 5x 25
R19 Sc all around 25
R20 3 sc, dec * repeat 5x 20
Fasten off and cut. Continue to work for the head upward. As you crochet along the pattern, fill the legs and body with Fiberfill enough to build the shape.
HEAD
Note: Before proceeding to R31, attach eyes and sew eye patch. Insert the eyes in the hole between R27 and R28, with 6 sc apart.
Change to white yarn
R21 FLO inc all around 40
R22 38 sc, dec 39
R23 37 sc, dec 38
R24-27 Sc all around (6 rows repeat) 38
R28 36 sc, dec 37
R29 35 sc, dec 36
R30 4 sc, dec * repeat 6x 36
R31 3 sc, dec * repeat 6x 30
R32 2 sc, dec * repeat 6x 30
R33 1 sc, dec * repeat 6x 24
R34 Dec * repeat 6x 24
Fill the head with Fiberfill enough to stand its shape. Fasten off and weave ends inside to hide.
EYE PATCH (make 2)
R1 Magic Ring of 6 sc 6
R2 Inc * repeat 2x, 2 sl st –
Cut a yarn tail long enough to sew the eye patch to the face. Insert the Safety eye in the main hole of the Magic Ring. Attach the eyes and sew eye patch. Insert the eyes in the hole between R27 and R28, with 6 sc apart.
ARMS (make 2)
R1 Magic Ring of 6 sc 6
R2 Inc all around 12
R3 3 sc, inc * repeat 3x 15
R4-8 Sc all around (6 rows repeat) 15
R9 3 sc, dec * repeat 3x 12
R10 Sc all around
Fasten off. Cut a long tail for sewing the parts to the body. Make 2 Hands. Add Fiberfill inside, enough for fluffiness.
EARS (make 2)
Use Black Yarn
R1 Magic Ring of 6 sc 6
R2 Inc all around 12
R3-4 Sc all around (2 rows repeat) 12
Fasten off. Cut a long tail for sewing parts to the top of the head. Make 2 Ears.
ASSEMBLE
1 Attach the 2 ears on the upper 2 sides of the head. Sew the ends. Fasten off, then weave to hide the yarn tail.
2 Sew the arms on R19 and R20 on the 2 sides of the body. Fasten off, make sure to hide the yarn tail. (You can attach arms before proceeding to R27.
3 Embroider the nose 2 times in between R5 and R6, between the two eyes.
4 Continue to embroider the mouth in V-shape as seen in the illustration. Fasten off, hide the yarn tail to hide and cut.


