Crochet Adorable Dragon
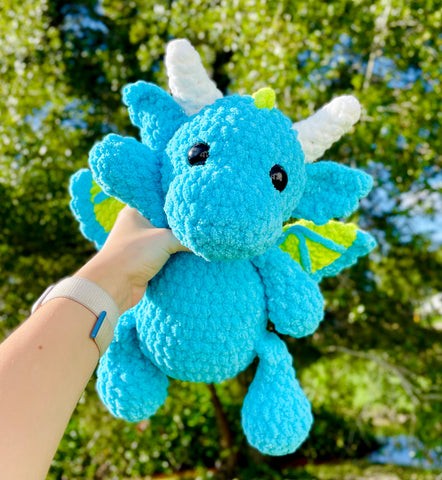
Crocheting an adorable dragon can be such a fun and rewarding project! Not only does it allow you to unleash your creativity and imagination, but it also results in a cute and unique addition to your collection of handmade items. Adding your personal touch with different colors and details can make your dragon truly one-of-a-kind.
Materials:
- Weight 6 yarn
- Size J/6.0mm
- Stuffing
- Safety Eyes or felt eyes
- Yarn needle
- Stitch Marker
Abbreviations:
- sc = single crochet
- dc = double crochet
- hdc = half double crochet
- inc = increase (2 sc in next stitch)
- dec = invisible decrease (sc 2 stitches together)
- st = stitch
- FO = fasten off
This pattern uses weight 6 blanket yarn. Any yarn may be used, but your crochet hook size will be different. Use a hook 1-2 sizes smaller than your yarn calls for. This pattern is in US crochet terms.
This pattern is worked in continuous rounds and using a stitch marker to mark the first stitch is recommended.
*Safety eyes are NOT recommended for children who are three years old or younger.
The Dragons pictured in the pattern are made with Big Twist and Bernat Blanket Yarn.
Legs (Make 2)
R1: 8 sc in a magic ring
R2: 8 inc (16)
R3-5 (3 rounds): 16 sc
R6: (2 sc, dec) x 4 (12)
R7: (2 sc, dec) x 3 (9)
R8-10 (3 rounds): 9 sc
Stuff up to round 7 only. Fold in half and 4 sc across to close. Do not leave a long tail – we will be crocheting these directly onto the body below.
Arms (Make 2)
R1: 6 sc in a magic ring
R2: 6 inc (12)
R3-4 (2 rounds): 12 sc
R5: (2 sc, dec) x 3 (9)
R6-7 (2 rounds): 9 sc
Stuff up to round 5 only. Fold in half and 4 sc across to close. Do not leave a long tail – we will be crocheting these directly onto the body below.
Body
R1: 8 sc in a magic ring
R2: 8 inc (16)
R3: (1 sc, inc) x 8 (24)
R4: (3 sc, inc) x 6 (30)
R5: (4 sc, inc) x 6 (36)
R6: 36 sc
R7: 8 sc, 4 sc with the first leg, 12 sc, 4 sc with the second leg, 8 sc
R8-10 (3 rounds): 36 sc
R11: (4 sc, dec) x 6 (30)
R12: 30 sc
R13: (3 sc, dec) x 6 (24)
*Depending on your tension, you may have to adjust where you sc the arms on. Just make sure they line up with the legs.*
R14: 6 sc, 4 sc with the first arm, 7 sc, 4 sc with the second arm, 3 sc (24)
R15: (1 sc, dec) x 8 (16)
Fasten off and leave a long tail for sewing.
Head
R1: Chain 7. Beginning in the second chain from the hook, 5 sc down the chain, inc. Continuing in the back of the chain, 5 sc, inc. (14)
R2: Inc, 5 sc, 2 inc, 5 sc, inc (18)
R3: 2 inc, 5 sc, 4 inc, 5 sc, 2 inc (26)
R4: 26 sc around
R5: 2 dec, 5 sc, 4 dec, 5 sc, 2 dec (18)
R6: (2 sc, inc) x 6 (24)
R7: (3 sc, inc) x 6 (30)
R8: (4 sc, inc) x 6 (36)
R9-14 (6 rounds): 36 sc
Attach the eyes between rounds 7-8 about 7 visible stitches apart.
R15: (4 sc, dec) x 6 (30)
Stuff the snout firmly. Start stuffing the head and keep stuffing firmly as you go.
R16: (3 sc, dec) x 6 (24)
R17: (2 sc, dec) x 6 (18)
R18: (1 sc, dec) x 6 (12)
R19: 6 dec (6)
Fasten off and sew hole shut.
Tail
R1: 4 sc in a magic ring
R2: (1 sc, inc) x 2 (6)
R3: (2 sc, inc) x 2 (8)
R4: (3 sc, inc) x 2 (10)
R5: 3 sc, 3 inc, 4 sc (13)
R6: 13 sc
R7: 3 sc, 6 inc, 4 sc (19)
R8: 19 sc
R9: 6 sc, 7 inc, 6 sc (26)
R10: 26 sc
Stuff, fasten off, and sew onto the back of the body about 3 rounds up from the bottom of the dragon.
Horns (Make 2)
R1: 4 sc in a magic ring
R2: inc, 3 sc (5)
R3: sc, inc, sc, dec (5)
R4: sc, inc, inc, 2 sc (7)
R5: 2 sc, inc, 2 sc, dec (7)
R6: 2 sc, inc, inc, 3 sc (9)
R7: 9 sc around
Fasten off and leave a long tail for sewing. Attach the horns to the head at approximately rows 11-13 , directly behind each eye (the horns should be about 8 stitches apart from each other).
Gills (Make 2)
R1: Chain 7. Beginning in the second chain from the hook, 6 sc down the chain.
R2: Chain 1, turn. 5 sc.
R3: Chain 1, turn. 5 sc.
R4: Chain 1, turn. 4 sc.
Fasten off, leave a long tail for sewing, and sew onto the head directly beneath each horn.
Spike
With a secondary color, insert your hook into the top of the head of the dragon and make a slip knot in between the horns.
Surface crochet *3 hdc, sl st* down the back of the dragon. Fasten off and weave in your ends.
Wings (Make 2):
In secondary color:
R1: 6 sc in a magic ring
R2: 6 inc (12)
R3: (1 sc, inc) x 6 (18)
R4: (2 sc, inc) x 6 (24)
R5: (3 sc, inc) x 6 (30)
R6: (4 sc, inc) x 6 (36)
Change to primary color:
Fold wing in half. We are going to crochet through BOTH sides, closing it while adding the frill at the same time:
Work *3 hdc in the same stitch, sl st* until the wing is shut, ensuring you went through every stitch.
Embroider 3 little lines in the primary color if desired.
Fasten off, leave a long tail for sewing, and sew each wing onto the back of the dragon at round 12-13 of the body.

