Crochet Sunflower Bookmark
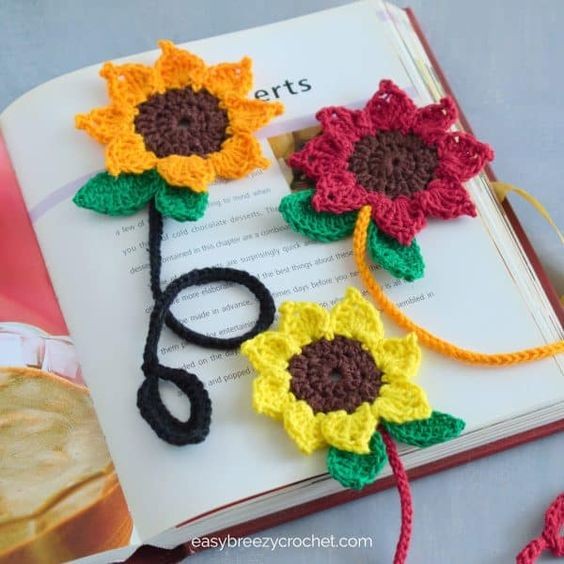
When it comes to adding a touch of charm to your reading adventures, a Crochet Sunflower Bookmark is an absolute delight! This handmade creation not only helps you keep track of your favorite pages in style but also brings a cheerful burst of sunshine to your reading nook. Imagine turning the pages of your book and being greeted by the vibrant hues of a crocheted sunflower, adding a sprinkle of joy to your literary journey.
What You Will Need
Yarn
- 3-ply 100% crochet cotton yarn
- Color A, flower center, about 3.06 yards (2.8 meters) of brown yarn.
- Color B, flower petals, about 6.6 yards (6.8 meters) of yellow yarn.
- Color C, leaves, about 3.6 yards (3.3 meters) of green yarn.
- Color D, stem, about yards 3.7 (3.4 meters) of red yarn.
Hook
- 2.5 mm crochet hook.
Notions
- Scissors
- Yarn Needle
Gauge
- Not important for this pattern
Finished Size
- This crochet sunflower bookmark measures about 12 inches (30 cm) long, and the flower head is about 3 inches (8 cm) in diameter.
Stitches and Abbreviations Used (US Terms)
- MR - magic ring
- ch - chain
- sc - single crochet
- hdc - half double crochet
- dc - double crochet
- tr - treble or triple crochet
- picot - picot (see special stitches below)
- hk - hook
- sk - skip
- st/sts - stitch/stitches
- sl st - slip stitch
- rpt - repeat
- YO - yarn over hook
Special Stitches
- Picot - ch3, insert hk into 3rd ch from hk, YO pull the yarn back through both the stitch and the loop on the hk.
Pattern Notes
- If you would like a longer bookmark increase the number of chains in the stem.
- Two leaves are crocheted onto the flower head and if you are having difficulty with this, crochet them separately and stitch them into place.
Instructions
Sunflower
- Foundation, color A - MR, or ch6, sl st into 1st ch to join.
- Round 1 - Ch2 (not counted as a stitch), 12 dc in ring, sl st into top of 1st dc to join. [12dc]
- Round 2 - Ch2 (not counted as a st), 2dc in each of the 12 sts, sl st into top of 1st dc to join, ch1, cut yarn, and fasten off. [24dc]
- Round 3, color B - Sl knot yarn to hk, sl st into any st.Ch2, in same st make 1dc, 2tr, picot, 2tr, 2dc, sk 1-st, 1sc in next, * in next st (sc, ch2, 1dc, 2tr, picot, 2tr, 2dc), sk 1-st, 1sc in next st, rpt from * ch1, cut yarn leaving a long tail for sewing later, fasten off.Note: There will be 2 stitches remaining, you will work the leaves and stem into these.) [8 petals]
Leaves
- Leaf 1, Color C -Slip knot yarn to hk and sl st into the space between the first and last petal of round 3.Ch10, 1sc in 2nd ch from hk, 1hdc in next, 1dc in each of the next 2-sts, 1tr in next, 1dc in each of the next 2-sts, 1hdc in next, 1sc in next, turn.Sc in next st, 1hdc in next, 1dc in each of the next 2-sts, 1tr in next, 1dc in each of the next 2-sts, 1hdc in next, 1sc, sl st into 1st sc, cut yarn, fasten off, and weave in ends.
- Leaf 2, color C - Slip knot yarn to hk and sl st into the space between the first and last petal of round 3, then make a leaf the same as leaf 1.
Stem
- Stem, color D - Ch20, sl st into 2nd ch from hk, sl st into next st, 1sc in each of the next 4-sts, 1hdc in next, 1dc in next 2-sts, (1tr, picot, 1tr) in next st, 1dc in next 2-sts, 1hdc in next, 1sc in next 4-sts, sl st into each of the next 2-sts, sl st into 1st sl st to join, chain 60. Do not cut yarn.
Attach Stem To Flower
- With the wrong side of the flower facing you, slip-stitch the stem into the stitch between the two leaves on the flower.Then, slip stitch into each stitch back down the 60 chains until you reach the top bookmark end, slip stitch into the top chain 1, cut yarn, fasten off, and weave in the ends.
Finish
- Working from the back of the flower, use a darning needle and the flower yarn tail to close the gap between the first and last petals, and make sure that the leaves and stems are on the wrong side (back) of the flower as you sew.Once the gap is closed, arrange for the leaves and stem to hang down from the back of the flower.Tack the top edges of each leaf to the back of the flower to hold them in place, secure the end, and fasten off.The flower head may not sit flat a first, but pressing and gently pulling it with your fingers will make it sit flat.
No comments
Write a comment

