Crochet Baby Yoda Glasses Holder
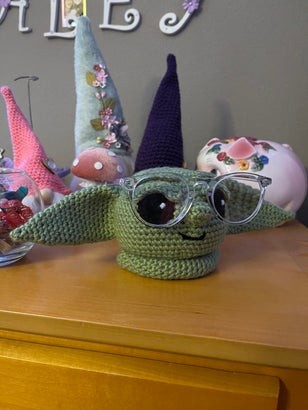
The Crochet Baby Yoda Glasses Holder is an adorable and functional accessory for any Star Wars fan! Made with soft, cuddly crochet, this little Baby Yoda figure cradles your glasses or sunglasses in his outstretched arms, keeping them safe and within reach. A delightful addition to any room, this crochet Baby Yoda is sure to bring a smile to the face of any Star Wars enthusiast, and makes a thoughtful gift for any fan of the beloved franchise.
Material:
* H 5.00m Hook
* G 4.00m Hook
* #4 weight Worsted Weight
* Big Safety Eyes (Optional)
* Tapestry Needle
* Poly Fill
Abbreviations:
MC - Magic Circle
ST- Stitch
Sl St - Slip Stitch
Ch - Chain
Sc - Single Crochet
Sc2Tog = Decrease
Head Pattern: H Hook
Make 12 Sc in Magic Circle, sl st, ch 1
Round 2: *Make a Sc in first st, 2 Sc in next st*, repeat, sl st, ch 1
Round 3: *Make a Sc in first 2 sts, 2 Sc in next st*, repeat, sl st, ch 1
Round 4: *Make a Sc in first 3 sts, 2 Sc in next st*, repeat, sl st, ch 1
Round 5: *Make a Sc in first 4 sts, 2 Sc in next st*, repeat, sl st, ch 1
Round 6: *Make a Sc in first 5 sts, 2 Sc in next st*, repeat, sl st, ch 1
Round 7: *Make a Sc in first 6 sts, 2 Sc in next st*, repeat, sl st, ch 1
Round 8: *Make a Sc in first 7 sts, 2 Sc in next st*, repeat, sl st, ch 1
Round 9: *Make a Sc in first 8 sts, 2 Sc in next st*, repeat, sl st, ch 1
Round 10-19: Sc in each st, sl st, ch 1
Start Stuffing & add safety eyes if using those
Round 20: *Sc in first 8 sts, Sc2Tog*, repeat, sl st, ch 1
Round 21: *Sc in first 7 sts, Sc2Tog*, repeat, sl st, ch 1
Round 22: *Sc in first 6 sts, Sc2Tog*, repeat, sl st, ch 1
Round 23: *Sc in first 5 sts, Sc2Tog*, repeat, sl st, ch 1
Round 24: *Sc in first 4 sts, Sc2Tog*, repeat, sl st, ch 1
Round 25: *Sc in first 3 sts, Sc2Tog*, repeat, sl st, ch 1
Round 26: *Sc in first 2 sts, Sc2Tog*, repeat, sl st, ch 1
Round 27: *Sc in first st, Sc2Tog*, repeat, sl st, ch 1
Cut a long enough tail to close up hole
Nose Pattern: G Hook
Chain 5
Round 1: Sc across, then turn your work and Sc on the other side of chain, sl st, ch 1
Round 2-3: Sc around, sl st, ch 1
Tie off and leave tail to sew nose on
Eyes: G Hook (Make 2) Using Black Yarn
Make 6 Sc in Magic Circle, sl st, ch 1
Round 2: Make 2 Sc in each st, sl st, ch 1
Tie off and leave tail to sew onto face
*I used white and made a French knot for a little accent for the eye*
Eyelids: G Hook (make 2)
Ch 9
Sl st across, then turn your work and sl st on other side of chain
*I weaved my ends in and hot glued lids on, but you can sew then on*
Eyebrows: G hook (make 2)
Ch 11
Sl st across, then turn your work and sl st on other side of chain
*I weaved my ends in and hot glued lids on, but you can sew then on*
Ears: G Hook (Make 2) I made these using continuous rounds but you can sl st & ch 1
Make 4 Sc in Magic Circle
Round 2: Sc in each st
Round 3: *Make a Sc in first st, Make 2 Sc in next st*, repeat
Round 4: *Make a Sc in first 2 sts, Make 2 Sc in next st*, repeat
Round 5: *Make a Sc in first 3 sts, Make 2 Sc in next st*, repeat
Round 6: Make a Sc in the next 4 Sts, Make 2 sts in the next 2 sts, Sc in the last 4 sts
Round 7: Sc around
Round 8: Make a Sc in the next 5 Sts, Make 2 sts in the next 2 sts, Sc in the last 5 sts
Round 9: Sc around
Round 10: Make a Sc in the next 6 Sts, Make 2 sts in the next 2 sts, Sc in the last 6 sts
Round 11: Sc around
Round 12: Make a Sc in the next 7 Sts, Make 2 sts in the next 2 sts, Sc in the last 7 sts
Round 13: Sc around
Round 14: Make a Sc in the next 8 Sts, Make 2 sts in the next 2 sts, Sc in the last 8 sts
Round 15: Sc around
Round 16: Make a Sc in the next 9 Sts, Make 2 sts in the next 2 sts, Sc in the last 9 sts
Round 17-18: Sc around
Round 19: Make a Sc in the next 10 Sts, Make 2 sts in the next 2 sts, Sc in the last 10 sts
Round 20-21: Sc around
Leave a tail to sew onto head
Base: G Hook (I made this so it stay upright, but you can add a bag of sand or something heavy in
head to stay standing
Make 8 sc in Magic circle ( i worked in continuous rounds & stuffed as i went)
Round 2-29: Sc around
Leave tail to close end up. I hot glued it to the bottom of the head
Now you can assemble as shown in the pic, sew a small smile and you're done!

