CrochetMenScarvesHatsGlovesSweatersCardigansSocksOther clothingWomenScarvesHatsGlovesShawls and cover upSweatersCardigansSocksSlippersBagsOther clothingChildrenScarvesHatsGlovesSweatersCardigansSocksSlippersOther clothingHomeBlankets and plaidsRugsHome decorationsPetsSchemesKnittingOther hand-madeChat
Crochet Lacy Seashell Corner to Corner (C2C) Blanket

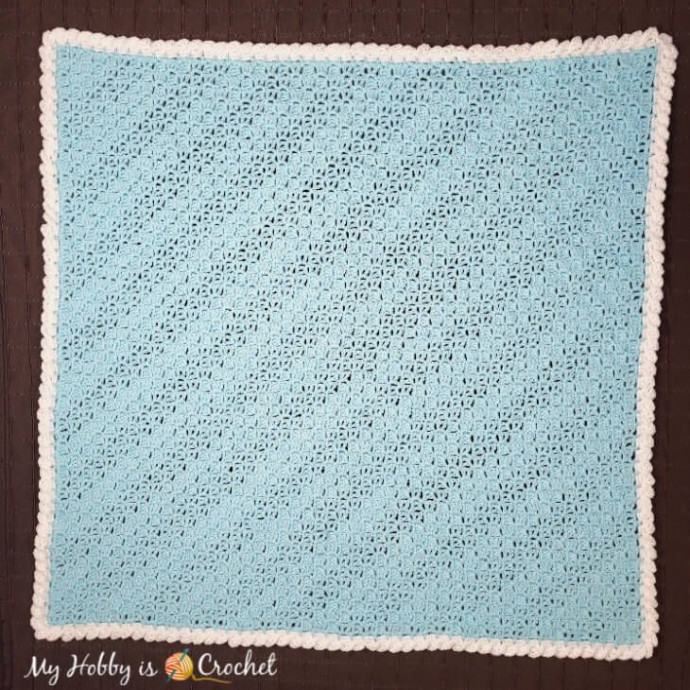
Creating a Crochet Lacy Seashell Corner to Corner (C2C) Blanket is such a delightful project filled with elegance and charm! This pattern combines the intricate design of lacy shells with the cozy comfort of a corner-to-corner blanket. With each stitch, you'll see the beautiful seashell pattern emerge, bringing a touch of seaside serenity to your home.
Whether you're a beginner or experienced crocheter, this lovely blanket will surely add a touch of warmth and style to any space. Let your creativity flow and enjoy the soothing rhythm of crocheting this exquisite piece!SIZE: This blanket is made as a square baby blanket, sized 34 inches x 34 inches (approx 86 cm x 86 cm)
You can make it any size you wish, working more/ less c2c increase rows.
You can also use a thicker yarn with the recommended hook size for that specific yarn. (But not for baby blankets, because the holes would be much larger!).
CROCHET GAUGE
6 c2c blocks x 6 c2c blocks = 4 inches x 4 inches (10 cm x 10 cm)
SUPPLIES
- The Yarn: King Cole Big Value Baby DK 100g 320 yds (290m)/ 100g ball, DK weight, 4 skeins in color Turquoise, 1 skein color White
- 4mm/ G Crochet Hook (or hook size needed to obtain gauge)
- Yarn Needle
- Scissors
- Measuring tape
STITCHES AND ABBREVIATIONS (US TERMS)
- ch: chain
- st: stitch
- slst : slip stitch
- sc : single crochet
- standing sc : standing single crochet<
- dc: double crochet
- ch2sp: chain 2 space
- ch3sp: chain 3 space
- rep from *to*: repeat the sequence between the stars
- rep from (to): repeat the sequence between the brackets
- beg: beginning
- RS: right side
- WS: wrong side
INSTRUCTIONS
Use main color and a 4 mm crochet.
Row 1 (with solid c2c box stitch) : Start with ch6. Work 1dc in 4th. ch from hook and 1dc in each of next 2 ch. (The 3 skipped chains at beg of row will be a ch3sp).
You made the First and only solid Box Stitch of row 1!
From now on, you’ll start increasing 1 box st in each row.
INCREASE ROWS
Row 2 (with solid c2c box stitch): ch 6, turn, work 1dc in 4rth. ch from hook and 1dc in each of next 2 ch. (1st. box st of the 2nd row made).
Flip your first c2c box, so that the ch3sp is at the left, sk all 3dc of first box st, slst to ch3sp at left of that box st, ch3, work 3dc in same ch3sp. ( 2nd. Box st of the 2nd row made!)
Row 3 (with solid c2c box stitch): ch 6, turn, work 1dc in 4rth. ch from hook and 1dc in each of next 2 ch. (1st. box st of the 3rd. row made).
Flip the piece to work into ch3sp of next box st!
*sk all 3dc of next box st and slst to the ch3sp at left of that box st, ch 3, work 3dc in same ch3sp . (2nd. solid Box st of the 3rd row made); rep from * for the next box st (3rd. Box st of the 3rd row made).
Rows 4 (with the lacy c2c box stitch): ch 6, turn, work 1dc into 4.th ch from hook, ch1, sk next ch, work 1dc into last ch (1st. Lacy box st of the 4th. row made)
Flip the piece to work into ch3sp of next box st!
*sk 3dc of next solid box st and slst to the ch3sp at left of that box st, ch 3, work (1dc, 1ch, 1dc) in same ch3sp . (2nd. Lacy Box st made); rep from * for the next two box sts of the row. At the end of this row you'll have 4 lacy box sts.
Rows 5 - 6 (with the lacy c2c box stitch): ch 6, turn, work 1dc into 4.th ch from hook, ch1, sk next ch, work 1dc into last ch (1st. Lacy box st made)
Flip the piece,
*sk (1dc, 1ch, 1dc) of next lacy box st and slst to the ch3sp at left of that lacy box st, ch 3, work (1dc, 1ch, 1dc) in same ch3sp . (2nd. Lacy Box st made);
rep from * for the next lacy box sts of the row. Each new row you’ll have one lacy box st more as in the previous row: row 5 with 5 lacy box sts and row 6 with 6 lacy box sts.
Rows 7, 8, 9: increase rows with solid box st (as written above)
Rows 10, 11,12: increase rows with lacy box st (as written above)
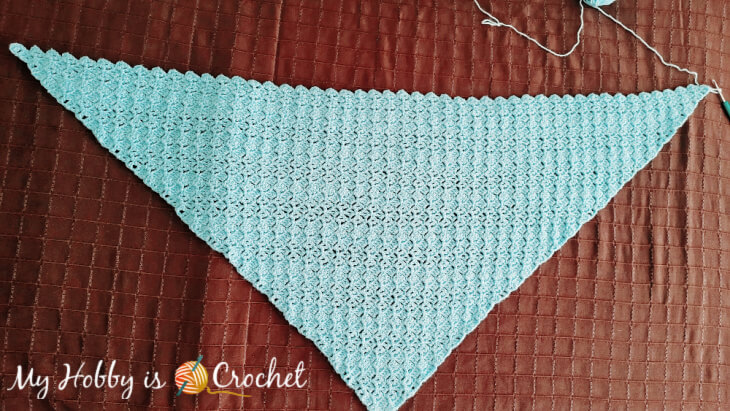
Continue with the increase rows alternating 3 rows with the solid box st and 3 rows with the lacy box st. until you reach the desired width for your blanket.
In my case I have made 48 increase rows and the last 3 rows in the pattern repeat were with the lacy box stitch.

Now start decreasing!
DECREASE ROWS
With each decrease row you will decrease one box stitch, so each new row you will have one box stitch less as in the previous row!
Even in the decrease rows you will continue with the pattern repeat of 3 rows with the solid box st and 3 rows with the lacy box sts!
In my case the first 3 decrease rows were with the solid box stitch. Then the next 3 with the lacy box stitch, and so on …
First Decrease Row (in my case row 49 with the solid box st):
Turn your work! Do not chain 6 anymore! We are making a decrease at the beginning of the rows by slst through the top of all 3 sts of the last box of the previous row,
then slst into the ch3sp at left of that box st; ch 3, work 3 dc into same ch3sp ;
*slst into the ch3sp at left of next box st, ch 3, work 3 dc into same ch3sp,
rep from * till you reach the last box st of previous row.
Slst to ch3sp of last block st and TURN! Do not work another box stitch into the last block st! This will be a decrease at the end of the row!
Next two Decrease Rows with solid box st : Decrease each row 1 box st as written above for the first decrease row.
Next three Decrease Rows with lacy box st: Turn your work! Do not chain 6 anymore! Slst through the top of all 3 sts of the last box of the previous row then slst into the ch3sp at left of that box st, ch 3, work (1dc, 1 ch, 1dc) into same ch3sp; (decrease made)
*slst into the ch3sp at left of next box st, ch 3, work (1dc, 1 ch, 1dc) into same ch3sp, rep from * till you reach the last box st of previous row.
Slst to ch3sp of last block st and TURN! Do not work another box stitch into the last block st! This will be a decrease at the end of the row!
Continue decreasing one box stitch each row following the pattern repeat until you get to 1 box st by last row and the lacy c2c square is completed
The Border

To make the border you will first start with a set up border round continuing with the main color!
Border Set up Round:
After finishing the last c2c block on RS, turn work 90° to left and work on that edge on RS:
ch1, work 1 sc in between the 1st. block st and the 2nd.block st, (*ch2, 1sc in between the next two block sts; repeat from *across the side to first corner, ending the repeat with 1 sc into the top of ch3/corner stitch of the last block st);
turn work to 90° and continue working along the next side repeating from ( to). Repeat for next 2 sides; onces you made the last ch2 in between the last 2 box sts of the last side, join with slst into 1st sc at the beg. of the round. Cut yarn and finish off invisibly. Weave in all ends.
You should have an egal number of ch2 spaces for each side and it should be the same as the number of box stitch on each side.
In my case 48 box sts = 48 ch2 spaces for each side.
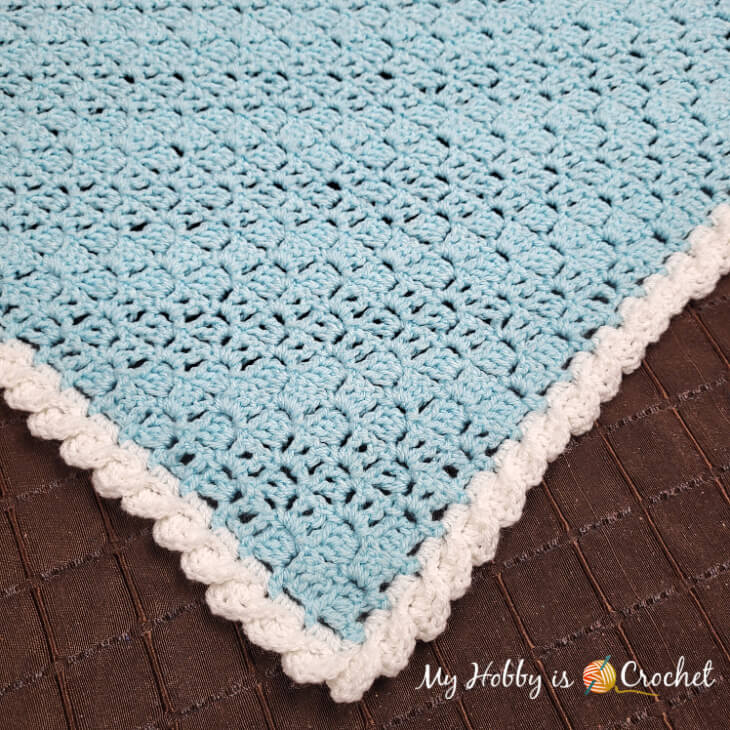
Twisted Lacy Shell Border:
Change to color 2 ( here white)!
The twisted lacy shell border is made as 2 rows at once, turning the row for each shell.
Into first ch2sp on top edge, start with a standing sc, work 2sc more into same ch2sp, ch2, turn work to WS and slst around the 1st sc, ch1, turn again to RS and into the ch2sp just made work (1dc, 1ch,1dc,1ch, 1dc);
you have just made the first lacy shell;
For each next twisted lacy shell along the edge: work 3sc into next ch2sp of previous row, ch2, turn work to WS and slst around the ch2 bar below the last shell made inserting hook from back to front, ch1, turn to RS again and work (1dc, 1ch,1dc,1ch, 1dc) into the ch2sp you previously made.
Continue with the twisted lacy shell along the side.
When you reach the corner, work a corner twisted lacy shell this way: work 1sc into the top of sc corner st of the set up round; ch2, turn, slst around the ch2 bar below the last shell made inserting hook from back to front, ch1, turn to RS again and work (1dc, 1ch,1dc,1ch, 1dc) into the ch2sp you previously made.
Continue with the twisted lacy shell border around the blanket, in each corner work a corner shell as written above.
After finishing the last shell, cut yarn leaving a bit of yarn tail, then finish off this way: release the loop from the hook, insert hook from back to front into first sc below the very first lacy shell, pick up the loop on the hook and pull it through the st to the back of the work, fasten off tight so that you perfectly join the last shell with the first one. Weave in all ends.
No comments
Write a comment
