CrochetMenScarvesHatsGlovesSweatersCardigansSocksOther clothingWomenScarvesHatsGlovesShawls and cover upSweatersCardigansSocksSlippersBagsOther clothingChildrenScarvesHatsGlovesSweatersCardigansSocksSlippersOther clothingHomeBlankets and plaidsRugsHome decorationsPetsSchemesKnittingOther hand-madeChat
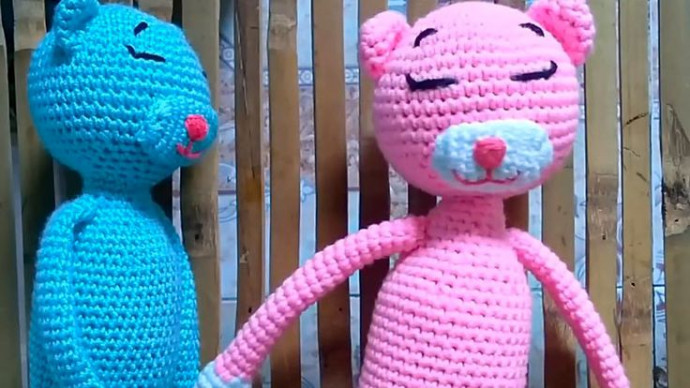
Crochet Amineko Cat

The Crochet Amineko Cat is an adorable and lovable creation that brings joy and charm into any space. With its cute designs and soft textures, this amigurumi cat is perfect for cuddling and displaying in your home. Whether you are an experienced crocheter or a beginner looking for a fun project, creating your own Crochet Amineko Cat can be a rewarding and relaxing experience.
With its playful demeanor and sweet expression, this handmade feline friend is sure to brighten your day and make a delightful addition to your crochet collection.Materials Needed & Measurements:
- Yarn: Light Fingering Weight (118 yards/108 meters)
- Hook: 2.75mm (C) or 3.0mm
- Stuffing: Polyester fiberfill
- Eyes: Black safety eyes or embroidery thread
- Other: Tapestry needle, stitch markers, scissors
Measurements:
- Finished size: 9-10 inches (23-25 cm) tall
Crochet Abbreviations:
- sc: Single Crochet
- inc: Increase (work 2 sc into the same stitch)
Stitching Instructions for Making the Amineko Crocheted Cat Pattern:
Head:
- Round 1: Start with a magic ring, then work 6 single crochet (sc) into the ring. (6)
- Round 2: Work 2 sc into each stitch around (inc) for a total of 12 sc. (12)
- Round 3: (Sc in next stitch, inc) around. Repeat this for the entire round. (18)
- Round 4: (Sc in next 2 stitches, inc) around. (24)
- Continue to increase as needed (for example, increase in 3 stitches or 4 stitches for a more rounded shape) until the head is large enough. For a smoother finish, work in a pattern of (sc in next 3-4 stitches, inc).
- Stuff the head lightly as you go along to maintain its shape.
Body:
- Round 1: Start with a magic ring, and work 6 sc into the ring. (6)
- Round 2: Work 2 sc in each stitch around (inc). (12)
- Round 3: (Sc in next stitch, inc) around. (18)
- Round 4: (Sc in next 2 stitches, inc) around. (24)
- Continue the body by working even rounds without increases for a few more rounds. You can work for about 10-15 more rounds (depending on how long you want the body) to reach the desired length.
- Stuff the body as you go.
Ears (Make 2):
- Round 1: Start with a magic ring, and work 6 sc into the ring. (6)
- Round 2: (Sc in next stitch, inc) around. (9)
- Fold the ear in half and use a whip stitch to sew the sides together, creating the shape of the ear.
- Attach the ears on top of the head, positioning them symmetrically.
Arms (Make 2):
- Round 1: Start with a magic ring, and work 6 sc into the ring. (6)
- Round 2: Work 2 sc in each stitch around (inc). (12)
- Continue working in a spiral without increasing for 6-8 more rounds until the arms are about 2-3 inches long.
- Stuff lightly and sew them onto the sides of the body.
Legs (Make 2):
- Round 1: Start with a magic ring, and work 6 sc into the ring. (6)
- Round 2: Work 2 sc in each stitch around (inc). (12)
- Continue working without increasing for 10-12 more rounds. This will make the legs slightly longer than the arms.
- Stuff lightly and sew them onto the bottom of the body.
Tail:
- Round 1: Start with a magic ring, and work 6 sc into the ring. (6)
- Continue in rounds, working sc without any increases for about 12-15 rounds to create a long, thin tail.
- Stuff lightly and sew it onto the body.
Assembly:
- Attach the head to the top of the body, ensuring it is centered.
- Attach the arms to the sides of the body.
- Attach the legs to the bottom of the body.
- Sew the ears onto the top of the head, ensuring they are positioned symmetrically.
- Attach safety eyes or embroider the eyes with black embroidery thread.
- Use black thread to embroider the nose and mouth in the center of the face.
Finishing:
- Weave in all loose yarn ends to ensure everything is securely attached.
- Ensure all parts are securely sewn and stuffed to your liking.
- Trim any excess yarn.
Once finished, your Amineko crocheted cat will be a soft, adorable, and charming companion!
No comments
Write a comment
