CrochetMenScarvesHatsGlovesSweatersCardigansSocksOther clothingWomenScarvesHatsGlovesShawls and cover upSweatersCardigansSocksSlippersBagsOther clothingChildrenScarvesHatsGlovesSweatersCardigansSocksSlippersOther clothingHomeBlankets and plaidsRugsHome decorationsPetsSchemesKnittingOther hand-madeChat
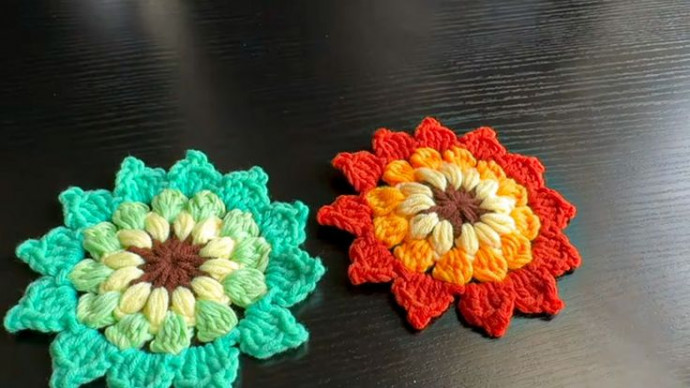
Crochet Sunburst Coasters

Crochet Sunburst Coasters are the perfect way to add a touch of charm and functionality to your home decor! Not only are they practical for catching drips and spills, but their whimsical sunburst design also brings a sunny vibe to any room. Whether you're a seasoned crocheter or just starting out, these coasters make for a fun and rewarding project.
Plus, they're great for using up leftover yarn scraps, making them both eco-friendly and budget-friendly. So, grab your yarn and crochet hook, and start creating your own set of adorable Crochet Sunburst Coasters today!Materials Needed & Measurements:
- Yarn: 1 skein each of Lion Brand Color Theory in the following colors:
- Canyon (619-132AG)
- Himalayan Salt (619-184X)
- Dijon (619-170AE)
- Tourmaline (619-178S)
- Stonewash (619-109W) (Worsted weight 4; 246 yds/225 m per skein. Each coaster requires approximately 20 yds/18 m.)
- Crochet Hook: Size US H/8 (5 mm)
- Additional Tools:
- Removable stitch marker (optional)
- Tapestry needle
Measurements:
- Gauge: 16 stitches = 4”/10 cm in double crochet
- Finished Dimensions:
- Diameter: 4”/10 cm
- Circumference: 12.5”/32 cm
Abbreviations Used:
- Ch: Chain
- Ch-1 sp: Chain-1 space
- Ch-2 sp: Chain-2 space
- Ch-3 sp: Chain-3 space
- Dc: Double crochet
- Dccl: Double crochet cluster
- 3dccl: 3 double crochet cluster
- Sc: Single crochet
- Sl st: Slip stitch
- St(s): Stitch(es)
- Tr: Treble crochet
Stitching Instructions for Making the Sunburst Coasters Pattern:
Round 1: Forming the Base Circle
- Start with a magic ring to create a seamless circular base.
- Ch 3 (this counts as the first dc of the round).
- Work 11 dc into the magic ring.
- Tighten the magic ring to close the center, then sl st into the top of the beginning ch 3 to join the round.
- Stitch Count: 12 dc.
Round 2: Adding Spaces for the Pattern
- Ch 4 (this counts as 1 dc + 1 ch-1 sp).
- Work 1 dc in the next stitch, then ch 1. Repeat from around the circle.
- End the round with sl st into the 3rd chain of the beginning ch 4.
- Stitch Count: 12 dc + 12 ch-1 sp.
Round 3: Creating a Framework for Clusters
- Ch 1 (this does not count as a stitch).
- Work 1 sc into the next ch-1 sp, then ch 2. Repeat from around.
- Sl st to the top of the first sc to join the round.
- Stitch Count: 12 sc + 12 ch-2 sp.
Round 4: Adding Clusters and Creating Texture
- Slip stitch (sl st) into the next ch-2 sp.
- Ch 2 (counts as the first double crochet of the 3dc cluster).
- Work a 3dccl into the same ch-2 sp:
- Yarn over, insert the hook into the ch-2 sp, yarn over and pull up a loop (3 loops on hook), yarn over, draw through 2 loops (2 loops on hook). Repeat this process twice more in the same space. Finally, yarn over and draw through all 4 loops on the hook to complete the cluster.
- Ch 3 to create a spacer between clusters.
- Work a 3dccl in the next ch-2 sp, then ch 3. Repeat from around.
- Sl st to the top of the first 3dccl to join the round.
- Stitch Count: 12 3dccl + 12 ch-3 sp.
Round 5: Adding Decorative Treble Stitches
- Ch 1 (this does not count as a stitch).
- Work sc in the same stitch as the join.
- *(In the next ch-3 sp, work the following sequence:
- 1 sc, ch 1, 1 tr in the sc from 2 rounds below, ch 1, 1 sc.) Work 1 sc into the top of the next 3dccl.* Repeat the sequence from to around.
- Sl st to the top of the first sc to join the round.
- Stitch Count: 12 tr + 36 sc + 24 ch-1 sp.
Finishing Steps:
- Cut the yarn, leaving a tail long enough to weave in securely.
- Fasten off by pulling the yarn tail through the last loop.
- Use a tapestry needle to weave in all loose ends neatly on the back side of the coaster.
By following these steps, you’ll have a perfectly crafted Sunburst Coaster! Repeat the process for each color to complete the set.

Love this pattern, going to make many of these in multiple colors for a valance in my bathroom.