CrochetMenScarvesHatsGlovesSweatersCardigansSocksOther clothingWomenScarvesHatsGlovesShawls and cover upSweatersCardigansSocksSlippersBagsOther clothingChildrenScarvesHatsGlovesSweatersCardigansSocksSlippersOther clothingHomeBlankets and plaidsRugsHome decorationsPetsSchemesKnittingOther hand-madeChat
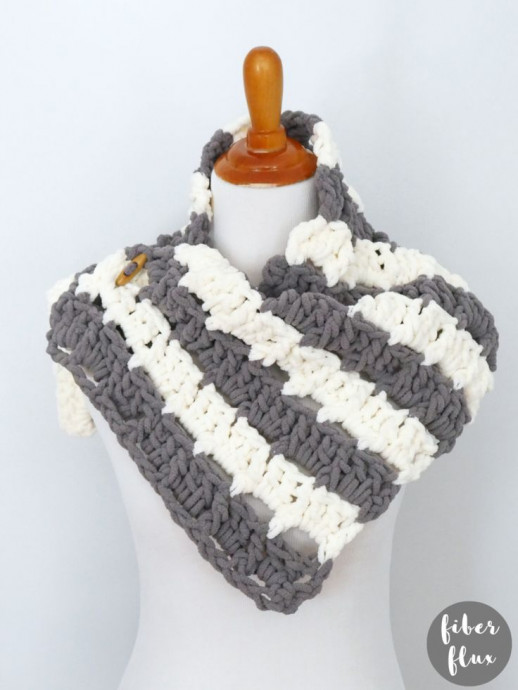
Crochet Plush Blocks Button Cowl

The Crochet Plush Blocks Button Cowl is a cozy and stylish accessory perfect for adding a touch of warmth to your outfit! Handcrafted with love and care, this charming cowl features a delightful combination of plush blocks and cute buttons, making it a unique and versatile piece for any wardrobe. Whether you're heading out to run errands or snuggling up at home, this cowl is sure to keep you looking chic and feeling comfy all day long. So go ahead, wrap yourself in the softness of the Crochet Plush Blocks Button Cowl and bring a smile to your face with its delightful design!
Materials:
- 10.0 mm crochet hook
- 220 yards of #6 super bulky weight yarn (I used 110 yards of Bernat Blanket Solids in “Dark Gray” and 110 yards of Bernat Blanket Solids in “Vintage White”
- Yarn/tapestry needle
- Scissors
- Measuring Tape
Sizing:
- 34 inches long (unbuttoned and laying flat)
- 12 inches wide
- Button shown is 1.5 inches wide
Pattern Notes:
- Cowl is made by making a rectangle then using the decorative holes to button it closed. It can be styled in a variety of ways!
- Make the rectangle wider/narrower by adjusting the starting using the multiples below.
- Make the rectangle longer by working more rows of the pattern.
- Rectangle length determines finished cowl circumference.
- Rectangle width determines the height of the finished cowl.
Plush Blocks Button Cowl Pattern:
Note: I switched colors after each 2 row pattern repeat for the striping effect.
- Row 1: Work a sc into the second ch from the hook, next *ch 2, skip 2 chains, then sc into the next chain. Repeat from * across.
- Row 2: Ch 3 (counts as a dc) and turn. *Work 2 dc into the next ch 2 space, fpdc around the next sc. Repeat from * across to the last ch 2 space. Work a dc into the last sc.
- Row 3: Ch 1 and turn. Work a sc into the first dc, then *ch 2, skip 2 dc, sc into the next dc. Repeat from * across to the last fpdc. Then ch 2. skip 2 dc, then work a sc into the top of the turning ch.
- Repeat rows 2 and 3 until the rectangle measures 34 inches long from the starting edge.
Finishing & Assembly:
- Weave in all ends. Using a piece of matching yarn, sew button to the bottom left corner of the starting edge.
No comments
Write a comment
