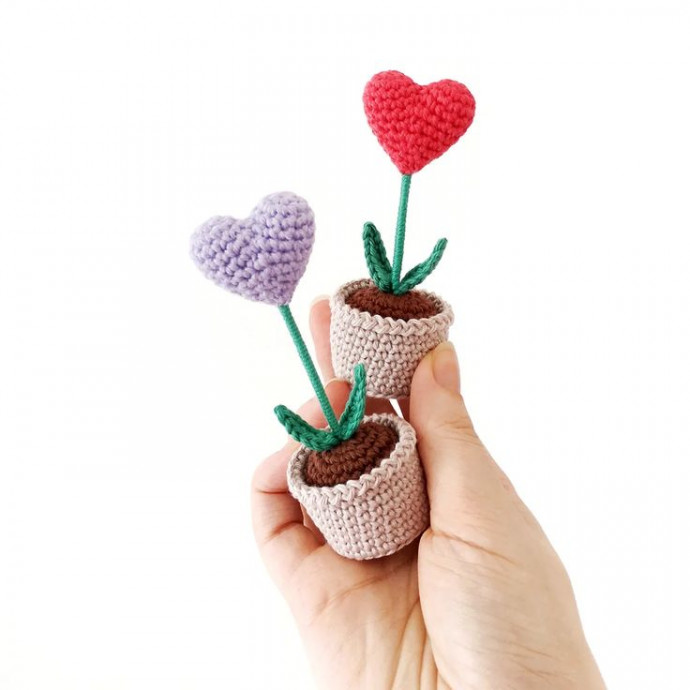
Crochet Amigurumi Heart in a Pot

Crocheting an amigurumi heart in a pot can be a delightful and charming project that adds a touch of warmth and creativity to your space. The process of crafting the heart, carefully working through each stitch to form its shape, and then placing it in a tiny pot to bring it to life is both relaxing and rewarding.
As you create this sweet little piece, filled with love and care, it becomes a whimsical decoration that is sure to bring smiles to anyone who sees it. So, grab your yarn and crochet hook, and let's spread some heartwarming crochet magic together!Materials
- DK weight yarn in pot colour, dark brown, green and heart colour (I used Paintbox Yarns Cotton DK in Taupe, Coffee Bean, Slate Green and Lipstick Pink/Pale Lilac)
- 2.5mm crochet hook
- Polyester fiberfill
- Card (tissue box, cereal box, etc)
- 18 gauge floral wire
- Pliers
- Fabric glue
- Stitch marker, yarn needle, scissors
Abbreviations (US Terms)
- ch – chain
- sc – single crochet
- inc – increase
- invdec – invisible decrease
- BLO – back loop only
- hdc – half double crochet
- sl st – slip stitch
- st/s – stitch/es
- […] – repeat the instructions in brackets
- (…) – indicates stitch count at end of round
Finished Size
The finished heart in a pot measures approximately 4″ (10cm) tall. Size may vary depending on tension and materials used.
Gauge
Gauge is not important in this pattern. Use a hook size to match your chosen yarn. Make sure that your stitches are tight enough to prevent stuffing showing through and adjust hook size if necessary.
Notes
- Pieces are worked in a continuous spiral starting with a magic ring unless otherwise specified. Mark the first stitch of each round with a removable stitch marker.
Pattern Instructions
Pot (pot colour)
R1: 6 sc in magic ring (6)
R2: [Inc] x6 (12)
R3: [Sc, inc] x6 (18)
R4: Sc, inc, [2 sc, inc] x5, sc (24)
R5: [3 sc, inc] x6 (30)
R6: BLO [sc] x30 (30)
R7-12: [Sc] x30 (30) 6 rounds
R13: [Sl st, ch 1] x30
Sl st into the same st as starting sl st. Fasten off and weave in ends.
Measure the base of the pot and cut a circle out of card. Place in the bottom of the pot.
Leaves (make 2, green)
Ch 7, sl st in 2nd ch from hook and next ch, sc in next 2 chs, hdc in last 2 chs (6)
Fasten off leaving a long tail for sewing.
Heart (heart colour)
R1: 6 sc in magic ring (6)
R2: [Inc] x6 (12)
R3: [Sc] x12 (12)
Fasten off leaving an end of approximately 10cm for sewing.
Repeat R1-3, do not fasten off.
In the next round we’ll be joining the 2 pieces together to form the top of the heart.
R3: 6 sc on the second piece, 12 sc on the first piece (starting in the first st of the last round), 6 sc on the second piece (24)
Use the leftover yarn tail from the first piece to sew up the hole between the 2 pieces. Secure on the inside with a knot.
R4: [Sc] x24 (24)
R5: Sc, invdec, [2 sc, invdec] x5, sc (18)
R6: [Sc] x18 (18)
Start stuffing and continue to stuff as you go.
R5: [Sc, invdec] x6 (12)
R6: [Sc] x12 (12)
R7: [Invdec] x6 (6)
Cut the yarn leaving a tail and pull through last st. Weave the yarn tail through the front loops only of the final round, do not pull closed. Set aside.
Soil (dark brown)
R1: 6 sc in magic ring (6)
R2: [Inc] x6 (12)
R3: [Sc, inc] x6 (18)
R4: Sc, inc, [2 sc, inc] x5, sc (24)
R5: [7 sc, inc] x3 (27)
R6-9: [Sc] x27 (27) 4 rounds
R10: [7 sc, invdec] x3 (24)
R11: [Sc, invdec] x8 (16)
Leaving the yarn attached, set aside while you prepare the stem.
Stem
Using pliers, twist one end of your wire into a circular shape approximately 1/2″ (1.5cm) wide, with the long end of the wire coming out as close to the centre of the circle as possible.
Insert the wire into the soil with the long end coming out of the centre of the magic ring.
Trim the wire to your desired length + 2cm. I wanted my stem to be 4 cm long so I made my wire 6cm.
Using pliers, fold the end over by 1cm.
Picking up where we left off on the soil, start stuffing the soil and continue to stuff as you go.
R12: [Invdec] x8 (8)
Cut the yarn leaving a tail and pull through last st. Do not close up yet.
Bring a long length of green yarn (approximately 40cm, this will vary depending on the length of your stem) up through the bottom of the soil and out through the centre of the magic ring.
Wrap the yarn firmly around the wire making sure that the wraps don’t overlap each other and that none of the wire is showing through. Stop when the yarn is snug against the folded end.
Add some fabric glue to the exposed wire and place your heart on top so that it’s covering the wire completely.
Bring excess green yarn up through the bottom of the heart and secure by weaving in and out of the heart a few times.
Cinch the heart closed around the wire and hide end inside the heart.
With the front of the heart facing forward, sew leaves to the soil one on each side of the stem.
Secure all green ends and close the bottom of the soil by weaving the ending yarn tail through the front loops only of the final round and pulling to close. Hide the end inside the soil.
Place soil inside the pot.
