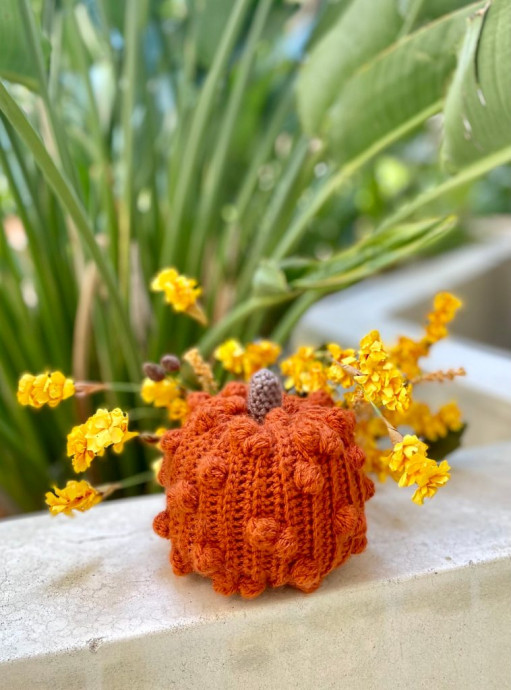
Crochet Lumpy Pumpkin

Crochet Lumpy Pumpkin is a charming and unique addition to any fall decor. Handcrafted with love and attention to detail, each pumpkin features a delightful lumpy texture that adds character and warmth to your home. Whether displayed on a mantel, shelf, or as a centerpiece for your Thanksgiving table, these crocheted pumpkins are sure to bring a touch of whimsy to your space.
With their cozy autumn colors and handmade feel, they make for a perfect seasonal accent that will be cherished for years to come. So why not add a Crochet Lumpy Pumpkin to your collection and celebrate the beauty of the season in style?Materials
- Big Twist Value 100% acrylic worsted weight #4 yarn (6oz/380yd; 170g/347m)
- Main color: Rust
- Stem Color: Taupe
- US Size 7 (4.5mm) crochet hook
- Polyfill
- Scissors
- Row counter (optional)
Pattern Notes
- The Ch 1 at the beginning of each row does not count as a stitch.
- The bobble stitch (Bo) is used to work the lumps on the pumpkin. To work the bobble stitch, complete the following: *Yarn over and insert your hook into the stitch. Yarn over and pull up a loop, pull through two loops on the hook. Repeat from *4 more times for 6 total loops on the hook. Yarn over and pull through all 6 loops.
- The pumpkin is worked horizontally and is joined with slip stitches.
- A stitch counter will come in handy for this pattern.
Stitches and Abbreviations (US terms)
- Ch- Chain
- Bo – Bobble Stitch
- Inc – Increase
- Sc – Single Crochet
- Sc BLO – Single Crochet Back Loop Only
- St(s) – Stitch(es)
- **- Repeat
Pattern Instructions
Pumpkin Body
Ch 33
Row 1: Sc in the 2nd ch from hook and in each ch across, ch 1, turn. (32 sts)
Row 2: Sc BLO 3, Bo, Sc BLO 24, Bo, Sc BLO 3, ch 1, turn. (32 sts)
Row 3: Sc BLO 16, Bo, Sc BLO 15, ch 1, turn. (32 sts)
Row 4: Sc BLO 15, Bo, Sc BLO 16, ch 1, turn. (32 sts)
Row 5: Sc BLO 7, Bo, Sc BLO 16, Bo, Sc BLO 7, ch 1, turn. (32 sts)
Row 6: Sc BLO 24, Bo, Sc BLO 7, ch 1, turn. (32 sts)
Row 7: Sc BLO 10, Bo, Sc BLO 9, Bo, Sc BLO 11, ch 1, turn. (32 sts)
Rows 8-13: Repeat rows 2 through 7.
Rows 14-19: Repeat rows 2 through 7.
Rows 20-25: Repeat rows 2 through 7.
Rows 26-31: Repeat rows 2 through 7.
Rows 32-37: Repeat rows 2 through 7.
Rows 38-43: Repeat rows 2 through 7.
Closing The Pumpkin
At the end of row 43, ch 1 and insert the hook through the current stitch and the
corresponding stitch of Row 1. Slip stitch across t to close the pumpkin, joining both sides together with each stitch. Ch 1 at the end of the row and cut the yarn with about 14 inches remaining from the last stitch. Pull the yarn through the ch to secure. We will now begin closing the bottom of the pumpkin.
- Insert the yarn through the tapestry needle to begin sewing the bottom. Pull the needle and yarn through the end of each previously worked row. As you stitch, pull the yarn tight to ensure that the bottom is fully closed. Continue around, and pull tight as you go. Do not cut the yarn. Once the bottom of the pumpkin is closed, begin stuffing the pumpkin.
- Pull the yarn through the bottom hole of the pumpkin and insert it into the top edge of the pumpkin. Begin sewing the top shut, just as we did to the bottom. Pull tight and continue around.
- Once the top is closed, we will create the pumpkin shaping. Insert your needle into the top hole, pushing the pumpkin down to pull the needle out of the bottom. Stitch tightly so that the pumpkin maintains this shape. Repeat 2-3 more times.
Stem
Form a magic ring
Round 1: Sc 5 (5 sts)
Round 2: 2 Sc inc x5 (10 sts)
Round 3-6: Sc around (10 sts)
Stuff the stem and tie off, leaving a long end to sew the stem to the pumpkin. Using the tapestry needle, stitch the stem through the top hole of the pumpkin.
You have now finished your lumpy crochet pumpkin!
