CrochetMenScarvesHatsGlovesSweatersCardigansSocksOther clothingWomenScarvesHatsGlovesShawls and cover upSweatersCardigansSocksSlippersBagsOther clothingChildrenScarvesHatsGlovesSweatersCardigansSocksSlippersOther clothingHomeBlankets and plaidsRugsHome decorationsPetsSchemesKnittingOther hand-madeChat
Create Your Own Adorable Crochet Cloud Amigurumi: A Fun and Easy Guide for Beginners and Experienced Crafters

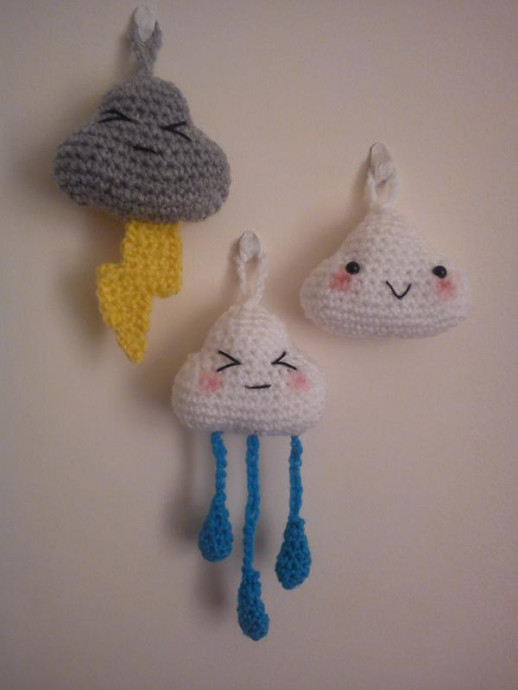
Crochet Cloud Amigurumi is a delightful and charming craft project that will surely bring a touch of whimsy and creativity to your space. By using soft yarn and a few simple crochet stitches, you can create your very own fluffy cloud toy that will brighten up any room. This cute amigurumi design is perfect for both beginners and experienced crocheters looking for a fun and relaxing project.
Whether you choose to make it as a decorative item for your home or as a sweet gift for a friend, the Crochet Cloud Amigurumi is sure to put a smile on anyone's face with its adorable and cuddly appearance. So, grab your crochet hook, pick out some fluffy yarn, and let your imagination soar as you create your own charming cloud amigurumi!Ingredients
To make these cute little clouds you will need:
- 5mm safety eyes
- Double knit or worsted weight yarn in your chosen cloud colours
- 3.5mm hook
- Black embroidery floss and needle
- Fibre fill
- A stitch marker
Cloud Instructions
Cloud
Beginning at the bottom of the cloud working in a continuous spiral:
- Chain 11
- R1: sc in 2nd ch from hook, sc in next 9, 3 sc in last chain, work along other side of foundation chain, sc in next 8, 2 sc in last stitch.
- R2: inc in first st, sc in next 8, inc in each of the next 3, sc in next 8, inc in last 2. (28 sc)
- R3: sc in first, inc in next, sc in next 8, inc, sc, inc, sc, inc, sc in next 9, inc, sc inc, sc (34sc)
- R4-7: sc around (34 sc)
- R8: dec in first 2, sc in next 9, dec 4 times, sc in next 9, dec 2 times (26 sc)
- R9: dec in first 2, sc in next 6, dec 3 times, sc in next 8, dec. (20sc)
- R10-11: sc around (20sc)
- R12: sc in first 3, dec in next, rep around (17sc)
- R13: sc in first 2, dec in next, rep around
- Add eyes and embroider mouth
- R14: sc in first, dec in next, rep around
- Stuff
- R15: dec around until closed, make a chain to desired length if you wish then FO.
Rain Drop Instructions
Rain Drop
Instructions to create a rain drop:
- R1: 6sc in ring
- R2: sc around increasing twice anywhere you wish (8sc)
- R3: sc around
- R4: dec, sc around (7sc)
- R5: sc around decreasing twice anywhere you wish (5sc)
- R6: dec once, sc around, slip stitch to close, make a chain to desired length and attach to cloud.
Lightning Instructions
Lightning
Follow these steps to create the lightning:
- Ch 5, leave tail to sew.
- R1: sc in 2nd chain from hook and in each chain, ch 1, turn (4sc)
- R2-3: sc across, ch 1, turn (4sc)
- R4: sc across, chain 3, turn
- R5: sc in 2nd chain from hook and in next chain and all stitches across, ch 1, turn (6sc)
- R6: sc across, ch 1, turn (6sc)
- R7: sc in next 4, ch 1, turn (4sc)
- R8: dec in first, sc in next 2, ch 1, turn (3sc)
- R9: sc across, ch 1, turn
- R10: dec in first, sc, ch 1, turn (2sc)
- R11: dec, ch 2, slip stitch in stitch you just decreased, slip stitch around the edges to tidy up doing 3 slip stitches to turn corners. FO attach to cloud.
No comments
Write a comment
