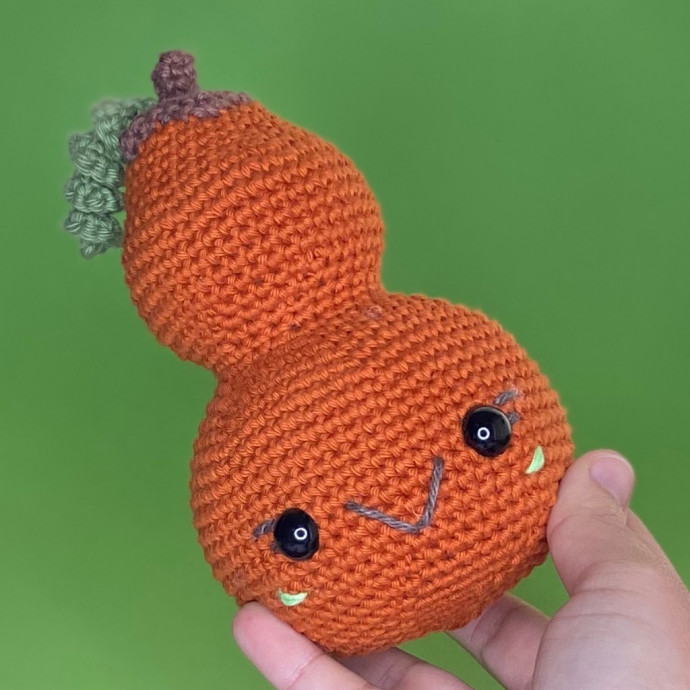
Crochet Gwen the Gourd

Crochet Gwen the Gourd is a delightful and whimsical project perfect for adding a touch of charm to your fall decor. With its vibrant orange color and unique shape, Gwen makes for a cheerful addition to your home or as a thoughtful handmade gift for a loved one. The crochet pattern for Gwen is easy to follow, making it an enjoyable project for crocheters of all skill levels. Whether you're an experienced crafter looking for a fun challenge or a beginner eager to try something new, creating Gwen the Gourd will surely bring a smile to your face. So grab your yarn and crochet hook, and let's bring this adorable autumn decoration to life!
Materials
• DK or 8ply yarn in orange, brown and green (I like to use the Ricorumi DK*)
• 3.75 (F) crochet hook*
• Stitch marker, tapestry needle and scissors
• Polyfill*
• 2x 12mm safety eyes (not meant for children under 3 y.o.)
Abbreviation used (U.S. terms)
ch: chain
sc: single crochet
st: stitch
*…*: repeat
(…): work in the same st
BLO: back loop only
sl st: slip stitch
hdc: half double crochet
dc: double crochet
inc: 2 single crochet in the same stitch
dec: single crochet 2 stitches together through front loop only (invisible decrease)
Finished size: approx. 15 cm/ 6 inches
All pieces are worked through both loops of the stitches and in the round without joining unless stated otherwise in the pattern. It is recommended to use a stitch marker to mark the beginning of each round. To make it easier, stuff the body as you go.
Stem – in brown make 1
Work in rounds
Round 1. sc 5 in a magic ring
Round 2. in BLO, sc in each st around
Rounds 3-4. sc in each st around
Round 5. (sc 1, hdc 1, sc 1) in the same st x5
Round 6. *sc 1, (hdc 1, dc 1, hdc 1) in the same st, sc 1* x5
Fasten off leaving a long tail for sewing on top of the body. Do not stuff.
Vine – in green make 1
Works in rows
Row 1. ch 21
Row 2. Starting from the second ch from hook, inc in each ch
Sl st in last ch and fasten off, leaving a long tail for sewing.
Body – in orange make 1
Work in rounds, from top to bottom
Round 1. sc 6 in a magic ring
Round 2. inc in each st around
Round 3. *sc 1, inc* around
Round 4. *sc 2, inc* around
Rounds 5-7. sc in each st around
Round 8. *sc 3, inc* around
Round 9. *sc 4, inc* around
Round 10. *sc 5, inc* around
Rounds 11-15. sc in each st around
Round 16. *sc 5, dec* around
Round 17. *sc 4, dec* around
Round 18. *sc 3, dec* around
Round 19. sc in each st around
Round 20. *sc 3, inc* around
Round 21. *sc 4, inc* around
Start stuffing the top of the body now.
Round 22. *sc 5, inc* around
Round 23. *sc 6, inc* around
Round 24. *sc 7, inc* around
Round 25. *sc 8, inc* around
Rounds 26-35. sc in each st around
Round 36. *sc 8, dec* around
Round 37. *sc 7, dec* around
If using safety eyes, insert them between rounds 31-32, with approximately 8 stitches between them.
Round 38. *sc 6, dec* around
Round 39. *sc 5, dec* around
Round 40. *sc 4, dec* around
Round 41. *sc 3, dec* around
Start stuffing the bottom of the body now.
Round 42. *sc 2, dec* around
Round 43. *sc 1, dec* around
Round 44. *dec* around
Finish stuffing, fasten off and weave in ends.
Assembly
1. Sew the stem on top of the body.
2. Sew the vine to the stem, slightly to the left side.
3. You can have fun with adding details to the face! Make it as creepy or cute as you want, by adding lashes, a mouth, and cheeks.
You are done!
