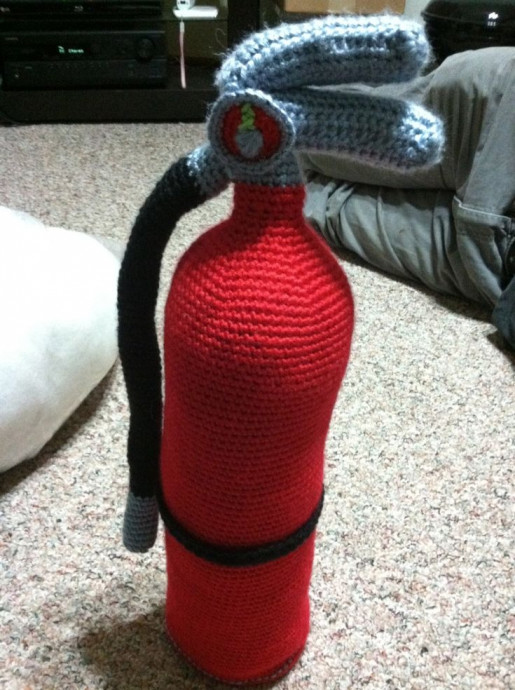
Crochet Fire Extinguisher

Imagine a whimsical world where even fire safety gets a touch of creativity with a crochet fire extinguisher! Picture the classic red canister adorned with intricate crochet patterns, turning a practical device into a charming work of art. This fun twist not only adds a cozy touch to emergency preparedness but also serves as a quirky conversation starter in any home or workplace. Who knew that combining the practicality of fire safety with the warmth of handmade crafts could result in such a delightful and unique creation? It's like a little reminder that safety measures can also be fun and visually appealing. So, next time you spot a crochet fire extinguisher, embrace the creativity and appreciate the blend of functionality and imagination it brings to your surroundings.
Supplies
-red yarn (for the main body, you’ll need at least one skein of yarn worsted weight, like red heart or caron simply soft)
-grey, black, and green yarn (this is more for smaller parts, so scraps will do)
-G hook (or whatever works with your yarn)
-yarn needle
-stuffing
Handles
So I really simplified down the mechanics of the extinguisher. In fact I forgot the pin, but that’s pretty simple to modify on your own. If you think of a better way to do the handle feel free to change it up. I basically just made two rectangles.
Top Handle:
R1: ch 18
R2-14: sc 17
Tie off, sew long sides together to make a tube.
Bottom Handle:
R1: ch 21
R2-14: sc 20
Tie off, sew long sides together to make a tube.
Sides x 4:
R1: ch 6
R2-3: sc 5
Tie off and leave long tail. Stuff tubes and then stitch sides onto both handles.
Now pick two edges and stitch the edges together of the top and bottom handle. Attach a bit of the long sides together as well so it looks like where a joint would connect. (About an inch by inch area next to the edge)
Body
So this area gets simplified a lot. The joint is supposed to start out kinda like a granny square to get the appearance of the square connection to the handle. Mine ended up a bit rounded still, but it’s not a biggie. Then the shape turns into the conical shape and body of the extinguisher. I made the pattern so it would have ridges at top to look more like joints, but it’s hard to see it while stuffing, so you could always just make rows 3-11 all 18 sc.
R1: magic circle 6 sc (begin with grey)
R2: 2sc, 1 sc* repeat – 12 sc
R3: 2sc, 2sc, 1 sc* repeat – 18 sc
R4-6: sc in each st – 18 sc
switch to red
R7-8: sc in each st – 18 sc
R9: sc2tog, 1 sc – 12 sc
R10: sc in each st – 12 sc
R11: 2sc, 1 sc – 18 sc
R12: sc in each st – 18 sc
R13: 2sc, 2 sc* repeat – 24 sc
R14: 2sc, 3 sc* repeat – 30 sc
R15: 2sc, 4 sc* repeat – 36 sc
R16: 2sc, 5 sc* repeat – 42 sc
R17: 2sc, 6 sc* repeat – 48 sc
R18: 2sc, 7 sc* repeat – 54 sc
R19: 2sc, 8 sc* repeat – 60 sc
R20-88: sc in each st – 60 sc
Stuff and continue stuffing as you go. Fire extinguishers are either flat or inverted half circles on the bottom, so you want to either have the bottom run as flat as possible or push upwards inside of itself to be a half sphere.
R89: sc2tog, 8 sc* repeat – 54 sc
R90: sc2tog, 7 sc* repeat – 48 sc
R91: sc2tog, 6 sc* repeat – 42 sc
R92: sc2tog, 5 sc* repeat – 36 sc
R93: sc2tog, 4 sc* repeat – 30 sc
R94: sc2tog, 3 sc* repeat – 24 sc
R95: sc2tog, 2 sc* repeat – 18 sc
R96: sc2tog, 1 sc* repeat – 12 sc
R97: sc2tog* repeat – 6 sc
Loop together and tie off.
Using the grey yarn, stitch around the edge with a backstitch. This is more optional, but I found it good for making the edge more defined since the bottom is smushy. Stitch right around the last and second to last row before you decreased. Okay, I thought I had a picture of this, but it turns out it didn’t upload onto my computer, so I’ll try to remember to take a picture later so you can see what I’m talking about.
Gauge
Start with red yarn.
R1: magic circle 6 sc
R2: 2sc in each st – 12 sc
R3: 2sc, 1 sc* repeat – 18 sc
switch to grey
R4: 2sc, 2 sc* repeat – 24 sc
Tie off. Use a green yarn to stitch an arrow on the gauge. Use grey yarn to stitch circle in middle.
Attach gauge to bottom handle on one side. Tuck in loose ends.
Hose
Start with grey.
R1: ch 12 and connect to first stitch
R2-5: sc in each st – 12 sc
switch to black
R6-50: sc in each st – 12 sc
switch to grey
R51-60: sc in each st – 12 sc
You can either stuff the hose or not. I decided not to. Attach it to the front of the bottom handle. My husband teased me because he said the bottom grey area should funnel out a bit. So if you want to you can increase every 2nd or 3rd row of the last 51 – 60 rows.
Band
R1: ch 61
R2-3: sc in each st – 60
Wrap around body and stitch front to back. I used the loose ends of the yarn to make a loop that keeps the hose in place before tying them off and tucking them away.
