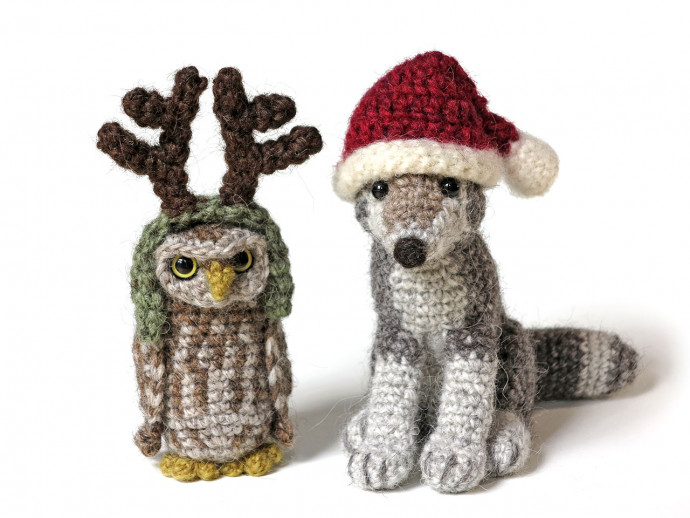
Crochet Santa Hat & Mini Antlers

The Crochet Santa Hat & Mini Antlers set is absolutely adorable and perfect for spreading holiday cheer! The Santa hat adds a fun and festive touch to any outfit, while the mini antlers bring a playful and whimsical vibe. Whether you're dressing up for a Christmas party or just wanting to add some holiday spirit to your day, this set is a must-have. The soft yarn used for crocheting ensures a comfortable fit and the attention to detail in the design makes it truly special. Get ready to jingle all the way with this charming accessory set that is sure to put a smile on your face and those around you.
Mini Santa hat pattern
For this pattern you need worsted weight yarn and hook E US/ 3,5 mm. I’ve used Lett Lopi yarn; colours white 0051 and dark red 1409. You’ll also need sewing materials and a hard brush to fuzzy up the brim and pompom.
The red part, work in rows
1. magic ring of 6 = 6
2. sc in each around = 6, close with sl st.
3. ch 2, (dc in next 2, 2 dc in next) x 2 = 8, sl st,
4. ch 2, (dc in next 3, 2 dc in next) x 2 = 10, sl st.
5. ch 2, (dc in next 4, 2 dc in next) x 2 = 12, sl st.
6. ch 2, (dc in next 3, 2 dc in next) x 3 = 15, sl st.
7. ch 2, (dc in next 4, 2 dc in next) x 3 = 18, sl st.
8. ch 2, (dc in next 8, 2 dc in next) x 2 = 20, sl st.
9. ch 2, (dc in next 9, 2 dc in next) x 2 = 22, sl st.
10. ch 2, (dc in next 10, 2 dc in next) x 2 = 24, change colour to white in sl st. If you need a bigger mini hat, don’t change to white just yet and continue like above by adding two stitches each round, till your hat is the right size. Keep in mind there will be white folded rounds (three rounds of sc’s) below the red part of the hat.
11. ch 2, (dc in next 11, 2 dc in next) x 2 = 26, sl st.
12. ch 1, sc in each around = 26, sl st.
13. ch 1, sc in each around = 26, sl st.
14. ch 1, sc in each around = 26, sl st in 1st and leave yarn end for sewing.
Now fold the white part upwards, so your hat will have a nice and thick brim. Sew it tight with the yarn end.
Mini antlers pattern
For the antlers you also need the worsted Lett Lopi yarn in the colour brown and any other colour you like and the same hook as above. Pipe-cleaners to make the pieces bendable are optional. I have used them but they are not safe for small children!
The antlers (brown, make two of each piece)
Part 1
1. magic ring of 4 = 4
2 – 6. sc in each around = 4, sl st and leave yarn end
Part 2
1. magic ring of 4 = 4
2 – 4. sc in each around = 4, sl st and leave yarn end
Part 3
1. magic ring of 4 = 4
2 – 3. sc in each around = 4, sl st and leave yarn end
Now you can insert the pipe-cleaners in the longest 4 pieces. Stretch the parts to get the right length and make sure the cleaners in the longest two (part 1’s) stick out just a little bit, so you can prick them into the headband. Now attach the parts 2 to the bottom parts of the parts 1 and the parts 3 to the top part of the parts 1, as shown in the picture. Weave in the yarn ends except for the yarn ends of the longest parts, so you can use them to sew the antlers to the headband.
Headband (any cheerful colour will do)
1. magic ring of 4 = 4
2 – 22. sc in each around = 4, sl st.
Now stretch this piece too and insert the pipe-cleaner. Now you can sew the band closed by putting the needle from the inside out through all the outside loops of the 4 st, clockwise. If you do it correctly, you can pull the yarn end and it will close the gap.
All you have to do now is attach the antlers to the headband, about two rounds apart.
