CrochetMenScarvesHatsGlovesSweatersCardigansSocksOther clothingWomenScarvesHatsGlovesShawls and cover upSweatersCardigansSocksSlippersBagsOther clothingChildrenScarvesHatsGlovesSweatersCardigansSocksSlippersOther clothingHomeBlankets and plaidsRugsHome decorationsPetsSchemesKnittingOther hand-madeChat
Crochet Spooky C2C Blanket

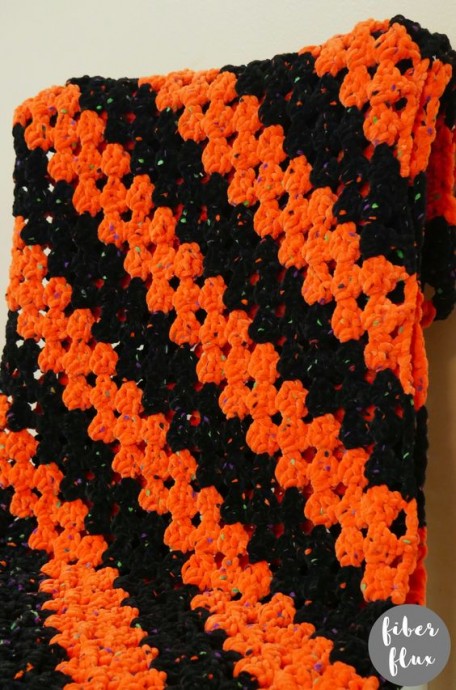
Are you ready to add a touch of spooky fun to your home decor with a Crochet Spooky C2C Blanket project? This exciting creation combines the intricate art of crochet with a playful Halloween theme, perfect for cozy evenings or as a unique gift to delight your loved ones. With its corner-to-corner design, you can watch the ghostly images come to life row by row, creating a one-of-a-kind masterpiece.
Whether you're a seasoned crocheter or just starting out, this project offers a mix of challenge and creativity that is sure to keep you engaged and entertained. So grab your yarn, hook, and a cup of hot cocoa, and get ready to craft a spooky blanket that will bring a touch of whimsy to your home all year round!Materials:
- K (6.5 mm) crochet hook
- 720 yards of super bulky/#6 weight yarn (I used 6 balls of Honey Bunny Candy from Hobbii in “Black” and “Orange” (Note: if that yarn is unavailable, you can use the regular Honey Bunny in “Black” and “Pumpkin”)
- Yarn/tapestry needle
- Scissors
- Measuring Tape
Sizing:
- 36 inches wide
- 36 inches tall
Pattern Notes:
- This blanket pattern is worked corner to corner.
- Make the blanket as wide and tall as you want by working as many rows of part 1 (increase) as you need, using HALF of your yarn, then move on to part two (decrease) using the remainder of the yarn to finish the blanket.
- Be sure to end on an even number for part 1 (increase) before moving onto part 2.
Striping Pattern & Yarn Usage:
- Because the Spooky C2C Crochet Blanket is worked corner to corner, you’ll use up the colors at different rates as the blanket grows. See below for three striping ideas for your blanket, using two colors as shown.
- Striping idea #1: Use half of the yarn in one color for the increase part and the half the yarn in the other color for the decrease part. The result is a color block look with half orange and half black.
- Striping idea #2: Alternate each color of yarn to make stripes, but use each ball until they run out. For example, start with orange, work the pattern until the ball runs out, then switch to black, use that one until it runs out, and so on. The result is stripes of color but the stripes will be of varying widths.
- Striping idea #3: (As shown) This option is if you want even stripes of color across the entire blanket. For this option, weigh half of your yarn (without the labels), then work the first part (increase) of the blanket until it weighs the same or slightly less than the yarn you weighed. Then work part 2 (decrease) with the remaining yarn. Because you’ll work the two colors at different rates and use up the yarn differently, weighing is an easy way to know when to stop part 1 and start part 2.
Spooky C2C Crochet Blanket Pattern:
Note: I did three rows of each color. For other striping options, see “Striping Pattern & Yarn Usage” section above.
Part 1-The Increase:
- Chain 6, then work a sl st into the furthest ch from the hook to create a ring.
- Row 1: Ch 4 (counts as a dc, ch 1), then work 3 dc into the ring. Then ch 1, then work a dc into the center of the ring.
- Row 2: Ch 4, then work (3 dc, ch 1) into the first ch 1 space of the row. Work (3 dc, ch 1, 1 dc) into the last ch 1 space of the row.
- Row 3: Ch 4, then work (3 dc, ch 1) into the first ch 1 space of the row. Work (3 dc, ch 1) into each ch 1 space across. Then work (3 dc, ch 1, 1 dc) into the last ch 1 space of the row.
- Repeat row 3 until your blanket is roughly half the size you’d like it to be (or you’ve used half of your yarn), then continue onto the next section to begin the decrease part.
Part 2-The Decrease:
- Row 1: Ch 4, then skip the first ch 1 space. Work (3 dc, ch 1) in each ch 1 space across until just before the last space (turning chain space). Instead of working into this space, work a dc into the top chain of the turning chain.
- Repeat row 1 of the decrease until just a top point remains. Fasten off and weave in ends that remain. Note: if the top is challenging for you, be sure to check out the video for this part (or any other part) to see me walk through it step by step!
Finishing & Assembly:
- Weave in any ends and you’re done!
No comments
Write a comment
