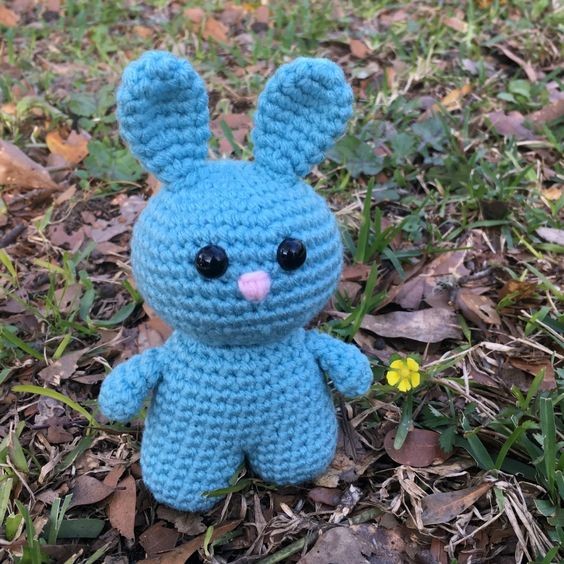
Crochet Easter Bunny Buddy

The Crochet Easter Bunny Buddy is a delightful addition to your holiday decorations! With its fluffy yarn and adorable floppy ears, this sweet little bunny will surely bring a smile to your face. Whether you place it on your mantelpiece or use it as a cuddly toy for the little ones, this handmade creation is bound to spread joy and cheer.
Its intricate crochet details and pastel colors make it a lovely Easter-themed decor piece that can be cherished for years to come. Plus, the soft texture of the bunny adds a cozy touch to any room. Embrace the magic of Easter with this charming Crochet Easter Bunny Buddy - a heartwarming companion that embodies the spirit of the season!Materials Used:G or 4.00 MM Hook
1 Ball Worsted Weight Yarn in Blue and Pink
Stitch Marker (to mark ends of rounds if needed)
Fiberfill
Tapestry Needle
Two Eyes (I used safety eyes but you could use buttons or sew them in yourself)
Stitches Used:CH – Chain
SC – Single Crochet
INC – Single Crochet Increase
DEC – Single Crochet Decrease
SLST – Slip Stitch
Notes:
This pattern is written using American crochet terms.
Approximate finished size is 6.5” tall, 3” wide, and 2.5” in depth.
To make smaller or larger try varying the hook size and yarn weight. You will want a stitch that does not let fiberfill come through.
Body (In Blue or other main color; worked from the feet up)
You will start by making two legs as follows:
Row 1: Create a magic circle, CH 1 and SC 6 into the circle then pull tight. You may also use a CH 2 and 6 SC into the first chain then pull tight. Do not join. (6)
Row 2: INC 6 (12)
Row 3: *SC, INC* 6 times (18)
Row 4-7: SC 18 (18)
The first leg you will SLST and finish off. The second you will not.
Row 8 you will be working in both legs from where you are in the second.
Row 8: (Starting from where you left off on the second leg) SC into any stitch in the first leg, SC 14, skip 3 stitches, SC in the stitch 3 stitches away from where you left off on the second leg, SC 14 (30)
You should have the three skipped stitches from each leg touching. Take an extra piece of yarn and stitch these together now.
Row 9-13: SC 30 (30)
Row 14: *DEC, SC 3* 6 times (24)
Row 15: SC 24 (24)
Begin stuffing with fiberfill now.Row 16: *DEC, SC 2* 6 times (18)
Row 17: *DEC, SC* 6 times (12)
Row 18: DEC 6 (6)
Finish off leaving a long tail for sewing, stuff with fiberfill, then weave tail through the remaining stitches and pull tight to close. Leave remaining tail for sewing.
Head (In Blue or other main color)
Row 1: Create a magic circle, CH 1 and SC 6 into the circle then pull tight. You may also use a CH 2 and 6 SC into the first chain then pull tight. Do not join. (6)
Row 2: INC 6 (12)
Row 3: *SC, INC* 6 times (18)
Row 4: *SC 2, INC* 6 times (24)
Row 5: *SC 3, INC* 6 times (30)
Row 6: *SC 4, INC* 6 times (36)
Row 7: *SC 5, INC* 6 times (42)
Row 8-12: SC 42 (42)
Row 13: *DEC, SC 5* 6 times (36)
Row 14: *DEC, SC 4* 6 times (30)
Row 15: *DEC, SC 3* 6 times (24)
If using safety eyes place them now. I placed mine between rows 8 and 9. Once placed begin filling with fiberfill.
Row 16: *DEC, SC 2* 6 times (18)
Row 17: *DEC, SC* 6 times (12)
Row 18: DEC 6 times (6)
Finish off leaving a long tail for sewing, stuff with fiberfill, then weave tail through the remaining stitches and pull tight to close. Leave remaining tail for sewing. I attached my head at Row 16 to the body at Row 16.
Arms (In Blue or other main color)
Row 1: Create a magic circle, CH 1 and SC 6 into the circle then pull tight. You may also use a CH 2 and 6 SC into the first chain then pull tight. Do not join. (6)
Row 2: *SC, INC* 3 times (9)
Row 3: SC 9 (9)
Row 4: *DEC, SC* 3 times (6)
Row 5: SC 6 (6)
SLST to next stitch and finish off leaving a long tail for sewing. Stuff slightly, fold the last row flat and attach through both sides to the body.
Tail (In Blue or other main color)
Row 1: Create a magic circle, CH 1 and SC 6 into the circle then pull tight. You may also use a CH 2 and 6 SC into the first chain then pull tight. Do not join. (6)
Row 2: INC 6 (12)
Row 3-4: SC 12 (12)
Row 5: DEC 6 (6)
SLST to next stitch and finish off leaving a long tail for sewing. Stuff slightly and attach above the legs on the back of the body.
Ears (In Blue or other main color)
Row 1: Create a magic circle, CH 1 and SC 6 into the circle then pull tight. You may also use a CH 2 and 6 SC into the first chain then pull tight. Do not join. (6)Row 2: INC 6 (12)
Row 3-5: SC 12 (12)
Row 6: *DEC, SC 2* 3 times (9)
Row 7: SC 9 (9)
Row 8: *DEC, SC* 3 times (6)
Finish off leaving a long tail for sewing, flatten the ears to create a curve at the top and attach around the base of the ear to the top of the head. I placed my ears slightly slanted inward between Rows 2 and 4 of the Head.
