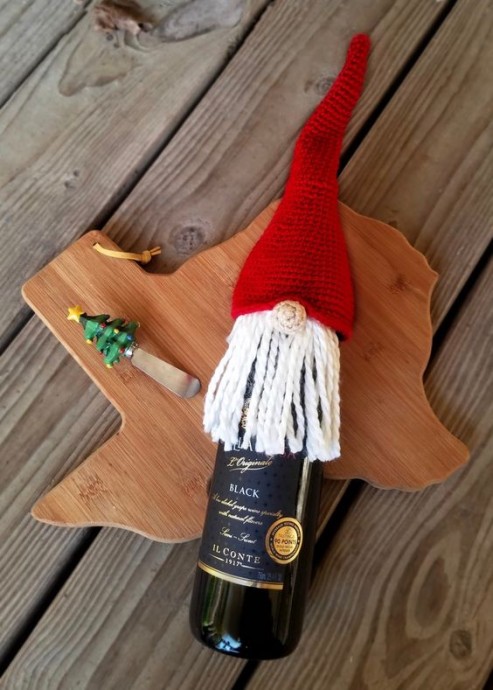
Crochet Scandinavian Gnome Bottle Topper

The Crochet Scandinavian Gnome Bottle Topper is the perfect accessory to add whimsy and charm to your holiday gatherings. Crafted with care and attention to detail, these adorable gnomes are sure to be a conversation starter at any party. With their vibrant colors and cute design, these toppers bring a touch of festive cheer to every bottle they adorn.
Whether you're hosting a dinner party or looking for a unique gift for a friend, these little gnomes make a delightful addition to any celebration. So why not sprinkle some magic into your next gathering with these lovable bottle toppers?Materials Used:
G or 4.25 MM Hook
1 Ball Worsted Weight Yarn Each in Red and Nude
1 Ball Bulky Weight Yarn in White
Stitch Marker (to mark ends of rounds if needed)
Tiny Bit of Fiberfill
Tapestry Needle
Stitches Used:CH – Chain
SC – Single Crochet
DEC – Single Crochet Decrease
FLO – Front Loops Only
SLST – Slip Stitch
Notes:
This pattern is written using American crochet terms.
Approximate finished size is 9.5” tall from top to bottom of the hat and 4” in diameter at its widest spot..
To make smaller or larger try varying the hook size and yarn weight.
Hat (In Red)
Row 1: Create a magic circle, CH 1 and SC 6 into the circle then pull tight. You may also use a CH 2 and 6 SC into the first chain then pull tight. Do not join. (6)
Row 2: SC 6 (6)
Row 3: INC, SC 5 (7)
Row 4: SC 7 (7)
Row 5: INC, SC 6 (8)
Row 6: SC 8 (8)
Row 7: INC, SC 7 (9)
Row 8: SC 9 (9)
Row 9: INC, SC 8 (10)
Row 10: SC 10 (10)
Row 11: INC, SC 9 (11)
Row 12: SC 11 (11)
Row 13: INC, SC 10 (12)
Row 14: SC 12 (12)
Row 15: INC, SC 11 (13)
Row 16: SC 13 (13)
Row 17: INC, SC 12 (14)
Row 18: SC 14 (14)
Row 19: INC, SC 13 (15)
Row 20: SC 15 (15)
Row 21: INC, SC 14 (16)
Row 22: SC 16 (16)
Row 23: INC, SC 15 (17)
Row 24: SC 17 (17)
Row 25: INC, SC 16 (18)
Row 26: SC 18 (18)
Row 27: *INC, SC 5* 3 times (21)
Row 28: SC 21 (21)
Row 29: *INC, SC 6* 3 times (24)
Row 30: SC 24 (24)
Row 31: *INC, SC 7* 3 times (27)
Row 32: SC 27 (27)
Row 33: *INC, SC 8* 3 times (30)
Row 34: SC 30 (30)
Row 35: *INC, SC 4* 6 times (36)
Row 36-37: SC 36 (36)
Row 38: *INC, SC 5* 6 times (42)
Row 39-40: SC 42 (42)
Row 41: *INC, SC 6* 6 times (48)
Row 42-43: SC 48 (48)
Row 44: *INC, SC 7* 6 times (54)
Row 45-49: SC 54 (54)
Row 50: In FLO, SC 54 (54)
Row 51: SC 54 (54)
Row 52: SC 54 (54) Finish off leaving a long tail for sewing.
Nose (In Nude)
Row 1: Create a magic circle, CH 1 and SC 6 into the circle then pull tight. You may also use a CH 2 and 6 SC into the first chain then pull tight. Do not join. (6)
Row 2: INC 6 (12)
Row 3-4: SC 12 (12)
Row 5: DEC 6 times (6)
Finish off leaving a long tail for sewing, stuff with fiberfill, then weave tail through the remaining stitches and pull tight to close. Leave a tail to attach with. You will attach the nose after you’ve attached the beard.
Beard (In White)
Cut pieces of your Bulky, white yarn to double the length you want your beard. I cut mine into 7” pieces. You can make as many or few as you would like for your gnome, I did 13 pieces for mine. Take a single piece and fold it in half. You will be looping these through and over themselves on the back loops from Row 50 in the hat. I started in the loop opposite the finished knot in the piece and worked equally on both sides. Once your beard is attached you can cut it evenly or at an angle or however you would prefer.
Now you can attach the nose. I used the tail from the nose to attach it to the inside of the hat in the center of the beard. You basically want the edge of the hat to drape over the nose and secure it to the inside of the brim so no off color yarn shows through the hat.
