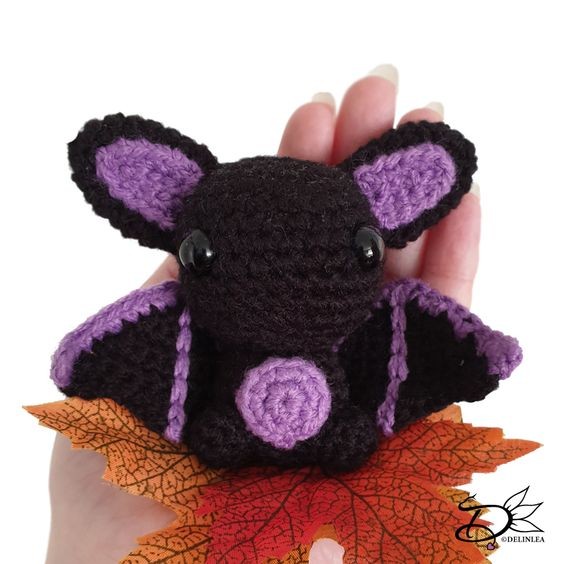
Crochet Bat Amigurumi

Creating a crochet bat amigurumi can be a delightful and rewarding project for both beginners and experienced crocheters alike. These adorable little creatures are not only fun to make but also make charming gifts or decorations. To bring your amigurumi bat to life, select your favorite yarn colors and get started with basic crochet stitches like single crochet and increase/decrease techniques.
Don't be afraid to experiment and add your unique touch by incorporating different embellishments like safety eyes or small pieces of felt for facial features. With a bit of patience and creativity, you'll have a cute and cuddly crochet bat that will surely bring a smile to your face and those around you.For this DIY you’ll need:
♥ Yarn in the colors; Black and Purple (I used Budgetyarn.com).
♥ Crochet Hook (I used a 2,5mm hook).
♥ Stuffing.
♥ Scissors.
♥ Sewing Pins.
♥ Yarn Needle.
♥ Safety Eyes, 9mm.
Stitches used (US Terms):
Magic Ring.
CH = Chain.
SLST = Slip Stitch.
SC = Single Crochet.
HDC = Half Double Crochet.
DC = Double Crochet.
ST = Stitch.
Inc = Increase.
Dec = Decrease.
(…) = Repeat the space in brackets the given number of times.
[…] = Total number of stitches.
Pattern
Work in continues rounds, use a stitch marker to mark your first stitch of every row. This is for every part, unless stated otherwise.
Head + Body
Use the color Black.
1: 6SC in Magic Ring. [6]
2: 2SC in each st around. [12]
3: (1SC, inc) 6 times. [18]
4: (2SC, inc) 6 times. [24]
5: (3SC, inc) 6 times. [30]
6: 30SC. [30]
|
11: 30 SC. [30]
12: (3SC, dec) 6 times. [24]
13: (2SC, dec) 6 times. [18] Insert the eyes between row 8 and 9, about 4 cm apart. Stuff the head here to make it easier for yourself. You can do it last but it’s harder to stuff nicely.
14: (1SC, dec) 6 times. [12]
15: 12SC. [12]
16: (1SC, inc) 6 times. [18]
17: 18SC. [18]
|
20: 18SC. [18]
21: (1SC, dec) 6 times. [12] Stuff the body now as well.
22: Dec all around. [6]
Fasten off and weave in tail.
Ears (Make 2)
Use the color black
1: 6SC in Magic Ring. [6]
2: (1SC, inc) 3 times. [9]
3: (2SC, inc) 3 times. [12]
4: 12SC. [12]
|
8: 12 SC. [12]
Fasten off and leave a long tail for sewing.
Inside of the Ears (Make 2)
Use the color Purple.
You won’t work in continues rounds.
1: Ch5, insert in second Ch from hook, 4SC, turn. [4]
2: 4SC, 3SC in the next st, 4SC. [11]
Fasten off and leave a long tail for sewing, sew this to the outer ear.
Belly
Use the color Purple.
1: 6SC in Magic Ring. [6]
2: 2SC in each st around. [12]
Fasten off and leave a long tail for sewing.
Legs (Make 2)
Use the color Black.
1: 6SC in Magic Ring. [6]
2: (1SC, inc) 3 times. [9]
3: 9SC. [9]
Fasten off and leave a long tail for sewing.
Wings (Make 2)
Start with the color Black.
You won’t work in continues rounds.
1: Ch3, insert in second Ch from hook, 2SC, turn. [2]
2: Inc 2 times, turn. [4]
3: Inc, 2SC, inc, turn. [6]
4: Inc, 4SC, inc, turn. [8]
5: 8SC, turn. [8]
6: Inc, 6SC, inc, turn. [10]
7: 10SC, turn. [10]
8: Ch3, DC + HDC in the next st, 3SC, HDC + DC in the next st, Ch1, DC + HDC in the next st, 4SC.
Change to the color Purple.
Crochet along the edge of the wing now. In the middle of the wing you can either stitch on a line with Purple yarn of use the Surface Crochet Technique.
Assembling
By using sewing pins, you can position all parts before sewing them on. This way you can easily move them around until you are happy with how it looks.
Sew the ears on to of the head of the Bat and his belly to the body. His legs go right beside, slightly lower his belly. On His back you will sew his wings. Position them however you like.
If you want you can sew on a little mouth
