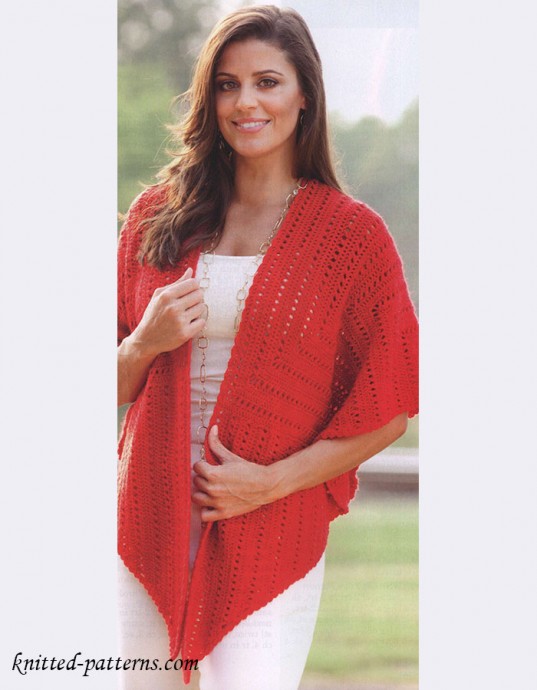
Crochet Lovely Shawl

Isn't there something so charming about crocheted shawls? They are the perfect accessory to add a touch of elegance and warmth to any outfit! Creating a crochet lovely shawl can be a delightful experience, full of creativity and joy. As you work the yarn through your fingers, forming intricate patterns stitch by stitch, you can't help but feel a sense of accomplishment.
The beauty of a crochet shawl lies not only in its intricate design but also in the love and care that goes into making it. Whether you're gifting it to a friend or keeping it for yourself, a crochet lovely shawl is sure to bring a smile to anyone who wears it. So grab your crochet hook and some soft yarn, and let's create something truly special together!FINISHED SIZE
One size fits most
FINISHED MEASUREMENTS
34 inches from back neckline to front bottom point
26 inches from back neckline to bottom point
MATERIALS
Omega Sol fine (sport) weight acrylic yarn (1 3/4oz/164 yds/50g per skein) (2): 9 skeins #1040 red
Size G/6/4mm crochet hook or size needed to obtain gauge
Tapestry needle
GAUGE
6 rows = 2 1/2 inches; 7 cross-sts = 3 inch
PATTERN NOTES
Weave in loose ends as work progresses.
Chain-3 at beginning of row counts as first double crochet unless otherwise stated.
Chain-4 at beginning of row counts as first treble crochet unless otherwise stated.
Join with slip stitch as indicated unless otherwise stated.
SHAWL
SQUARE
Make 3.
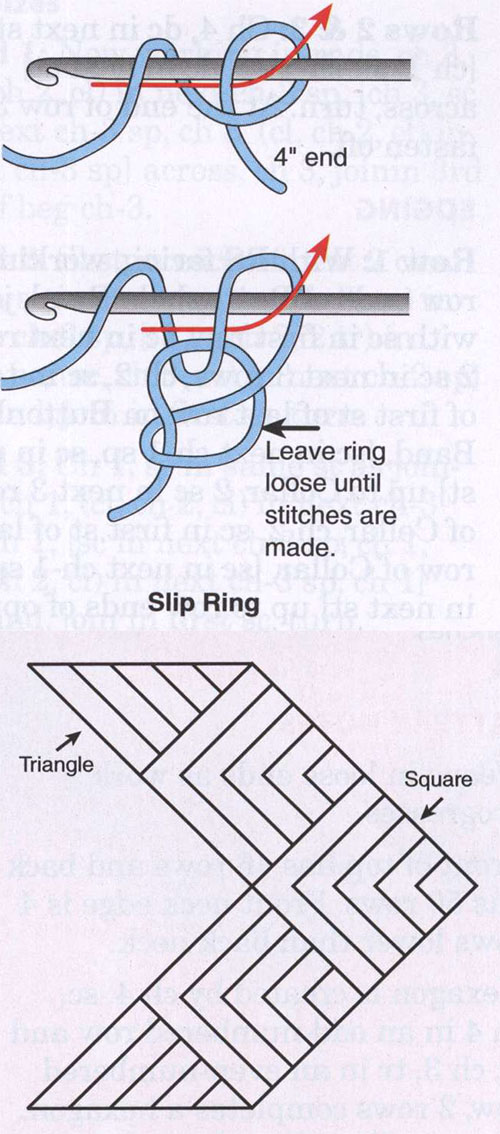
Row 1: Leaving 6-inch length, make a slip ring (see illustration), ch 3 (see Pattern Notes), 4 dc in ring, turn. Pull rem length to close opening. (5 dc)
Row 2: Ch 3, dc in 2nd dc, 3 dc in next dc, dc in next dc, dc in top of ch-3, turn. (7 dc)
Row 3: Ch 3, dc in each of next 2 dc, 5 dc in next dc, dc in each next 2 dc, dc in top of ch-3, turn. (11 dc)
Row 4: Ch 3, dc in each of next 4 dc, 3 dc in next dc, dc in each of next 4 dc, dc in top of ch-3, turn. (13 dc)
Row 5: Ch 3, dc in each of next 5 dc, 5 dc in next dc, dc in each of next 5 dc, dc in top of ch-3, turn. (17 dc)
Row 6: Ch 4 (see Pattern Notes), sk next dc, tr in next dc, tr in sk dc (cross-st made), [sk next dc, tr in next dc, tr in sk dc] 3 times, (tr, ch 2, tr) in middle dc of 5-dc group that has a tr already worked in it, tr in next dc, tr in same middle dc of 5-dc group behind tr just made, [sk next dc, tr in next dc, tr in sk dc] 3 times, tr in top of ch-3, turn. (8 cross-sts)
Note: Each cross-st row has 6 more cross-sts than the previous cross-st row, 3 each side of center.
Row 7: Ch 3, dc in each tr to ch-2 sp at center, 5 dc in ch-2 sp, dc in each tr across, dc in top of ch-4, turn. (25 dc)
Row 8: Ch 3, dc in each dc across, working 5 dc in center dc of 5-dc group, turn.
Row 9: Ch 4, sk next dc, tr in next dc, tr in sk dc, [sk next dc, tr in next dc, tr in sk dc] across to center dc of 5-dc group, (tr, ch 2, tr) in same center dc, tr in next dc, tr in same center dc of 5-dc group behind tr just made, [sk next dc, tr in next dc, tr in sk dc] across, ending with tr in top of ch-3, turn. (14 cross-sts)
Rows 10-39: [Rep rows 7-9 consecutively] 10 times.
At the end of row 39, 37 each side of center, 74 cross-sts total.
Row 40: Rep row 7. Fasten off.
TRIANGLE
Make 2.
Note: At beg of each row for Triangle the changing beg chs will vary to maintain the shape.
Row 1: Leaving 6-inch length, make a slip ring, ch 3, 2 dc in ring, turn. Pull rem length to close opening. (3 dc)
Row 2: Ch 3, dc in next dc, 2 dc in top of ch-3, turn. (4 dc)
Row 3: Ch 4, 2 dc in same dc as beg ch-4, dc in each of next 2 dc, dc in top of ch-3, turn. (6 dc)
Row 4: Ch 3, dc in next 4 dc, 2 dc in top of ch-4, turn. (7 dc)
Row 5: Ch 4, 2 dc in same dc as beg ch-4 dc, dc in each of next 5 dc, dc in top of ch-3, turn. (9 sts)
Row 6: Ch 3, tr in 3rd dc, tr in 2nd dc behind tr just made, [sk next dc, tr in next dc, tr in sk dc] twice, sk next dc, tr in top of ch-4, tr in sk dc, (tr, dtr—see Stitch Guide) in top of same ch-4, turn. (4 cross-sts)
Row 7: Ch 4, 2 dc in dtr, dc in each tr across, dc in top of ch-3.
Row 8: Ch 3, dc in each dc across, ending with (2 dc, tr) in top of ch-4, turn.
Row 9: Ch 5, tr in first tr, tr in next dc, tr in first tr again behind 2nd tr, [sk next dc, tr in next dc, tr in sk dc] across, ending with tr in top of ch-3, turn. (7 cross-sts)
Row 10: Ch 3, dc in each st across, ending with (2 dc, tr) in top of ch-5, turn.
Row 11: Ch 4, 2 dc in same st as beg ch-4, dc in each st across, dc in top of ch-3, turn.
Row 12: Ch 4, tr in next dc, tr in same st as beg ch-4 behind tr just made, [sk next dc, tr in next dc, tr in sk dc] across, ending with tr in top of ch-4, tr in sk dc, (tr, dtr) in top of same ch-4, turn. (10 cross-sts)
Note: For rows 13-40, each cross-st row will have 3 more cross-sts than the previous cross-st row.
Rows 13-36: [Rep rows 7-12 consecutively] 4 times.
Rows 37-40: Rep rows 7-10. Fasten off.
ASSEMBLY
Sew the 3 Squares and 2 Triangles tog following Assembly Diagram.
TRIM
Rnd 1: Join (see Pattern Notes) yarn in any corner, ch 2, dc in same st, [sk 2 sts, sl st in next st, ch 2, dc in same st] around entire outer edge. When working along sides of rows, work sl st at end of dc rows and 2 sl sts at end of tr rows. At corners do not sk 2 sts to ease around corner. Make sure there are no flares or puckers around edge, join in same st as beg ch-2. Fasten off.

