Crochet Scarecrow Doll
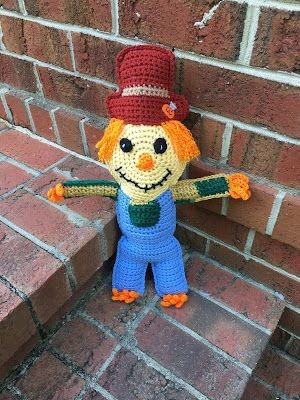
If you're looking to add a touch of whimsy to your seasonal decor, a Crochet Scarecrow Doll might just be the perfect addition! With its charming country appeal and handmade charm, this lovable little creation can bring a smile to anyone's face. Whether perched on a shelf for a cozy autumn feel or given as a thoughtful gift, this crochet scarecrow doll is sure to delight both the young and the young at heart.
So grab your yarn and crochet hook, and let your creativity soar as you bring this adorable scarecrow to life stitch by stitch. With its cute hat, colorful patches, and friendly smile, this little buddy will quickly become a treasured part of your fall decorations, spreading joy wherever it goes.Size: approximately 19" long
Materials:
--4.5mm hook
--#4 worsted weight yarn (Terra Cotta, Orange, Black, White, Medium Blue, Green/Gold, Taupe/Tan and a pale/light yellow skin color) -- not a lot of each color; the most used was the body/leg portion - approx. 110 - 150 yds and the face - 80 - 11 yds
--1 decorative button (on hat)
--tapestry needle for weaving
U.S. Stitch Abbreviations:
Ch: chain
Sl st: slip stitch
St: stitch(es)
SC: single crochet
SC2tog: single crochet 2 stitches together (creates a decrease)
BLO: back loops only
Rep: repeat
MR: magic ring
FO: fasten off
Directions:
Head (make 2):
(Note: I used a pale yellow color. Any skin color yarn will work just fine. I worked the head portion in the round; so use a stitch marker to keep track of beginning/ending stitch)
1. 8 SC to MR. (8)
2. 2 SC in each st around. (16)
3. 2 SC in first st, 1 SC in next st. Rep around. (24)
4. 2 SC in first st, 1 SC in next 2 st. Rep around. (32)
5. 2 SC in first st, 1 SC in next 3 st. Rep around. (40)
6. 2 SC in first st, 1 SC in next 4 st. Rep around. (48)
7. 2 SC in first st, 1 SC in next 5 st. Rep around. (56)
8. 2 SC in first st, 1 SC in next 6 st. Rep around. (64)
9. 2 SC in first st, 1 SC in next 7 st. Rep around. Join to first st with a sl st and FO. Weave ends. (72)
Hat (make 2):
1. With Terra Cotta yarn, Ch21. SC in 2nd ch from hook and across. Ch1 and turn. (20)
2. SC across. Ch1 and turn. (20)
3-5. Rep #2. At the end of Row 5, FO and weave ends.
6. With Taupe/Tan yarn, join in the 5th st (Sk 4 st) with a sl st and ch1. SC in same st and into the next 11 st. Ch1 and turn. (12)
7. SC across. FO and weave ends. (12)
8. Re-join Terra Cotta yarn. SC across. Ch1 and turn. (12)
9-15. SC across. Ch1 and turn. At the end of Row 15, FO and weave ends.
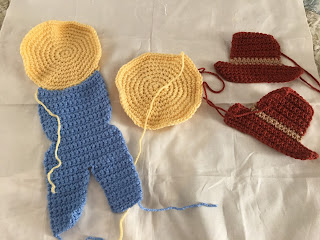
Body (make 2):
1. Join Medium Blue yarn into any stitch with a sl st into the BLO of Round 9 of the Head. Into the BLO, SC in same and into the back loops of the next 15 st. Ch1 and turn.
2. SC across. Ch1 and turn. (16)
3-13. Rep # 2. (16)
14. SC2tog, 1 SC in the next 12 st, SC2tog. Ch1 and turn. (14)
15. SC2tog, 1 SC in the next 10 st, SC2tog. Ch1 and turn. (12)
16. 2 SC in the first st, 1 SC in the next 10 st, 2 SC in the last st. Ch1 and turn. (14)
17. 2 SC in the first st, 1 SC in the next 12 st, 2 SC in the last st. Ch1 and turn. (16)
18. 2 SC in the first st, 1 SC in the next 14 st, 2 SC in the last st. Ch1 and turn. (18)
19. SC across. Ch1 and turn. (18)
20-24. Rep #19.
First Leg:
25. SC in the first 7 st, 2 SC in the next st. Ch1 and turn. (9)
26. SC across. Ch1 and turn. (9)
27. SC across. Ch1 and turn. (9)
28. SC2tog, 1 SC in the next 7 st. Ch1 and turn. (8)
29. SC across. Ch1 and turn. (8)
30-36. Rep #29. At the end of Row 36, FO and weave ends. (8)
Second Leg:
Join yarn at the other end of Row 24 and Rep steps #25 - 36 for the second leg.
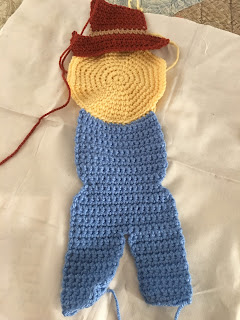
Now, center hat at the top and whipstitch to attach. I placed Row 1 of Hat to Round 7 of Head, with 2 stitches on each end of the hat hanging over.
By now, you should have 2 completed/attached Hat to Head to Body pieces (Front section and Back section)
Arms:
1. Join Green/Gold (or your color of choice) to the first side stitch of the body with a sl st and ch1. SC in same st. SC in the next 3 st. Ch1 and turn. (4)
2. SC across. Ch1 and turn. (4)
3-16. Rep #2. At the end of Row 16, FO and weave ends.
Repeat on the opposite side of Body. And, then repeat again on the second Body piece.
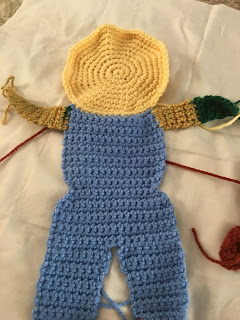
Now, that the arms are attached, you will be adding the facial features to only one of the Head sections.
Eyes:
1. With Black yarn, 6 SC into MR. Sl st join to first st and FO. Leave a tail for attaching. (6)
2. I used White yarn to embroider a pupil.
3. Attach eyes at Rounds 4-5 of the Head.
Nose:
1. With Orange yarn, Ch4. SC in 2nd ch from hook and across. Ch1 and turn. (3)
2. SC2tog, SC in next st. Ch1 and turn. (2)
3. SC2tog. FO and leave a tail for attaching.
4. Attach nose to center of Head at Round 1.
Mouth:
For the mouth, I used Black yarn and embroidered a smile, then continued to make the mouth to look like stitches.
Patch:
1. With Green/Gold yarn, Ch7. SC in 2nd ch from hook and across. Ch1 and turn. (6)
2. SC across. Ch1 and turn. (6)
3-6. Rep #2. (6)
7. SC evenly around. FO and leave a tail for attaching to center front of Body.
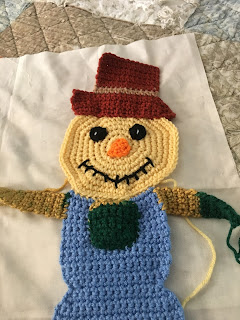
Now, you are ready to attach the Front and Back sections together. With the Front section facing me, I joined Terra Cotta yarn on the right side, bottom of hat with a sl st and Ch1. SC in same. I then SC joined my 2 sections together, changing colors, where needed, to match up with each area. As you join the 2 pieces together, add your polyfil (or your stuffing of choice). For the arms, I had to stuff small amounts at a time to get it in.
Finally, you are ready to attach hair, fingers and toes.
Hair:
For the hair, I joined yarn and tied into a double knot. I then used my tapestry needle to fray the yarn. I repeated this 3 more times - for a total of 4 times on one side. I then repeated the process on the opposite side of the face.
Fingers:
1. With Orange yarn, I joined yarn on the arm end. *Ch6. Sl st into 2nd ch from hook and next 4 ch. Sl st into the base stitch of the arm. Sl st into the next st.* Rep from * to * until you have 4 fingers made.
2. Repeat on opposite arm.
Feet:
I gave my Scarecrow 6 feet. The feet are made the same way as the fingers were made.
Last, I added a decorative Pumpkin button to the hat. And, that's it for this super simple and cute "Scarecrow Doll."
I hope you all will enjoy this little guy as much as I did in designing him.
