Crochet Paw Print C2C Blanket

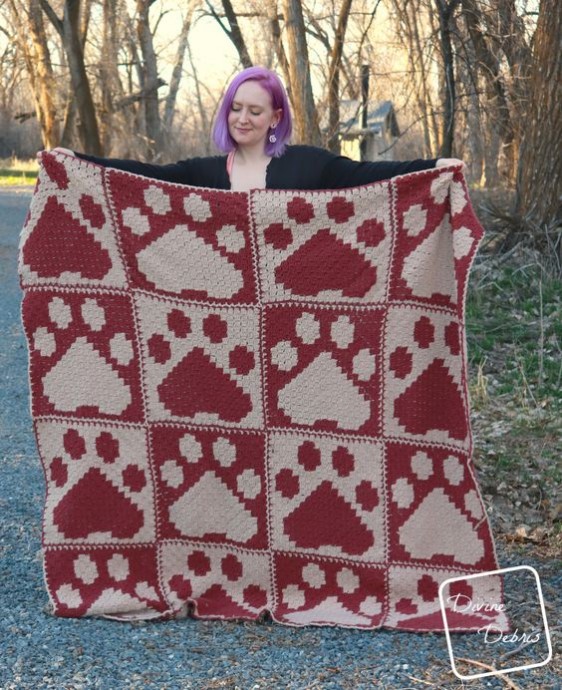
Unleash your creativity with the Crochet Paw Print C2C Blanket! This unique and adorable blanket design is perfect for all the animal lovers out there. Whether you're a cat person, a dog person, or simply appreciate the beauty of paw prints, this blanket is sure to bring a touch of charm to any space.
The Crochet Paw Print C2C Blanket is a labor of love, meticulously handcrafted to perfection. Using the Corner-to-Corner (C2C) crochet technique, this blanket showcases a stunning pattern of paw prints that will capture the hearts of both young and old. The intricate details of each paw print are carefully woven into the fabric, creating a textured and visually appealing design. Made with soft and cozy yarn, this blanket not only looks amazing but also provides warmth and comfort. Whether you're snuggling up on the couch, adding a decorative touch to your bed, or gifting it to a loved one, the Crochet Paw Print C2C Blanket is a versatile and heartwarming addition to any home.Level
Intermediate (need to know how to read a graph and corner to corner crochet)
Materials
- US G (4.00 mm) crochet hook
- Worsted/ medium/ size #4 weight yarn
- 2 colors
- Blanket: 24 oz/ 1530 yds ea color
- Square: A: 2 oz/ 127 yds, B: 1.8 oz/ 115 yds
- I used Pound of Love by Lion Brand Yarn for this pattern. 2 skeins each of Sugar Cookie and Cinnabar.
- Notions: scissors, measuring tape, yarn needle
Gauge
- 5 blocks x 5 rows = 4″ (blocked)
Blocked Cute Paw Print C2C Blanket Crochet Pattern Finished Product Details(approx not including fringe)
Blanket
Cute Paw Print C2C Blanket Crochet Pattern
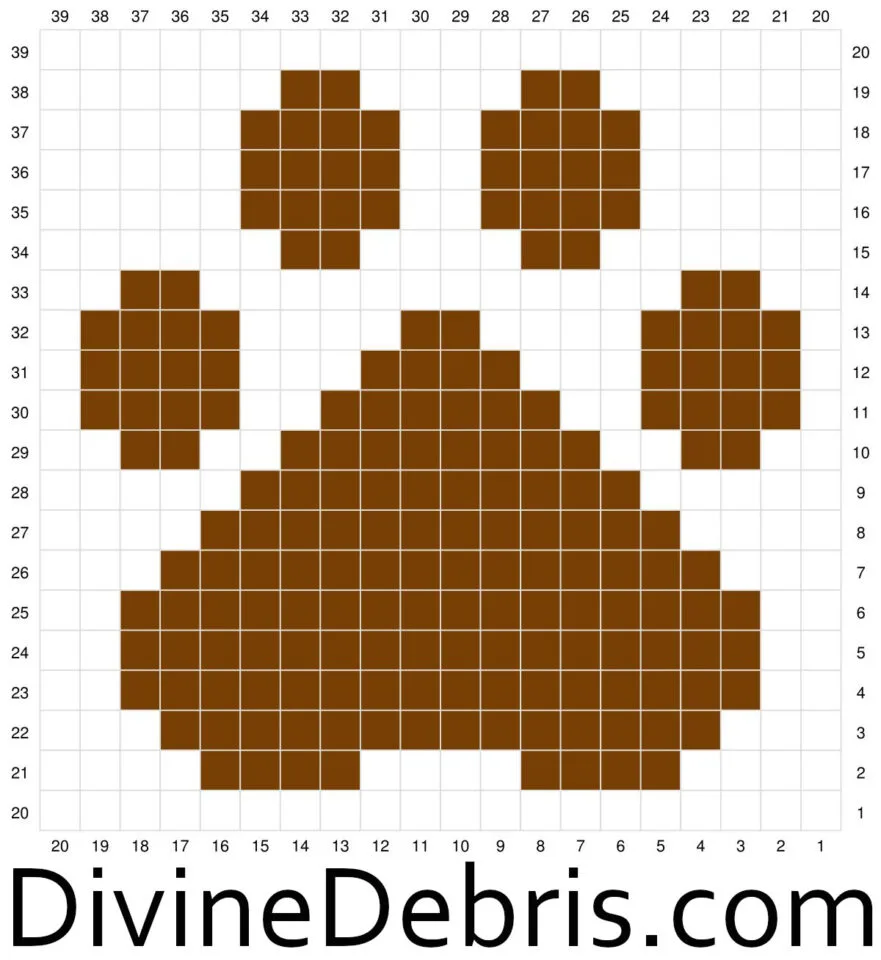
Cute Paw Print C2C Square 1 Graph
Make 8
Key: color A is white and color B is brown.

Begin in the bottom right hand corner with color A.
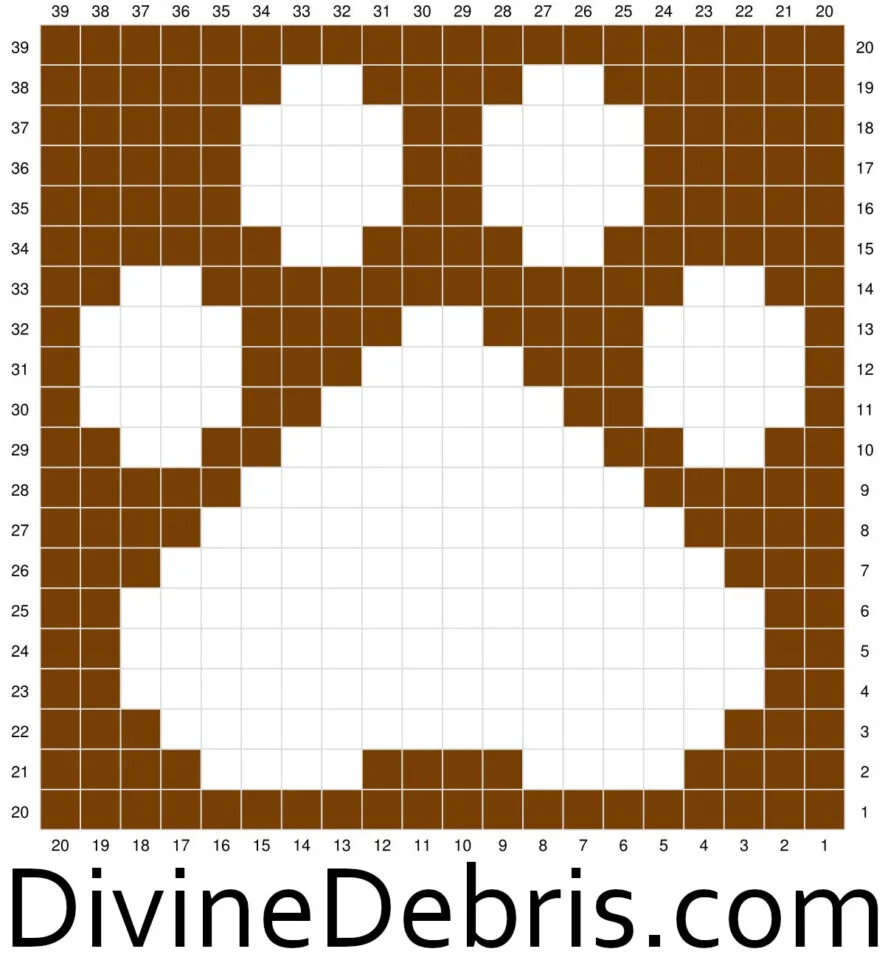
Cute Paw Print C2C Square 2 Graph
Make 8
Key: color A is brown and color B is white.

Begin in the bottom right hand corner with color A.
Seaming for the Cute Paw Print C2C Blanket
For the first square you will create a border that subsequent squares are joined to: with the RS
facing you, create a slipknot on your hook (this will make your first sc a standing st, if you’d
rather pull up a loop and ch 1 to create your sc you can), sc into the first st on the corner (this
can be a ch-3 space or a dc), [ch 3 and skip the next block,sc into the space between the blocks, ch 3 and skip the next block, repeat from * to * across until you get to the last block, sc
into the last st of the block, ch 3, sc into the same st as the last sc,] repeat from [ to ] twice
more, ch 3 and skip the next block, sc into the space between the block, ch 3 and skip the next block, repeat from * to * across until you get to the last block, sc into the last st of the block,
ch 3 and slip st into the first st. Fasten off, weave in your ends and block your square if desired.
For the 2nd square and on: with the RS facing you line up the new square with the square or
squares you want to join it to. Repeat the instructions for the first square until you get to the
edge or edges where you want to join your squares.
Starting at the corner: sc into the last st of the block, ch 1, slip st into the corner ch-3 of the
square you’re joining to, ch 1, sc into the same st as the last sc, ch 1, slip st into the next ch-3 of the square you’re joining to, ch 1, skip the next block, sc into the space between the blocks,
repeat from * to * the rest of the way down the side. If you’re joining multiple squares, repeat
the corner and side instructions until you get back to your first st, join with a slip st.
Fasten off, weave in your ends and block your square if desired.
