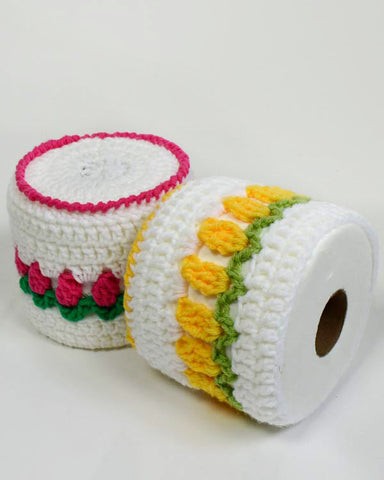
Crochet Rosebud TP Topper

Introducing the Crochet Rosebud TP Topper, a delightful and charming addition to your bathroom decor! This unique and creative crochet project is designed to add a touch of elegance and whimsy to your toilet paper roll. Made with love and attention to detail, this adorable topper features delicate rosebuds that will bring a burst of color and beauty to your bathroom.
Whether you're looking to add a touch of femininity to your bathroom or simply want to showcase your crochet skills, the Crochet Rosebud TP Topper is the perfect project for you. With its easy-to-follow pattern and step-by-step instructions, even beginners can create this beautiful piece. So why settle for a plain and boring toilet paper roll when you can elevate it with a touch of crochet magic? Get your hands on the Crochet Rosebud TP Topper pattern today and transform your bathroom into a haven of beauty and creativity.Easy Skill
Size: 5" across x 5" tall
Materials:
- Worsted Weight Yarn;
- White (W) – 3 oz, 165 yd (84 g, 149 m);
- Small amounts Pink (P) and Green (G);
- Yarn Needle.
- Crochet Hook: Size H-8 (5.00 mm) or size needed to obtain gauge.
Gauge: 6 dc = 2"
JOINING WITH SC
When instructed to join with sc, begin with sl knot on hook, insert hook in st or sp indicated, yo and pull up a loop, yo and draw through both loops on hook.
Special Stitches
- V-Stitch (v-st):(Dc, ch 1, dc) in same st or sp.
- Cluster Stitch (cl-st):Keeping last lp of each st on hook, 3 tr in indicated st, yo, draw through all lps on hook.
Top
Rnd 1 (Right Side): With W, ch 4, 11 dc in 4th ch from hook; join with sl st to top of beg ch-3. (12 dc)
Rnd 2:Ch 3 (counts as first dc now and throughout), dc in same st as joining, 2 dc in each dc around; join with sl st to first dc. (24 dc)
Rnd 3:Ch 3, 2 dc in next dc, (dc in next dc, 2 dc in next dc) around; join. (36 dc)
Rnd 4:Ch 3, dc in next dc, 2 dc in next dc, (dc in next 2 dc, 2 dc in next dc) around; join. (48 dc) Finish off and weave in ends.
Base
Rnd 1 (Right Side):Starting at bottom, with W, ch 48, being careful not to twist chain, join with sl st to first ch to form ring; ch 3, dc in each ch around; join with sl st to first dc. (48 dc)
Rnd 2:Ch 3, dc in each dc around; join. Finish off and weave in ends.
Rnd 3:With right side facing, join G with sl st to top of first dc of Rnd 2, ch 4 (counts as dc, ch 1), dc in same st as joining, (skip 2 dc, v-st in next dc) around; join with sl st to first dc. (16 v-sts) Finish off and weave in ends.
Rnd 4:With right side facing, join P with sl st to any ch-1 sp, ch 3, keeping last lp of each st on hook, 2 tr in same ch-1 sp, yo, draw through all lps on hook, ch 2, (cl-st in next ch-1 sp, ch 2) around; join with sl st to top of 1st cl st. (16 cl-st) Finish off and weave in ends.
Rnd 5:With right side facing, join W with sl st to any ch-2 sp, ch 3, 2 dc in same sp, (3 dc in next ch-2 sp) around; join. (48 dc)
Rnds 6-7:Rep Rnd 2.
At the end of Rnd 7, finish of leaving long end.
Finishing
With wrong sides facing, using long end and matching stitches, sew Base to Top through back lps only of each st.
Edging
With right side facing and working loosely from left to right, join P to any unused lp of Top Rnd 4, * insert hook in next st to the right, yo and draw through 2 lps on hook; rep from * around; join with sl st to first sc. Finish off and weave in ends.
