Crochet Fiesta Placemat – Free Pattern

Get ready to add a touch of fun and color to your dining table with the Crochet Fiesta Placemat! This vibrant and lively placemat is perfect for adding a festive flair to your meals, whether you're hosting a dinner party or simply enjoying a meal with your family. The intricate crochet design of the placemat is sure to impress your guests and elevate the look of your table setting.
Made with high-quality yarn in a variety of bright and bold colors, the Crochet Fiesta Placemat is not only stylish but also durable and easy to clean. The intricate crochet pattern adds a touch of elegance to your table while also providing a protective barrier against spills and stains. Whether you're serving up a casual brunch or a formal dinner, the Crochet Fiesta Placemat is the perfect accessory to make your table setting pop. Add a touch of fiesta to your dining experience with this beautiful and practical placemat!
Tapestry needle
Abbreviations:
ch(s) = chain(s)
st(s) – stitch(es)
sc = single crochet
hdc = half double crochet
dc = double crochet
FLO = front loop only
sl st = slip stitch
American crochet terms throughout
Gauge:
4″ x 4″ = 12 sc, 16 rows
Finished Size Approximately:
14″ wide x 20″ tall (including border)
Instructions:
Row 1:
With white, ch 58, sc in 2nd ch from hook and each ch across, turn. (57 sts)
Row 2:
Ch 1, sc in each st across, turn.
Row 3:
Ch 1, sc in each st across, turn.
Row 4:
Ch 1, sc in FLO in each st across, turn.
Row 5:
Repeat row 3.
Row 6:
Repeat row 4. Fasten off white.
Row 7:
With turquoise, and leaving a 36″ tail (you will be using this tail later on to make your zig zag design), ch 1 and sc in each st across, turn.
Row 8:
Ch 3 (counts as dc), skip 1st st, skip next st, *2dc in next st, skip next st; repeat from * across to last st, 1dc in last st, turn.
Row 9:
Ch 3 (counts as dc), skip 2 sts, *2dc in the space between the 2dc that make the “v” from the row below; repeat from * across until last 2 sts, skip 1 st, 1dc in last st, turn.
Row 10:
Ch 1, 2sc in 1st st, sc in each st across to last st (remember to put a sc in the 3rd ch of the turning-ch-3 turn of the row below since it counts as a st). Fasten off turqoise. (57 sts)
Row 11:
With white, ch 1, sc in each st across, turn. (57 sts)
Row 12:
Ch 1, sc in each st across, turn.
Row 13:
Ch 1, sc in each st across, turn.
Row 14:
Ch 1, sc in FLO in each st across, turn.
Row 15:
Repeat row 13.
Row 16:
Repeat row 14. Fasten off white.
Row 17:
With burnt sienna, and leaving a 36″ tail (you will be using this tail later on to make your zig zag design), ch 1 and sc in each st across, turn.
Row 18:
Ch 3 (counts as dc), skip 1st st, skip next st, *2dc in next st, skip next st; repeat from * across to last st, 1dc in last st, turn.
Row 19:
Ch 3 (counts as dc), skip 2 sts, *2dc in the space between the 2dc that make the “v” from the row below; repeat from * across until last 2 sts, skip 1 st, 1dc in last st, turn.
Row 20:
Ch 1, 2sc in 1st st, sc in each st across to last st (remember to put a sc in the 3rd ch of the turning-ch-3 turn of the row below since it counts as a st). Fasten off burnt sienna. (57 sts)
Row 21:
With white, ch 1, sc in each st across, turn. (57 sts)
Row 22:
Ch 1, sc in each st across, turn.
Row 23:
Ch 1, sc in each st across, turn.
Row 24:
Ch 1, sc in FLO in each st across, turn.
Row 25:
Repeat row 23.
Row 26:
Repeat row 24. Fasten off white.
Row 27:
With taupe, and leaving a 36″ tail (you will be using this tail later on to make your zig zag design), ch 1 and sc in each st across, turn.
Row 28:
Ch 3 (counts as dc), skip 1st st, skip next st, *2dc in next st, skip next st; repeat from * across to last st, 1dc in last st, turn.
Row 29:
Ch 3 (counts as dc), skip 2 sts, *2dc in the space between the 2dc that make the “v” from the row below; repeat from * across until last 2 sts, skip 1 st, 1dc in last st, turn.
Row 30:
Ch 1, 2sc in 1st st, sc in each st across to last st (remember to put a sc in the 3rd ch of the turning-ch-3 turn of the row below since it counts as a st). Fasten off taupe. (57 sts)
Row 31:
With white, ch 1, sc in each st across, turn. (57 sts)
Row 32:
Ch 1, sc in each st across, turn.
Row 33:
Ch 1, sc in each st across, turn.
Row 34:
Ch 1, sc in FLO in each st across, turn.
Row 35:
Repeat row 33.
Row 36:
Repeat row 34. Fasten off white.
Row 37:
With turquoise, and leaving a 36″ tail (you will be using this tail later on to make your zig zag design), ch 1 and sc in each st across, turn.
Row 38:
Ch 3 (counts as dc), skip 1st st, skip next st, *2dc in next st, skip next st; repeat from * across to last st, 1dc in last st, turn.
Row 39:
Ch 3 (counts as dc), skip 2 sts, *2dc in the space between the 2dc that makes the “v” from the row below; repeat from * across until last 2 sts, skip 1 st, 1dc in last st, turn.
Row 40:
Ch 1, 2sc in 1st st, sc in each st across to last st (remember to put a sc in the 3rd ch of the turning-ch-3 turn of the row below since it counts as a st). Fasten off turqoise. (57 sts)
Border:
Round 1:
Using taupe, work one round of hdc around all four edges, working 2hdc in each corner, and sl st to beginning hdc. Make sure you end up with a stitch count divisible by 3. Fasten off taupe.
Round 2:
Attach burnt sienna in any st, ch 1 and sc in same st, ch 4, skip 2 sts, *sc in next st, ch 4, skip 2 sts; repeat from * around and sl st to beg sc. Fasten off burnt sienna.
Attach turquoise in any st to the left of any red sc, ch 1 and sc in same st, ch 4, skip 2 sts, *sc in next st, ch 4, skip 2 sts; repeat from * around and sl st to beginning sc. (Alternate making the turqoise sc in front of the burnt sienna ch-4 and behind the burnt sienna ch-4). Fasten off turqoise.
Attach white in any st to the left of any turqoise sc, ch 1 and sc in same st, ch 4, skip 2 sts, *sc in next st, ch 4, skip 2 sts; repeat from * around and sl st to beginning sc. (Alternate making the white sc in front of the turqoise ch-4 and behind the turqoise ch-4). Fasten off white.
To add the Zig Zag Detailing:
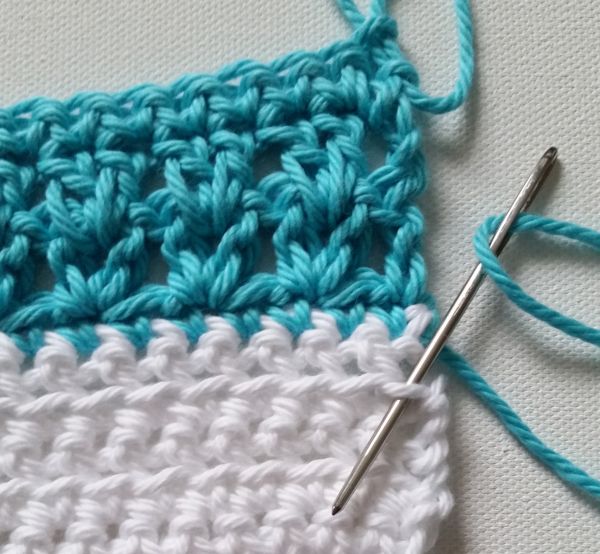
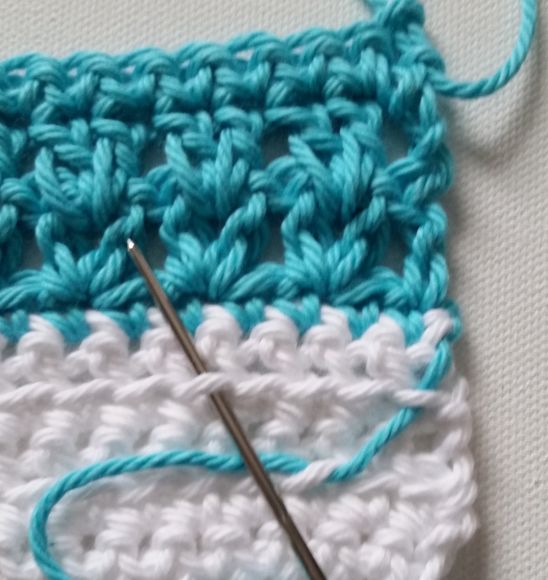
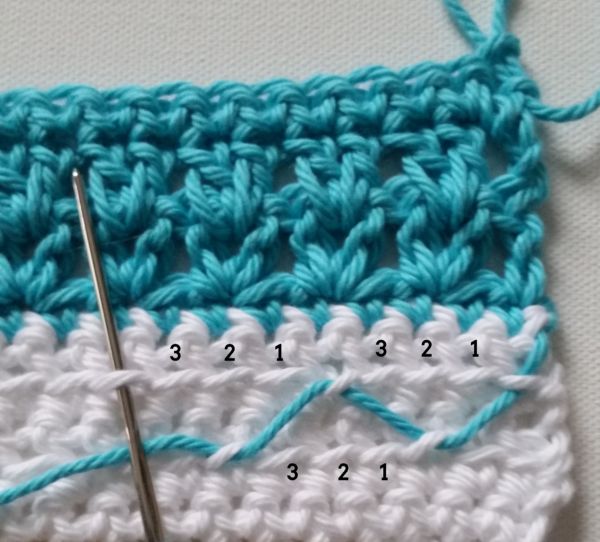
The zig zags will be weaved through the loops that were left unworked in the FLO rows of sc (rows 4, 6, 14, 16, 24, 26, 34 and 36). With right side facing, thread the turqoise tail from row 7 onto a tapestry needle. Directly below the two rows of turqoise “v” stitches, there will be two rows of unworked loops. Moving in a downward direction, work the tapestry needle under the 1st loop of the top row. Pull yarn through completely. (Note: This initial entry point is the only time your tapestry needle will work in a downward direction. All other needle work will move in an upward direction from the bottom row of unworked loops to the top row of unworked loops.)

Then, working in an upward direction, work the tapestry needle under the 3rd loop of the bottom row and under the 5th loop of the top row. Pull yarn through completely.

Continue making zig zags across in the same manner, always in an upward direction, leaving 3 unworked loops between each point of each zigzag.

When you reach the end of the row, you will have just come up under the last top row loop. Fasten the yarn off securely to the dc end post of the section of turquoise directly above.
Repeat these same steps with the other yarn tails and weave in all ends.
