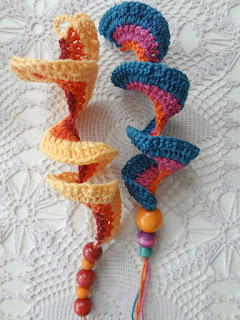
Crochet Wind Spinner


Introducing the Crochet Wind Spinner, a delightful and whimsical addition to your outdoor space. This unique and eye-catching piece of art is handcrafted with love and care, using the ancient technique of crochet. Made from high-quality yarn, the wind spinner features a mesmerizing spiral design that gracefully dances in the breeze, creating a mesmerizing display of color and movement. Hang it from a tree branch, porch, or even a shepherd's hook, and watch as it spins and twirls, catching the sunlight and casting a kaleidoscope of colors all around. Whether you're looking to add a touch of whimsy to your outdoor space or searching for a unique gift for a loved one, the Crochet Wind Spinner is sure to delight and captivate all who see it.
What you need:
Used stitches in American terminology: chain (ch), stitches (st.), slip stitch (sl st), single crochet (sc), double crochet (dc).
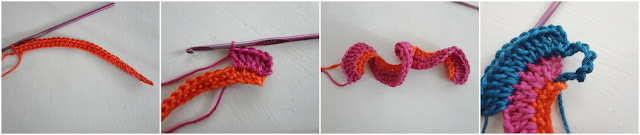
Cut yarn and leave a long tail. Do not turn work. The work is already shaping up.
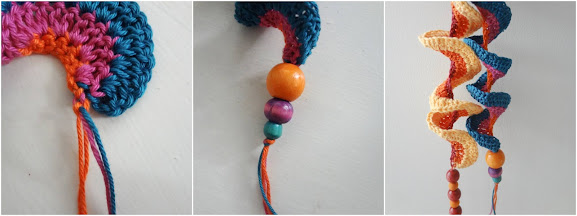
Row 3: with crochet work face up, insert color C in foundation row, ch10 and sl st in the 1st st of the second row. You can skip adding the loop, which is for hanging purposes and start crocheting right into row 2. Ch3 (counts as the 1st dc) and dc1 in the same st. Dc2 in next and all remain stitches of the row (280).This is also optional. You can cut yarn and weave the row 3 tail here, or sl st to get to the foundation row, cut yarn with a long tail (as I did).
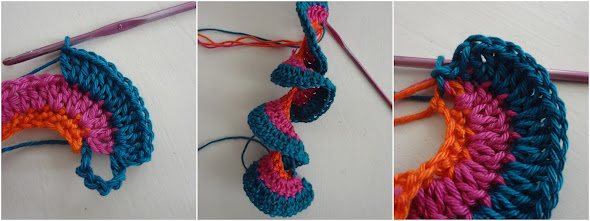
Tie all tails together into a tight knot. Here you can add a tassel, or string beads on the tails and tie a knot at the end to secure the beads not to fall down once you are done.